Showing posts with label Asian. Show all posts

Thursday, May 5, 2011

Coconut-crusted Coley Fillets with Cucumber Shallot Pickled Salad


I can't believe it took me so long to discover pouting. It's like cod with the price tag torn off. Another great sustainable fish is coley, also known as the "poor man's cod". Its flesh is not as pretty as cod, because it's a little grey, but it's a tasty fish with a light texture too, and is highly praised by British chefs like High Fearnley-Whittingstall.

This is a very light refreshing dish, inspired by classic southeast asian flavours like coconut, rice vinegar, shallots and pickled cucumber.

Coconut-crusted Coley Fillets
serves 2 (as a light lunch/starter)
Ingredients
2 coley fillets
1/2 cup of unsweetened coconut flakes (+pinch of sea salt)
1 tsp grated ginger
2 tsp fish sauce
white pepper
1 tbsp coconut oil

Method
1. Preheat oven to 180 degrees celsius.
2. Pat dry and season the pouting fillets with the fish sauce ginger and pepper.
3. Lay fish on a baking dish greased with coconut oil, and sprinkle the coconut flakes over the top of the fish.


4. Bake uncovered for about 15 minutes (depends on thickness of the fish. You can poke gently with a fork to test for done-ness). Switch to 'broil' for the coconut flakes to toast and brown a little just before the fish is done (or dry toast on a pan and then sprinkle over, if you don't want to risk over-cooking the fish).


Cucumber and Shallot Pickled Salad
serves 2
Ingredients
1/2 cucumber
1 shallot (I used banana shallot, which is milder and sweeter)
1/4 cup rice vinegar
1 tsp unrefined cane sugar
1/2 tsp fish sauce
pinch of chilli powder


Method
1. Halve the cucumber so you can lay it flat, then slice thinly into little semicircles. Same goes for the shallot.
2. Combine all ingredients and toss well, let sit for at least a couple of hours, preferably longer. This only gets better.


Finish with fresh coriander. It might be a good idea to serve the salad beside, not below the fish instead, makes eating easier.. That said, the sharp pickled cucumbers and shallots really bring out the fragrant aroma of toasted coconut and coley. I also had it with sambal tumis (I will share the recipe soon) and I would say the sambal chilli is also a must, but maybe that's just me hehe.

Asian Tofu Salad Recipe

INGREDIENTS
  • 3 tablespoons canola oil
  • 2 tablespoons rice vinegar
  • 1 tablespoon honey
  • 2 teaspoons reduced-sodium soy sauce
  • 1 teaspoon toasted sesame oil
  • 1 teaspoon minced fresh ginger
  • 1/2 teaspoon salt
  • 1 14-ounce package extra-firm, water-packed tofu, rinsed, patted dry and cut into 1-inch cubes
  • 8 cups mixed salad greens
  • 2 medium carrots, peeled, halved lengthwise and sliced
  • 1 large cucumber, chopped


Preparation
Whisk canola oil, vinegar, honey, soy sauce, sesame oil, ginger and salt in a bowl.
Tofu in a large nonstick skillet, place 2 tablespoons of dressing. Cook over medium high heat, turning every 2 to 3 minutes, until golden brown, 12 to 15 minutes total. Remove from heat, add 1 tablespoon of dressing to the pan and stir to coat.
Toss greens, carrots and cucumber with the remaining dressing. Serve immediately, topped with warm tofu.
Tips and comments
Make ahead tip: (Step 1) to keep, will be dressing in the refrigerator for 2 days to cover. Whisk just before using.
Nutrition
Per serving: 237 calories, 16 grams fat (2 g sat, 8 g mono); 0 mg cholesterol, 16 grams carbohydrates, 4 grams added sugar, 11 grams protein, 5 grams fiber, 454 mg sodium, 749 mg potassium.

Nutrition bonus: Vitamin (180% daily value), A, Folate (41% DV), Vitamin (38% DV) C, calcium (29% DV).

Carbohydrate Servings: 1 1 / 2

Three vegetable, 1 medium fat meat, 2 fat, 1 1 / 2 Carbohydrate Servings: Exchanges

Friday, April 29, 2011

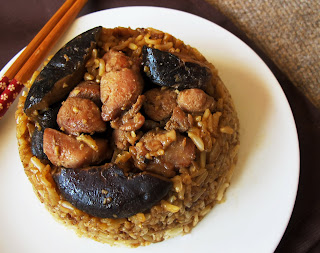
Steamed Glutinous Rice with Chicken (Lo Mai Kai)


I still keep in mind my self-challenge to showcase asian (especially Singaporean) food instead of the usual real food fare, and if I do share a recipe that's not, to follow up with one that's similar/inspired, but asian. When I did the Greek dolmades, I knew I just had to do Lo Mai Kai, fragrant glutinous rice steamed with chicken, shiitake mushrooms, chinese sausage, and/or dried shrimps, wrapped up in lotus leaves (hence also called Lotus Leaf Rice 荷叶饭). However, the Singapore version of Lo Mai Kai is slightly different. It's steamed in little aluminium foil bowls, sold in coffeeshops (kopitams) along with Chinese steamed buns (pau), as takeaway tea or breakfast.

Lo Mai Kai
serves 1 hungry person (please make more!)
Ingredients
1/2 cup brown glutinous rice
70g chicken thighs, deboned and chopped into bite-sized pieces
2 shiitake mushrooms, soaked (mushroom soaking water reserved)

For chicken and mushrooms
1 tsp dark soy sauce (I use 1 tsp tamari + 1 tsp molasses)
1 tsp natural oyster sauce
1 tsp shaoxing huadiao rice wine
1 clove garlic, grated
few drops of sesame oil
white pepper

For Rice
1 cup water (or stock)
1 tsp tamari light soy sauce (+a little bit of molasses)
1 tsp natural oyster sauce
1/2 tsp five spice powder
few drops of sesame oil
white pepper

Method
1. The night before, soak the rice with enough water to cover (This is not just a step to reduce phytic acid in grains, this is a must for sticky rice!) and marinate the mushrooms and chicken.
2. The next day, drain the rice and cook with 1 cup of water for about 30 minutes, or till cooked (I use a rice cooker). Mix with the seasoning for rice.


3. Fry the chicken and mushrooms for a few minutes till cooked.


4. To assemble, place the chicken and mushrooms at the bottom of a greased metal dish, then top with the rice. Press down to make sure the layers are tight.


5. Steam over medium high heat for 30 minutes.


6. Turn out onto a plate and dig in! If you've been wondering so far why I'm hiding the chicken and mushrooms with the rice instead of showcasing them, ah, now you know! It works like pineapple upside down cake.


The sticky rice is infused with the delicious flavours from the spices and seasoning, shiitake mushrooms, and marinated meat. And the pork lard, as used traditionally, and which I'd happily add to if I had. This was one of my favourite dishes growing up. My mum would go to the Tanjong Rhu Pau stall (best paus ever) and buy like 20 buns and these delicious Lo Mai Kai for tea that day and breakfast the next day. Now I wish I doubled the recipe..

Friday, April 15, 2011

Salmon Korokke (Croquette) Balls with Wasabi Avocado-naise


Since I posted a recipe which gives canned sardines a makeover following a post on roasted whole sardines, I thought it would be fun to share a recipe giving canned salmon a run for its fresh counterpart following my chilli-soy marinated salmon post. While the canning methods may affect the nutritional profile of salmon slightly, canned salmon is still rich in omega 3 fatty acids, protein, and calcium due to the soft edible bones. What's more, I can get wild Alaskan salmon without breaking the bank, in fact, it's really very cheap when you buy the bulk cans. (Farmed salmon is really not worth your saliva. Did you know that that beautiful orange-pink in farmed salmon comes from chemical dyes, not from the prey they feed on as in wild salmon?)

So here goes!

Salmon Korokke (Croquette) Balls with Wasabi Avocado-naise
makes 10 balls
Ingredients
400g can wild Alaskan salmon, drained
1 stalk spring onion, chopped
1 tbsp garlic powder (you can also use fresh garlic, but I find the garlic powder also helps bind the mixture, kind of like flour)
1/2 tsp sesame oil
1 egg, beaten
1/2 cup breadcrumbs (I put stale sourdough bread into the oven with some olive/sesame oil to lightly toast/dry out, then crushed them in a ziplock bag. You can also use a food processor. For a more Japanese korokke, you can use panko breadcrumbs, but I don't agree with the ingredients in these.)

Method
1. Preheat oven to 200 degrees celsius.
2. Combine the salmon, garlic powder, spring onions and beaten egg. Form little balls with your hands.


3. Roll them about in the breadcrumbs so they all get an even layer of crumb coating. Refrigerate for about 1h or so if you have time.


4. Grease a baking sheet and arrange the croquette balls, spacing them out so they aren't touching. If your breadcrumbs aren't already infused with oil, spray a mix of olive oil and sesame oil over the croquettes so they will crisp up nicely. Bake in the oven for about 20 min, or till crispy and golden.


for the wasabi Avocado-naise
Ingredients
1 ripe avocado
2 tbsp rice vinegar
1 tsp wasabi (Japanese horseradish) powder + 1 tsp water, combined to make a paste

Method
1. Combine all the ingredients together and blend. If you can't take spicy, leave the wasabi out, if you can but don't have wasabi, just sub with mustard/ horseradish. (Note: Avocado will oxidise and discolour on exposure to air, so don't do this too ahead of time!)


I'm sure we've all had our fair share of fishcakes served with tartare or dill sauce, so if you're looking for something slightly different, I think you'll enjoy this with Asian (Japanese) twist! You can flatten them into patties if you like, but I chose to make them into croquette balls because 1.it was easier to roll them about in the breadcrumbs 2. they looked cuter like that 3. so I can indulgently pop hot crispy balls into my mouth whole and get bursts of flavours and texture, yum, no fork or knife or dainty smile ;)


Wednesday, April 13, 2011

Spicy Sardines in Caramelised Onion and Tomato Sauce


I posted a roasted sardine dish earlier to show how we can include fish in our diet without breaking the bank, and here's another sardine dish, this time using sardines from cans. Sardines in cans are much easier to come by for most people and are really cheap. You get the same healthy omega 3 fats, b12, protein and best of all, calcium from the soft bones (no need to worry about picking them out this time because they just crumble). Another good thing about small fishes like sardines is that they are lower in toxins because they're lower in the food chain.

I like sardines in tomato sauce, but I avoid the tomato flavoured canned sardines because they're full of nasty vegetable oils and corn syrup. I get them canned in brine, simply salt and water, and then add tomatoes and onions instead of sugar for the sweetness, and of course, a fiery chilli kick.


Spicy Sardines in Caramelised Onion and Tomato Sauce
serves 1-2
Ingredients
1 can of sardines in brine (or olive oil, but brine is cheaper)
2 medium tomatoes, chopped (or about 1/3 cup of tinned tomatoes)
2 onions, peeled and sliced
1 Thai birdseye chilli, deseeded and sliced (or a milder chilli/chilli flakes/powder, to taste)
1 tbsp sweet rice vinegar (or balsamic vinegar)
1 tbsp coconut oil (or extra virgin olive oil)

Method
1. Heat the coconut oil in a pan over medium high heat. Add the sliced onions and let them cook till brown and caramelised.
2. Add the chopped tomatoes and cook till it disintegrates.
3. Add the rest of the ingredients, including the sardines and cook for a couple of minutes more.
4. Serve with rice and vegetables. If you want to, you can hack at the sardines with your spatula to break them up and then serve like a ragu of sorts over noodles or pasta too.

This is a fast and frugal dish that I can whip up anytime because I always have onions, a can of sardines, tinned tomatoes, and chilli flakes in my larder. Plus it's yummy; any "fishy smell" will cease to exist under all that sweetness from the caramelised onions, sourness from the tomatoes and vinegar, spiciness from the chilli, and saltiness from the sardines.

Quite evidently, I'm back from Romania! To my disappointment Mcdonald's has made its way there too, in fact, is there a country without the famous golden arches? But I had a great time eating my way through yummy bouncy (yes bouncy! how?!) sausages called mititei, cornmeal porridges (like polenta, called malinga) and stuffed cabbage rolls (something I really want to try making a version of really soon ;)

Tuesday, April 5, 2011

Pan Seared Chilli Soy-Marinated Salmon with Sesame Spinach


Finally! A horrible two weeks of deadlines after deadlines is over!

And to treat myself, I decided to slowly marinate a piece of salmon steak in spicy garlicky tamari and sesame oil for a couple of hours instead of my throw-it-all-together meals the past few days. The actual cooking and preparation time is still very short though, and there's nothing extremely unique or wow about this, but it's one of my favourite (comfort) flavour combinations.

Pan Seared Chilli Soy-Marinated Salmon
serves 1
Ingredients
1 piece salmon steak
1 tbsp coconut oil (or ghee or a mix with evoo, to fry)

Marinade
2 tsp soy sauce (naturally fermented and aged, I used tamari)
1/2 tsp sesame oil
1 small clove garlic, grated
1 cm piece of ginger, grated
1/2 tsp chilli flakes
1/2 tsp unrefined cane sugar or molasses

Method
1. Combine marinade ingredients and cover the salmon with it. Leave in the fridge for a couple of hours. Remove from marinade and bring to room temperature 20 min before cooking.
2. Over medium-high heat, add the oil in a pan and place the salmon into the hot pan. Don't keep poking it, or you won't get a nice sear. Salmon steaks are a bit trickier than the fillets because I can't see the colour change along the sides, but I give it an estimate of about 3 minutes before flipping over and letting it cook for another 2 min.

Sesame Spinach
Ingredients
2 big handfuls of spinach
2 tsp sesame oil
2 cloves garlic, chopped finely

Method
1. Heat the sesame oil in a pan and add the chopped garlic, stirring often till they get browned.
2. Meanwhile, wilt the spinach in boiling water or you can steam it. Refresh in cold water.
3. Toss with the garlic-infused sesame oil.

Sprinkle the toasted garlic all over the spinach and the salmon and serve with rice!

Salty spicy and sweet with the aroma of toasted sesame and garlic --Ah, happy (:


Thursday, March 31, 2011

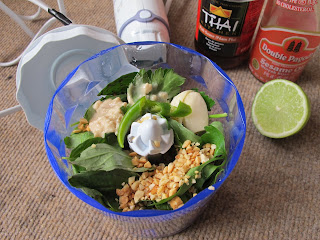
Pan Fried shrimps with Glass Noodles in Thai Basil and Coriander Pesto


One of my favourite things to do with fresh herbs is pesto. I had Thai basil (learn about this very special basil in my post on Three Cup Chicken), so I decided to make pesto out of it.

And now that I have a mini-chopper I can do pesto in no time at all! I know, those Italian mamas will insist on grinding everything the traditional way in a mortar and pestle, but.. I wanted pesto fast ): To redeem myself, I have done (chunky) walnut basil pesto by hand before. The next bit about this very special pesto that's sure to send the Italian mamas reeling again, is that I didn't use Parmesan, heck I didn't use any cheese at all! To keep to the true Thai theme, I used naturally fermented soybean paste to provide the savoury factor, and used toasted crushed peanuts instead of pine nuts.


Thai Basil and Coriander Pest0
Ingredients
1 clove garlic
1 large handful of Thai basil (leaves only)
2 large handfuls of coriander
1 handful of unsalted (and preferably soaked) peanuts, lightly toasted
1 tbsp of fermented soybean paste (kind of like white miso)
1 green chilli, deseeded (I used Thai birds eye chilli, but you can opt for milder ones;) )
fish sauce (to taste)
1 tsp of sesame oil
extra virgin olive oil
squeeze of half a lime

Method
1. Combine all ingredients in a food processor/mini chopper, pouring in enough extra virgin olive oil till you get to the desired smooth consistency. Add the lime juice after that to add some freshness.


With my controversial pesto ready, it was time for some asian-style pesto-and-pasta!


Panfried shrimps with Glass Noodles in Thai Basil and Coriander Pesto
Ingredients
1 bundle of glass noodles (also known as mung bean threads/vermicelli, cellophane noodles, dang hoon. Not the same as rice noodles.)
couple of shrimps/prawns, shelled (please use more, I just only had 2 sad ones left.)
a few drops of fish sauce
a little bit of coconut oil (or evoo)
1/4 cup of Thai basil and coriander pesto

Method
1. Soak the glass noodles in cold water for about 10 minutes to soften. Drain, then pour boiling water over the noodles and let sit for 10 seconds (these cook really fast!). Drain, then run cold water over it to stop the noodles from continuing to cook.
2. Devein the shrimps by slitting the back, coat with fish sauce and fry them in a hot pan, flipping once. You'll know when they're cooked, because they turn pink and curl into that pretty butterfly shape.
3. Toss all in the pesto, and garnish with a sprig of fresh Thai basil.


I love glass noodles in all their translucent beauty and slippery goodness, and I love shrimps, though I wish there were more, and when both of them are covered in that delicious savoury pesto with the fragrance of these asian herbs and the smell of toasted peanuts, it's <3!


By the way, Miz Helen decided to fill her plate up last week with my Baked Egg in Jacket Potato with Chilli, Lime and Coriander Butter (: Yay.

Saturday, March 12, 2011

Five-spice Roast Poussin with Mandarin Orange and Carrots


So, for my first fusion dish since that very important post, I decided to post a classic british roast chicken, but with lots of chinese flavour influence.

A poussin (pronounced poo-sun, sounds awfully french and posh doesn't it) is a teenage chicken (baby would be a chick wouldn't it??). It costs a bit more than chicken because the meat is much more tender, but my butcher was having a sale due to an oversupply of poussins, 1 pound each. That's cheaper than a chicken leg!

see how small it is!

I never really tried roasting a whole bird before, because it just doesn't make sense for one/two people. I usually roast chicken legs or sometimes chicken breasts, but this time, with a small poussin, I can finally try things like stuffing an entire lemon into the cavity. I want to try the technique of spatchcocking the next time I manage to get my hands on a whole bird!

I did this sometime in January, when mandarins and clementines were everywhere, so I decided to change it to a sweet citrus instead, and being mandarin oranges, I felt compelled to use some chinese spices. To prop up the bird, I roasted it on a bed of carrots, just because I felt very orange ;)

Five-spice Roast Poussin with Mandarin Orange and Carrots
serves 2
Ingredients
1 poussin
2 mandarin oranges/clementines
4-5 small carrots (or 3 large, halved lengthwise)
2 tbsp soy sauce
1 tbsp five-spice powder
1 tbsp Chinese rice wine (hua diao/shaoxing)
few sprigs of thyme
1 tbsp melted butter + a few more dabs
1 tsp sesame oil

Method
1. Preheat oven to 200 degrees celsius.
2. Parboil the carrots for about 5 min, not till it gets soft! At the same time, drop in the mandarin oranges, whole, to make it easier for the juices to release later.
3. Meanwhile, wash the poussin, pat dry and season the inside and outside of the poussin with the soy sauce, five spice powder. Rub the sesame oil and butter over the skin.
4. Poke one of the mandarin orange all over then stuff it with a sprig of thyme into the cavity of the poussin.
5. Arrange the carrots in a single layer on a roasting tray , throw the remaining thyme around, and then place the poussin on top (try to prop the legs up by being strategic with the carrots hehe).
6. Cut the other mandarin orange in half and then squeeze the juices all over the bird and carrots. Sprinkle the tbsp of Chinese rice wine around.


7. Into the oven for about 45 min, till the juices run clear!


8. Let the poussin rest, tented with foil for at least 15 min before cutting into it. I served it halved with the roasting juices spooned over.


Yes, on mashed potato,very un-Chinese I know, but it just felt right against the roast poussin and sweet carrots. I think it would also work out very well if you drop the carrots and then section the chicken, serving it over a bed of noodles and steamed vegetables, with the gravy poured over, kind of like roast duck noodles.


This is the first time I've tasted poussin. You know how if you poke baby skin you get that feeling of slight amazement at the tenderness and smoothness? It's the same with poussin! Poussin has less developed flavour than chicken though, so the five-spice and soy sauce really helps to add a punch. The mandarin orange adds sweetness without the need for sugar or honey, giving the crispy skin a deeper golden hue and the carrots, a yummy sticky glaze. I love seeing so much yellow, orange and brown on a plate, I think they're a few of the most appetising colours to the eye(:

This is part of Weekend Herb Blogging #274 hosted by Winnie from Healthy Green Kitchen.

Wednesday, March 2, 2011

Chilli Belachan Crispy Pork Belly


What to do with leftover roast pork belly? Honestly, it's not much of a problem, who am I kidding, I'll be more than happy eating it as it is. But just to spice things up a little, I stir-fried the leftover pork belly in true Singaporean style, with some chilli and belachan (fermented shrimp paste).

Chilli Belachan Crispy Pork Belly
Ingredients
~100g of leftover roasted pork belly, sliced into small chunks
1 small onion, sliced thinly (or a couple of shallots would be fantastic)
1-2 dried red chillies, deseeded
1 tsp fermented shrimp paste
1 tsp unrefined cane sugar
1 tsp soy sauce (traditionally brewed)
1 tsp Chinese black vinegar
1 tsp evoo (or unrefined coconut oil or palm oil)

Method
1. Over medium-high heat, fry the sliced onions in the oil, till they turn golden brown.
2. Add the dried chillies and fermented shrimp paste and toast till fragrant.
3. Add the pork belly, along with the vinegar, soy sauce and sugar, and stirfry for about 10 min more.
4. Serve over rice with some fresh coriander leaves (which I didn't have).

This dish really hit home with the mix of salty, sweet, sour, savoury and of course, spicy flavours, and the depth from the fermented shrimp paste. Really, you can't go wrong with crispy pork belly, but you can be more than just "right"!

This is part of Full Plate Thursday.

Saturday, February 5, 2011

Claypot Rice with Chinese Sausage and Shiitake Mushrooms


Tucked away in the back of my kitchen cupboard, is a claypot, left by the landlord/previous owner of this flat. But it's the first time I'm looking at it with devious eyes, because it's Chinese New Year and I've got lap cheong from my roommate's mum.

Cooking rice in a claypot means that the rice gets slowly simmered in low heat, absorbing the delicious porky flavours of the sausage and the savouriness of the dried shrimps and mushrooms. The best part about claypot rice is the caramelised crust at the bottom, much like the Spanish paella. The crust gives the rice a hint of smokiness (of course, in the past, when this was done over a charcoal stove, I'm guessing that smoky flavour would be much more divine), and texture.

the prized crust

This is a Chinese cured sausage, called lap cheong, and is kind of like a sweet version of Italian salami or Spanish Chorizo. Its combination of sweet and saltiness adds a lot of dimension to the rest of the dish.

fyi, in that jar of unknown squidgy things, are marinated shiitake mushrooms.

Claypot Rice with Chinese Sausage and Shiitake Mushrooms
serves 4
Ingredients
2 cups of long grain brown rice, soaked overnight or longer (I ran out, so I had to use short grain, hence the stickier rice in the photos ): )
1 link of Chinese sausage, chopped diagonally into long coins.
6 dried shiitake mushrooms
1 handful of dried shrimps
2 stalks of spring onions, chopped
3 cloves garlic, minced
1 cm piece of ginger, chopped finely
1 tsp olive oil + 1/2 tsp sesame oil

Marinade
2 tbsp good (naturally fermented/aged) light soy sauce
1 tbsp good oyster sauce (i.e. made of real oysters, not oyster flavouring, and without MSG)
1/2 tbsp Chinese rice wine (shaoxing/huadiao)
1 tsp sesame oil

To serve
dark thick soy sauce and sesame oil (to taste and very optional)

Method
1. The night before, soak your brown rice and shiitake mushrooms. 30 min later, slice the mushrooms and add the marinade ingredients to the mushroom-soaking water and let the mushrooms continue soaking up the flavourful liquid (that's a trick from my mum. usually recipes call for the chicken or whatever meat is being used to be marinated, but forget about these equally meaty and juicy mushrooms).
2. The next day, put the dried shrimps and some warm water into the claypot, for about 30 min.
3. Drain the rice and add the rice into the claypot. Drain the mushrooms too, but do not pour off the mushroom liquid! Add the liquid into the claypot.
4. Add enough water to just cover the rice by 1 cm. Now your rice is ready to cook in the shiitake and shrimp-infused stock! Place the claypot over medium heat on the stove, lid on, and allow it to slowly heat up. Watch it! Once it comes to the boil, reduce it to a simmer for 15 min.
5. Meanwhile, add the olive oil and sesame oil to a hot pan, and add in the chopped garlic, ginger and white parts of the spring onions. Saute till fragrant, then add the Chinese sausage, and saute till you see it ooze out some of its own fragrant oils. Add the drained mushrooms and cook for 3 min more.
6. 15 minutes should have passed. Open the lid, you should see the rice having holes on the surface. Spread the sausage and mushroom mixture over the top of the rice, close the lid, and let everything infuse and cook for 15 min more.
7. That's it, serve straight from the claypot, with the chopped green parts of the spring onions scattered over! (note be careful don't set the pot over a cold surface immediately, or it will crack)


To eat, dig your spoon in, mix it all up, and drizzle over as much of the dark soy-and-sesame-oil mixture as you want (that's how they do it in the claypot rice shops in Singapore. It's totally to taste, and I found I didn't have to add any because the rice was already so flavourful, but it's up to you!)


This is such a wonderful one-pot meal (though I will still have it with some vegetables at the side because I cannot do without eating something green, spring onions not enough). And of course, it's so convenient plus the claypot keeps the whole dish warm for a long time after serving. The flavour-infused fat from the Chinese sausage plus the shrimps and shiitake adds so much umami, and there's a wonderful contrast of savoury and sweet flavours, and fluffy and crunchy and springy (from the shiitake mushrooms!) textures.

Thank you landlord.

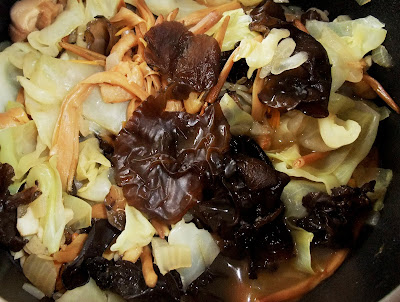
My Chap Chye (Nonya-style Mixed Vegetable Stew)


I love Peranakan food, it's that combination of fragrant spices influenced by a Malay background and the use of very Chinese ingredients and techniques that give rise to dishes that you really don't find anywhere except in Singapore and Malaysia. Not many people even know about this wonderful cuisine, so that makes it all the more unique. I need to do more recipes from home. My (chinese) new year's resolution maybe!

Anyway here goes for a Nonya Chap Chye (mixed vegetables stew), which is quite common for Chinese New Year, Most of the vegetables are actually dried, so I have them stored in my pantry, (brought over from home), and I can cook this anytime I want. There are so many variations of Nonya Chap Chyes out there, some with ginkgo nuts and black moss ('fat choy' which sounds like 'fa cai' which means to strike it rich, hence very popular for Chinese New Year). Some add oyster sauce/sugar but I don't see the need to. I like that natural sweetness of the cabbage, brought out by the extra sweetness and savouriness of the fermented beancurd and dried shrimps. This is my chap chye, the way I like it/do it ;)

My Nonya Chap Chye
serves 3-4
Ingredients
1 head round cabbage (not Napa), cut into large pieces
1 small handful of dried black fungus (aka wood ear mushrooms), soaked to rehydrate
1-2 long sticks of dried beancurd, soaked to rehydrate, then cut
4-6 dried shiitake mushrooms, soaked to rehydrate, then halved *save liquid
1 small handful of dried lily bulbs, cut off the hard tips, soaked to rehydrate *save liquid
2 tbsps dried shrimps, soaked to rehydrate *save liquid
1 bundle glass (mung bean) noodles, soaked till it becomes soft
1 tbsp fermented beancurd paste (aka taucheo)
4 cloves garlic, minced
1 small onion, minced
1 tbsp olive oil
dash of white pepper

Method
1. Prep ingredients about half an hour before by by soaking the 2nd to 7th ingredient in warm water for about 20 min. Meanwhile, chop up the fresh vegetables.
2. Over medium high heat, fry the garlic and onions till fragrant, then add the taucheo, fry 1 more min, then add the cabbage and stirfry till it's softening.
3. Add the rest of the ingredients, along with the *soaking water, plus enough water to cover. Cover, bring to a boil and then lower the heat and let it simmer for 15 min.
4. When the vegetables are all cooked, add the glass noodles, and let everything cook for 5 min more, uncovered, so the liquid reduces and concentrates in flavour. Not more than that,because these noodles will greedily absorb everything up then you'll be left with no sauce/stew.
5. Check seasoning, adding the white pepper to taste. Yum yum served now, or as leftovers the next day.

The dish looks like a grandma's patchwork quilt, but of vegetables! And indeed, it's those kind of traditional homecooking that brings warmth and a smile to your face (:

This is part of Muhibbah Monday.

Thursday, February 3, 2011

Sourdough Dumplings (饺子) and Gyoza/ Potstickers (锅贴)


Dumplings (aka Gyoza, when they spread to Japan) signify family reunion and their original round wrappers also look like coins (I know right, half the things we eat look like coins but, well, there you go) so they're traditionally eaten on Chinese New Year. I don't have my family here in London with me now, but it's fun making dumplings anyway! These were actually done a month ago though, when I was too free.

The basic dumpling dough is 2 cups of all-purpose flour and 1/2 cup of hot (that's what gives dumpling skins their elasticity) water. I made mine using my sourdough pasta dough, so texture-wise it's not exactly springy and also, I rolled out the dough too thick i.e. these are not fantastic dumplings. But they were so much fun anyway, and that tanginess and extra umami-ness of the dough made up for it! You can add any fillings you want, it's traditionally pork (plus shrimps. that would be nice), or even make it vegetarian with shitake mushrooms, but I was using up leftover chicken.

Sourdough Dumplings (饺子)
makes 20 (it's a great opportunity to pull your whole family in and make like 200 instead and freeze.)
20 round wrappers (I cut the flattened sourdough pasta dough into circles of about 7cm in diameter)
200g minced chicken
2 stalks of spring onion, sliced thinly
3 cloves garlic, minced
1 tbsp of grated ginger
1 tbsp soy sauce
1 tsp Chinese rice wine (shaoxing/huadiao)
1/2 tsp sesame oil

Method
1. Mix all the ingredients except the wrappers together and leave to marinade in the fridge for as long as you can, preferably overnight.
2. The next day, make your wrappers by rolling out the dough as thinly as possible and then cutting out circles (I used a glass).

3. Place about 2 teaspoons of the filling (don't be too greedy, but don't be too stingy either-- it's Chinese New Year!) in the centre of the circle.

4. Fold over to make a semi-circle, and press the edges to seal, with a bit of water or eggwash if needed.
5. (opt) To make it look pretty, you crimp the edges using a pinch-and-tuck technique. (watch from 2:20)

which I failed at.

but ah, that's why we have forks!

6. Done! I know they still don't look totally gyoza-like.. Anyway you can refrigerate or freeze them now for later use.


OR make

Sourdough Dumpling Soup
In a pot of boiling water, lower the dumplings in carefully and let them cook gently in simmering water for about 10 minutes till they float. Add to homemade chicken stock with a dash of soy sauce to taste, and garnish with chopped spring onions.

OR make
Sourdough Gyoza/Potstickers (锅贴)
Potstickers get their name because of their very special cooking technique.
Over medium-high heat, in a lightly-oiled pan, place the dumplings flat side down in a single layer, and let it fry until the bottom browns and sticks a little to the pan. Then add 1/4 cup of water or so and cover the pan, to unstick the bottoms and steam the top of the dumplings for about 3 min more, then uncover the pan and let the water evaporate (fully! else they won't be crispy).
A cheat method that I used is to steam (or boil) the dumplings for about 10 min first till they are fully cooked. Then place the cooked dumplings flat side down in one layer in a lightly-oiled pan, and fry over medium-high heat to get the bottom crispy and brown ;)
Traditionally served with a very simple dipping sauce made with Chinese black vinegar and shredded fresh ginger, that's all you really need!

I know these dumplings are not traditional and they probably taste not at all like the one you get in dim sum restaurants. But it's not a bad difference at all! They're denser, with a tangy depth to it, and combined with the savoury filling and the sharp vinegar and ginger to cut through that heaviness, are.. ho liao (means good stuff, in Hokkien)!

This is an entry for Presto Pasta Night hosted by Ruth of Once upon a Feast.

Wednesday, February 2, 2011

Stir-fried Leeks with Beef and Beancurd


It's Chinese New Year! Back home, my family's probably having a feast with lots of abalone and sea cucumber and roast duck ): The Chinese New Year fare is not only about the expensive or rare ingredients though, often it's the simple vegetables that shine. I love leeks, and as my mum happily informed me, that's going to bring me lots of wealth. Leeks are 蒜苗/大蒜 ('suan'), which sounds like “算”i.e. count, so the Chinese believe it means you will have lots of money to count. You could do it minus the beancurd too, or with extra vegetables like carrots, but the golden beancurd represents happiness (white tofu not recommended..white=death?) I can't promise you'll suddenly get a windfall with this, but no harm having some lucky food in you right? ;)

Stir-fried Leeks with Beef and Beancurd
serves 2-3
200g beef rump (it's a cheap cut but check out the Chinese stir-fry tips I learnt on how to make cheap meats tender even if you aren't slow-cooking it!)
1 medium leek, sliced into about 5cm long pieces
100g firm beancurd, chopped into medium pieces
1 red chilli, sliced thinly
2cm ginger, sliced thinly
3 cloves garlic, minced
1 tbsp of olive oil+2 tbsp of coconut oil/palm oil

For marinade and velveting
1/2 tbsp cornstarch
1/2 tbsp Chinese rice wine
1/4 tsp baking soda
1 tsp good (naturally aged) soy sauce
pinch of five-spice powder
few drop sesame oil

For sauce
4 tbsp of homemade stock
1 tbsp good (naturally aged) soy sauce
1 tsp of Chinese rice wine (shaoxing/huadiao)
1 tsp Chinese black vinegar
1/2 tsp of sesame oil
pinch of sugar
1tsp of cornstarch mixed with 1 tsp water (to thicken)

Method
1. Slice the beef thinly against the grain. Mix well with the marinade and then leave it aside for 30 min.
2. Meanwhile, you can prep your ingredients, wash the dirt off the leeks and chop everything up. Also, mix the sauce ingredients except the cornstarch and water so later you can have a relaxing stir fry.
3. Over med-high heat, add half the oil and fry the firm beancurd for about 5 min till light brown and set aside.
4. 30 min should have passed. Over high heat, add the rest of the oil and flash-fry the beef for 1 min, then remove from the pan (sorry no wok) and let drain and set aside.
5. Add the ginger and garlic to the hot oil, fry till fragrant. Add the leeks and chilli and cook till the leeks soften.
6. Add the sauce, which should help deglaze the pan. Let it come to the boil, then reduce the heat.
7. Stir in the cornstarch slurry a little at a time till you get the consistency you want. Note: it will thicken after it cools, so don't go pouring everything at a go!
8. Add the beef and beancurd (finally all the ingredients are happily together!) and stirfry for 2 min or so, making sure everything's coated.
9. Serve over a steaming bowl of rice (:

The beef, prepared this way, is really tender, oozing with juices and flavour-- no need for expensive sirloin steak cuts. Yay for frugal ingredients (: