Sunday, January 17, 2010

aqilah amin yg warna warni


people changes. right? so am I.
to certain ppl, i'm just the same. exactly the same aqilah.
and to some of u, i'm not myself anymore.
well, it's depends, to be exact.

but few things for sure.
i'm still that fatty fat-getting-dark woman-2-be.
i'm still that laugh / eat / talk a lot girl.
that crazy chick u can talk bout anything with.
and u know. silent = thinking.

again. i'm not the only one to blame.
sorry that i just dont have enough time.
that i'm in my final year. it's all about study, college, project.
and i've got a biggg full of colors family. yeah bby.
and sorry that i've got a personal things to care about too.

and to a boy. i dont care if u're anak datuk, anak tan sri, anak agung, anak jutawan sekali pun.
terlalu banyak org berpangkat datuk etc skrng ni. ramai sgt. so, x hairan lah.
x de duit pon dkt mata aku ni. btw. it's ur daddy. not u. stupid dam2.

dont pull me too hard.
that's mean u're pushing me away.

have a nice day ppl. =]]


Enough already!

Don't you think these look just as good
as the brownies pictured in the recipe?

The title of this post refers to brownie recipes.  I'm sure you are sick and tired of my endless postings related to them.  I know I am!

That said, I was asked to make something "chocolate" for a close friend who is celebrating a very big birthday this weekend.  Thank heavens I didn't have to make the birthday cake!  (Not sure I'm up to another 3-Cake Marathon again).  No, it just needed to be something chocolate that didn't require a knife, fork or plate.

So I remembered my recipe for Cappuccino Brownies.  That's a misnomer; they should really be called Caffeine Overload Brownies.  The recipe dates back to November, 1991 from Gourmet Magazine (yeah, I'm so old I have recipes dating back that far).

I swear on the lives of my dogs that this is the last brownie recipe I will post.....

But this one is awesome.  It is really, really rich and loaded with chocolate and caffeine.  While I was making it this afternoon, the aromas of chocolate and coffee totally took over my kitchen.  It was like Starbucks on steroids.

What I like about these brownies is the cinnamon in the cream cheese.  It adds an amazing layer of flavor that most people can't identify.  I also like the fact that you can cut these into very small squares (trust me, a little goes a long way) and serve them as a tiny little after-dinner taste.


They are rich.  They are deadly.  They are not as easy as my "One-Pot Brownies."  But if you want something a little special without a ton of work, this is your solution. 

CAPPUCCINO BROWNIES

For the brownie layer:
8 oz. bittersweet chocolate, chopped
3/4 cup unsalted butter
2 tablespoons instant espresso powder dissolved in 1 1/2 tablespoons boiling water
1 1/2 cups granulated sugar
2 teaspoons pure vanilla extract
4 extra-large eggs
1 cup all-purpose unbleached flour
1/2 teaspoons kosher salt
1 11-oz. bag semi-sweet chocolate chips

Preheat oven to 350-degrees.  Line a 13x9-inch baking pan with foil, letting it overhang the sides.  Butter foil or coat with cooking spray (if you are lazy like me, then you will opt for the spray).

Melt chocolate with butter and espresso mixture over medium-low heat.  Let cool for 10 minutes, then stir in remaining ingredients.  Blend well.

Spread batter evenly in baking pna and bake for 20-25 minutes until edges are browned and middle is still slightly underdone.  Cool completely, at least for 2 hours.

For the cream cheese layer:
8 oz. cream cheese, softened
6 tablespoons unsalted butter, softened
1 1/2 cups confectioner's sugar
1 teaspoon pure vanilla extract
Pinch of salt
1 teaspoon ground cinnamon

In electric mixer, beat cream cheese and butter until smooth.  Add confectioner's sugar and combine until smooth.  Beat in vanilla extract, salt and cinnamon.  Spread over cooled brownies and refrigerate at least 2 hours until cream cheese layer is firm.

For the glaze:
11 oz. bittersweet chocolate, chopped
4 tablespoons unsalted butter
1 cup heavy cream
2 tablespoons instant espresso powder, dissolved in 1 1/2 tablespoons boiling water

Combine all ingredients in a saucepan over medium-low heat.  Stir frequently until chocolate and butter melts and mixture is smooth.  Cool for 20 minutes, stirring occasionally.

Pour glaze over cream cheese and spread evenly.  Chill until set, about 3 hours.

When well-chilled, use overhanging foil to remove brownies from pan.  Cut as desired.

Yield:  16 - 48 squares, depending upon how you cut them.  Keep refrigerated and they will keep for about one week.


Trim edges before cutting into bars for a more finished look
(and you get to eat the them, of course!)

Oh, and forget about making coffee in the morning ... just eat one of these and you won't need any more caffeine for the rest of the day!

Battered Haddock Fillet with Healthy Option Chips and Salad

Battered Haddock Fillet with Healthy Option Chips and SaladBattered fillet of fish served with chips is most often thought of as a most unhealthy concoction. This is because the fish and the chips are normally fried in hot fat, such as beef dripping, and can often be very greasy as a consequence. In this instance, however, the battered fish is fried in sunflower oil and the chips are cooked in the oven.

Ingredients (Per Person)

1 skinless fillet of haddock
1 large Maris Piper potato
1 tomato
4 large lettuce leaves (shredded)
1/2 small onion (finely sliced)
1 tbsp plain flour
Refrigerated soda water
Salt
Sunflower oil
Slice of fresh lemon

Method

The oven should be put on to preheat to 400F/200C/Gas Mark 6. A baking sheet lightly covered with sunflower oil should be placed inside to also heat. The potato should be washed but not peeled then sliced and cut in to chip sized pieces. If you prefer to peel the potato, that is of course fine. When the oven is heated, the chips should be placed on the baking sheet, carefully shaken around to coat them in the oil and placed in the oven for around twenty-five minutes, being removed to be shaken again half-way through cooking.

Salad Bed for Battered HaddockA large pan should be filled with sunflower oil to a depth of around two inches and the oil heated until it splutters angrily when a little cold water is shaken in to it. The flour should be seasoned with salt and enough cold soda water stirred in to it to bring it to a consistency of thick custard. The fish should then be dragged through the batter and added to the oil, to fry for two minutes each side.

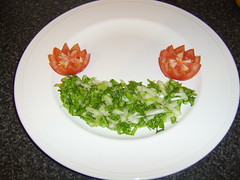
While the fish is cooking, the lettuce, onion and tomato should be prepared and plated as shown. The way in which I have carved the tomato is not essential but it is fairly easily performed with a small paring knife. The slice of lemon should be cut and twisted to serve as the final garnish for the fish.

A Beginner's Guide to Cooking with Fresh Herbs: Food Tip of the Day - Sunday, January 17th, 2009

A Beginner's Guide to Cooking with Fresh HerbsFor those unfamiliar with cooking with fresh herbs, there are a number of points which they should be aware of before starting to do so. The procedures involved - not to mention the quantities - for cooking with fresh herbs as opposed to dried are often very different and the article linked to below gives anyone considering starting cooking with fresh herbs some valuable advice to make the process as simple as possible for them from the outset.

A Beginner's Guide to Cooking with Fresh Herbs

Yum. Just Yum.


I've been meaning to write about these since I made them for a Christmas party back in December. But then there was that slew of Christmas baking and I felt it was more seasonally appropriate to post the toffee and cookie recipes first. And then I just got really lazy, and was somewhat unmotivated by the lack of pictures (this picture above is the ONLY semi-decent one I have, and was taken AT the party before anyone was allowed to try one). But anyway, late is better than never and these were wayy to good to leave undocumented.

It's funny - the first thought I had when I tried one was "Hey, they taste like pretzels!". Well, duh. I don't know why I was so surprised, but either way, these pretzel bites have that wonderful chewy, salty goodness of a delicious soft pretzel and are SO good when paired with a melty cheese dip. The recipe does take a bit of work but it's so worth it. They were a huge hit at the party and disappeared in record time. I'm itching to make some more in mini pretzel form...just need an excuse so that I don't eat the entire batch myself in one sitting! Maybe for Superbowl Sunday?


Soft Pretzel Bites
Adapted from SmittenKitchen and theKitchn

2 cups warm water (100-110 degrees Farenheit)
1 tbsp + 2 tbsp sugar
2 1/4 tsp active dry yeast
5 to 6 cups all-purpose flour
1 tbsp salt
2 tsp canola oil
1/4 cup baking soda
1 large egg
Coarse or pretzel salt

1. Pour warm water and 1 tbsp sugar into a bowl, and stir to combine. Sprinkle with yeast and let sit for 10 minutes until foamy.

2. Add 1 cup flour to yeast, and stir with a wooden spoon or using an electric mixer until combined. Add salt and 4 cups more flour, and mix until combined. You're supposed to continue mixing until the dough starts to pull away from the sides of the bowl, but at this point I just started using my hands. Start kneading and add the last cup as necessary until the dough is smooth. I actually found that I didn't need the last cup of flour at all.

3. Pour oil into a large bowl; swirl to coat sides. Transfer dough to bowl, turning dough to completely cover all sides. Cover with a kitchen towel, and leave in a warm spot for 1 hour, or until dough has doubled in size.

4. Heat oven to 450 degrees Farenheit, 230 degrees Celsius. Set a large pan with about 2 inches of water (I used a large wok) on the pan to boil. Hopefully by the time you're finished shaping the pretzel bites it will be boiling.

5. Lightly spray a few baking sheets with cooking spray (or use parchment paper, new love of my life! I had some issues with the bites sticking to the pan so I would probably go with the parchment next time). Heavily flour a work surface and dump dough out of bowl. Flour hands and shape into a large rectangle roughly 3/4 of an inch in thickness. Using a bench scraper, knife or pizza cutter, cut off 1 long strip, 1 inch wide and set aside. Cover remaining dough with a damp towel. Cut dough strip into 1 inch pieces and set aside, covering them with a damp towel.

6. Repeat the process until all dough has been cut into pieces and has been placed under a towel.

7. Once water is boiling, add baking soda and 2 tbsp sugar to it (careful, it will foam up!). Once the foam goes down, reduce heat to a simmer (there should be a few bubbles rising to the surface but not a rolling boil). Add enough bagel bites to fill about half the pan; they will swell up and you don't want them to crowd as it will be difficult to flip them if this happens. Simmer for 60-90 seconds on each side. I had some issues trying to figure out how long exactly to simmer these for as theKitchn makes a comment about making sure not to undercook these, just make sure the bites look like they have plumped up a bit before removing.

8. Once each side has cooked, remove from pan and place on cookie sheet and make sure the pieces do not touch, but fit as many as you can onto the pan at once (I think I ended up with three pans full of pretzel bites)

9. Beat egg with 1 tbsp water. Brush pretzels with the egg glaze. Sprinkle with salt. Bake until golden brown, about 12-15 minutes, rotating the tray once halfway through. Remove from oven and place on a wire rack for cooling. They are best eaten fresh, or the day of but they'll keep at room temperature for another day or so uncovered (I just kept a paper bowl over the bowl of leftovers). You can also freeze some as soon as they're cool and reheat until warm in an oven later.


Beer-Cheddar dip
This is more of a guideline than a real recipe - really I just kept throwing in more beer and cheese until I thought it tasted right.

1 part beer (any light pale ale or lager will do)
1 part cream cheese
1 part grated sharp cheddar

1. Heat cream cheese in a small saucepan until it is melty. Add beer and mix until combined. Slowly add grated cheddar while whisking the sauce to ensure there are no lumps. Add more beer/cream cheese/cheddar to taste.