Showing posts with label Noodles. Show all posts

Thursday, March 31, 2011

Pan Fried shrimps with Glass Noodles in Thai Basil and Coriander Pesto


One of my favourite things to do with fresh herbs is pesto. I had Thai basil (learn about this very special basil in my post on Three Cup Chicken), so I decided to make pesto out of it.

And now that I have a mini-chopper I can do pesto in no time at all! I know, those Italian mamas will insist on grinding everything the traditional way in a mortar and pestle, but.. I wanted pesto fast ): To redeem myself, I have done (chunky) walnut basil pesto by hand before. The next bit about this very special pesto that's sure to send the Italian mamas reeling again, is that I didn't use Parmesan, heck I didn't use any cheese at all! To keep to the true Thai theme, I used naturally fermented soybean paste to provide the savoury factor, and used toasted crushed peanuts instead of pine nuts.


Thai Basil and Coriander Pest0
Ingredients
1 clove garlic
1 large handful of Thai basil (leaves only)
2 large handfuls of coriander
1 handful of unsalted (and preferably soaked) peanuts, lightly toasted
1 tbsp of fermented soybean paste (kind of like white miso)
1 green chilli, deseeded (I used Thai birds eye chilli, but you can opt for milder ones;) )
fish sauce (to taste)
1 tsp of sesame oil
extra virgin olive oil
squeeze of half a lime

Method
1. Combine all ingredients in a food processor/mini chopper, pouring in enough extra virgin olive oil till you get to the desired smooth consistency. Add the lime juice after that to add some freshness.
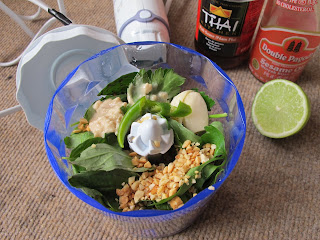

With my controversial pesto ready, it was time for some asian-style pesto-and-pasta!


Panfried shrimps with Glass Noodles in Thai Basil and Coriander Pesto
Ingredients
1 bundle of glass noodles (also known as mung bean threads/vermicelli, cellophane noodles, dang hoon. Not the same as rice noodles.)
couple of shrimps/prawns, shelled (please use more, I just only had 2 sad ones left.)
a few drops of fish sauce
a little bit of coconut oil (or evoo)
1/4 cup of Thai basil and coriander pesto

Method
1. Soak the glass noodles in cold water for about 10 minutes to soften. Drain, then pour boiling water over the noodles and let sit for 10 seconds (these cook really fast!). Drain, then run cold water over it to stop the noodles from continuing to cook.
2. Devein the shrimps by slitting the back, coat with fish sauce and fry them in a hot pan, flipping once. You'll know when they're cooked, because they turn pink and curl into that pretty butterfly shape.
3. Toss all in the pesto, and garnish with a sprig of fresh Thai basil.


I love glass noodles in all their translucent beauty and slippery goodness, and I love shrimps, though I wish there were more, and when both of them are covered in that delicious savoury pesto with the fragrance of these asian herbs and the smell of toasted peanuts, it's <3!


By the way, Miz Helen decided to fill her plate up last week with my Baked Egg in Jacket Potato with Chilli, Lime and Coriander Butter (: Yay.

Sunday, February 13, 2011

Not your traditional Sunday Dinner

Why have Roast Beef and Yorkies when you could be having Hot Thai Duck Noodle stir-fry with Chilli Jam? (Page 79)  First hurdle was actually getting the duck.  Recipe calls for 400g of cooked duck meat so after scouring tesco.com for the best solution I eventually went for an Aromatic Duck with 12 Pancakes.  Boy and Girl were very excited to spot it in the fridge as its one of their favourites so were rather crestfallen when I told them I was puting it in a stir fry!

Like most stir frys this was pretty easy to throw together - they key is getting all your ingredients prepped in advance so you don't waste any time when it comes to putting it together.  As usual there were a couple that I deviated from.  For ginger & chilli paste I used my trusty frozen cubes of each, instead of Thai holy basil I used bog standard and I used Pak Choi instead of Bok Choi - no idea what the difference there is!


Unfortunately the end result was dissapointing.  Recipe called for 400g of egg noodles which you had to cook, refresh and add to the stir fried veg/duck at the last minute and heat through for 30 seconds.  The sheer quantity and they fact they were now cold from refreshing meant they needed much longer to heat through which in turn meant the veg turned from crispy to soggy.  The photo in the book certainly shows a significantly less proportion of noodles than what I ended up with. 

The only redeeming feature was the accompanying Chilli Jam.  But I used my own version which I make from Rachel Allen's recipe rather than Giraffe, so the credit there goes to me and Ms Allen.  Boy and girl rolled theirs up in the pancakes and hoisin sauce and declared it a hit.  Personally I wouldn't bother with it again and will stick to the more traditional Sunday Roast - you can't beat Delia's Yorkies.

Thursday, February 3, 2011

Sourdough Dumplings (饺子) and Gyoza/ Potstickers (锅贴)


Dumplings (aka Gyoza, when they spread to Japan) signify family reunion and their original round wrappers also look like coins (I know right, half the things we eat look like coins but, well, there you go) so they're traditionally eaten on Chinese New Year. I don't have my family here in London with me now, but it's fun making dumplings anyway! These were actually done a month ago though, when I was too free.

The basic dumpling dough is 2 cups of all-purpose flour and 1/2 cup of hot (that's what gives dumpling skins their elasticity) water. I made mine using my sourdough pasta dough, so texture-wise it's not exactly springy and also, I rolled out the dough too thick i.e. these are not fantastic dumplings. But they were so much fun anyway, and that tanginess and extra umami-ness of the dough made up for it! You can add any fillings you want, it's traditionally pork (plus shrimps. that would be nice), or even make it vegetarian with shitake mushrooms, but I was using up leftover chicken.

Sourdough Dumplings (饺子)
makes 20 (it's a great opportunity to pull your whole family in and make like 200 instead and freeze.)
20 round wrappers (I cut the flattened sourdough pasta dough into circles of about 7cm in diameter)
200g minced chicken
2 stalks of spring onion, sliced thinly
3 cloves garlic, minced
1 tbsp of grated ginger
1 tbsp soy sauce
1 tsp Chinese rice wine (shaoxing/huadiao)
1/2 tsp sesame oil

Method
1. Mix all the ingredients except the wrappers together and leave to marinade in the fridge for as long as you can, preferably overnight.
2. The next day, make your wrappers by rolling out the dough as thinly as possible and then cutting out circles (I used a glass).

3. Place about 2 teaspoons of the filling (don't be too greedy, but don't be too stingy either-- it's Chinese New Year!) in the centre of the circle.

4. Fold over to make a semi-circle, and press the edges to seal, with a bit of water or eggwash if needed.
5. (opt) To make it look pretty, you crimp the edges using a pinch-and-tuck technique. (watch from 2:20)

which I failed at.

but ah, that's why we have forks!

6. Done! I know they still don't look totally gyoza-like.. Anyway you can refrigerate or freeze them now for later use.


OR make

Sourdough Dumpling Soup
In a pot of boiling water, lower the dumplings in carefully and let them cook gently in simmering water for about 10 minutes till they float. Add to homemade chicken stock with a dash of soy sauce to taste, and garnish with chopped spring onions.

OR make
Sourdough Gyoza/Potstickers (锅贴)
Potstickers get their name because of their very special cooking technique.
Over medium-high heat, in a lightly-oiled pan, place the dumplings flat side down in a single layer, and let it fry until the bottom browns and sticks a little to the pan. Then add 1/4 cup of water or so and cover the pan, to unstick the bottoms and steam the top of the dumplings for about 3 min more, then uncover the pan and let the water evaporate (fully! else they won't be crispy).
A cheat method that I used is to steam (or boil) the dumplings for about 10 min first till they are fully cooked. Then place the cooked dumplings flat side down in one layer in a lightly-oiled pan, and fry over medium-high heat to get the bottom crispy and brown ;)
Traditionally served with a very simple dipping sauce made with Chinese black vinegar and shredded fresh ginger, that's all you really need!

I know these dumplings are not traditional and they probably taste not at all like the one you get in dim sum restaurants. But it's not a bad difference at all! They're denser, with a tangy depth to it, and combined with the savoury filling and the sharp vinegar and ginger to cut through that heaviness, are.. ho liao (means good stuff, in Hokkien)!

This is an entry for Presto Pasta Night hosted by Ruth of Once upon a Feast.

Monday, December 20, 2010

Homemade Sourdough Pasta!


I've wanted to try making my own pasta since tasting a sample of the fresh pasta sold at Borough Market. For any of you keen to try, Jamie Oliver says to make your pasta dough with a 1 egg: 100g flour ratio knead into a ball, flatten and you can do whatever shapes you want after that. Sounds not too difficult, but not something you'll do when you're in a rush to just get food into your stomach, so I kept putting it off.

Then I found this recipe for sourdough noodles from Jenny. It's a great way to use up extra starter and encourage yourself to not neglect your baby(: If it sounds weird, actually it's not that weird, it's inspired by the traditional Russian pel'meni, a stuffed dumpling.

I modified the recipe a bit because the dough seemed too dry. Here's my version:

Ingredients
1/3 cup sourdough starter
1 cup wholegrain flour
1 whole egg (having the yolk alone made it too thick to stir)
2 tbsps water/whey (not advisable after all; the mixture felt too dry so I though I needed to add something liquid, but then the dough the next day was a bit too slack?)

Method
1. Mix wet ingredients first, then add the flour a bit at a time.
2. Knead into a ball. Let it rest, covered, overnight.
3. Dump ball on a floured surface, roll out very thin, trim edges into a rectangle, cut into desired shapes.
4. (optional) Leave to dry for half an hour before dropping in boiling water, or dust with some flour and freeze in a sealed bag/container.

Images speak louder than words and I am studying graphic design after all heh, so:

For stuffed pasta

For ribbon pasta/noodles

Now for some photos:
Ravioli

I don't have a fancy pizza cutter so they don't have pretty edges, but oh well, rustic ;)

Tortellini

They're like mini pasta hugs! Oh if you're wondering about the odd pointed crown, I should have made them on circles of dough instead. But it's cute still, heh? Check out my simple Herbed Cheese Tortellini!

I love stuffed pasta, love biting into that little nugget of surprise wrapped up in the dough. There are so many things you can stuff them with! Get crazy!
Noodles have that reassuring "slurp" quality though and I love them just as much.

Fettucini

Remember to flour the surface well, or the dough will stick!

For Linguini, cut thinner strips.
For Parpadelle, cut fatter strips.
For Lasagne, don't cut (sounds good and lazy. will try it the next time i make extra tomato bolognese sauce).


Verdict: Sourdough pasta has a deep, rich, yeasty flavour with a slight tang to it. Really really good. Texture-wise, there's a very comforting hearty mee hoon kueh/ ban mian (oh giving me ideas..)bite to it. But it doesn't have the springiness of al dente pasta.

Update: I don't think it's entirely to do with the sourdough. I think it's me. I was watching youtube videos on making normal egg pasta, and
1. I believe I left out a crucial step: kneading the dough.
"Once you’ve made your dough you need to knead and work it with your hands to develop the gluten in the flour, otherwise your pasta will be flabby and soft when you cook it, instead of springy and al dente. "
2. Also, yes please skip the added water/whey. "When you're making pasta, the dough must be very dry."
3. And to anyone making normal egg pasta, use 00 flour.

This post is an entry for Simple Lives Thursday by GNOWFGLINS.

Tuesday, June 15, 2010

Phad Thai and Cooking Like a Pro

Professional chefs work differently to home cooks. This is a lesson you learn very early on in a restaurant kitchen.

Working a successful service relies on a number of key practices but chief amongst these is doing one’s meez before the first ticket comes in.

Meez , short for mise en place, a French term for ‘putting in place’, means getting everything ready to go so you aren’t faffing around chopping vegetables when you should really be concentrating on cooking that sea bass for table 14.


It is getting everything how you want it, where you want it so when the time comes all you have to do is cook.

Whilst this is good working practice for a professional environment, it is a lesson I’ve brought home with me as well. I approach cooking differently, first doing any peeling or butchery then moving onto chopping and the like.

Only when everything is ready to go, do I start cooking. This actually cuts down the time spent in the kitchen and means that hands on cooking is as swift and smooth as possible.

More importantly it means there isn’t a mountain of washing up to do after dinner because all the clearing up is done as you go along – another lesson you learn very quickly in professional kitchens.

A chef friend of mine put it rather more succinctly. ‘The six Ps,’ he said when we were talking about cooking for paying customers. I looked at him blankly. ‘Proper preparation prevents poor performance.’

‘That’s only five,’ I replied. ‘Five Ps.’

‘Oh yes,’ he said. ‘I gave you the clean version. Commis chefs get the six P chat. Proper preparation prevents piss-poor performance.’

And he’s right.

One dish that really benefits from this approach is a stir-fry when you have a matter of just a few minutes to actually cook everything and Phad Thai is a real favourite. Last time I visited the family, my sister asked me the best way to cook this. I gave her a little lesson but neglected to write down the recipe so, Ellen – this one’s for you.

Ellen’s Phad Thai
The key flavourings are palm sugar (although you could sub in brown sugar) for sweetness, tamarind and lime for sourness, fish sauce and soy for saltiness and chillies for heat.


The core philosophy of Thai food is ensuring these are balanced so feel free to play with quantities as you see fit: There are no rules – it is a dish from the streets of Bangkok. It is fast, filling and very tasty indeed.

Ingredients are listed in the order they should be cooked

Per person:
Cooking oil (2-3 tablespoons)
½ carrot, sliced into thin strips
½ onion, finely sliced
2 cloves of garlic, finely sliced
Tablespoon of pickled radish or pickled turnip (you should find this in your friendly local Chinese supermarket)
Fresh red chillies, finely sliced
2 spring onions, finely sliced

10-15g palm sugar
2 tablespoons of tamarind
1 tablespoon fish sauce
1 tablespoon soy sauce

100g rice noodles, cooked in boiling water

1 egg, beaten

Tablespoon of peanuts, roasted and roughly ground
Tablespoon of dried shrimp

To finish
Bean sprouts
Finely shredded spring onion
Finely shredded red chillies
Roasted and ground peanuts
Lime wedges

Once the first ingredient goes into the hot oil this dish is about two minutes away from the plate so you have to work quickly. Get all your ingredients ready to go and set up in order – this is your mise en place. Congratulations, you are now a chef.


Heat up a wok so it is good and scorching. Add the oil then tip in the onion, garlic, carrot, chillies and pickled radish (or turnip). Move around the wok then add the flavourings: tamarind, palm sugar, fish sauce and soy stir well then add the cooked noodles. Coat with the sauce then make a well in the centre and add the egg. Let it cook, scramble it and incorporate it into the dish.

Sprinkle in the dried shrimp and peanuts, stir one last time and spoon into bowls. Garnish with bean sprouts, spring onions, chillies and peanuts then feel free to go crazy with the seasonings to pep up the dish to your own personal tastes. Finely chopped bird’s eye chillies in fish sauce is a real favourite that always brings back the memory of Thailand.

Who needs a takeaway?

Thursday, June 11, 2009

Eating New York: Momofuku Steamed Pork Buns

When you are recommended the same place by four separate individuals, it is sensible to see what the fuss is about.


When one of those individuals is a professional – and well-respected – food critic for a national newspaper, it would be bordering on the insane not to sample its wares.

And so we found ourselves at Momofuku Noodle Bar on 1st Avenue, a teeming and intimate dimly lit ramen bar that seems to have become something of an institution since opening in 2003.

This isn’t a restaurant review so I’ll skip over the finer details (empty water glasses were filled with swift proficiency, service was friendly, atmosphere was buzzy) and move onto the food.

We’d been recommended the apparently famous steamed pork buns as well as the ramen – deep bowlfuls of tasty broth complete with pork shoulder, slow cooked belly, a poached egg and enough noodles for two people.

Considering you can gorge on a near identical menu in Chinatown for around five dollars, the prices at Momofuku seem steep. In the region of ‘This had better be the best effing steamed bun and bowl of noodles I’ve ever tasted’ steep.

And, OK. They were. The buns are light, gently sweetened and filled with two slices of slow cooked pork belly complete with a slick of hoi-sin sauce. Fresh cucumber and spring onions cut through the richness.

Whilst clearly Japanese in inspiration, the ramen noodles have been deliberately Westernized with the choice of meat: two cuts of pig that I’d happily have eaten entire platefuls of: rich porky flavours that can only arise from well sourced meat cooked long and slow.

We walked home happy and sated, slept off the last of the jet lag and woke on Sunday feeling refreshed and ready to take on the City.

Or, at least I did. The GF had other ideas which mainly involved feeling desperately ill for the next two days and being unable to leave the hotel room.

Was it the noodles? Unlikely – I ate exactly the same menu and felt fine but when I mentioned the idea of re-creating that steaming bowl of deliciousness a couple of days ago she turned a worrying shade of green.

‘I’m sorry, I think it’s too soon. I’ll happily eat the pork buns but I need to wait a while before I try to face noodles and broth.’

So, here is how to cook steamed pork buns. Momofuku style. In your very own kitchen (but not ramen. Not yet.)

Momofuku Steamed Buns with Pork.
(Makes 12)

Brine a 400g piece of belly pork overnight (to make a brine, just dissolve 200g of salt and 200g of sugar in warm water. Let it cool before covering your belly with it).

The next day, drain the meat and place in a roasting tray with 250ml of chicken stock. Cook in a warm oven (about 125 degrees C) for two hours. If the liquid dries up, just replace with a little more water. Towards the end of cooking crank up the heat to crisp up the skin. Keep an eye on it though because it can burn really quickly.


For the buns, I adapted this recipe, courtesy of David Chang, chef/proprietor of Momofuku. Mix one and a half teaspoons of dried yeast with 250ml of warm water. Add a tablespoon of rendered pork fat. Mix well.

In a food mixer, combine 90g of plain flour, 275g of white bread flour, a teaspoon of salt and 40g of caster sugar.

Slowly pour in the water, yeast and fat mixture. Use a dough hook to knead it for about 15 minutes. It will be quite wet and sticky. Transfer the dough to a lightly oiled bowl, cover with a damp tea towel and leave it to rise for a couple of hours.

Once the dough has doubled in size, knock it back down and start rolling it into a long sausage shape. If it is too sticky, use a little more flour.


Cut it into twelve even sized pieces and leave to rise for another forty minutes on a sheet of baking paper.


In the mean time, cut out 12 squares of baking paper, each about four inches square.

Slice the pork belly into thin pieces and leave to rest in the cooking liquid. They’ll mop up the flavours beautifully.

Roll each ball of dough into an oval shape, about the size of your hand and fold it in half, placing it onto the square of baking paper. Again, leave them to rise for about thirty minutes.

Set a bamboo steamer over a pan of boiling water and steam the buns for about eight minutes until they puff up.

Once cooked, slice them open, spread a little hoi sin sauce over the bread, add some finely sliced cucumber and spring onion and then stuff them with as many slices of pork belly as you can.


Eat these little pillows of deliciousness whilst they are still warm and another batch is steaming away. Satisfying and summery in the best possible way. Serve to hungry guests with bottles of cold, cold beer, preferably just as the sun is starting to dip down past the horizon.

For more porcine treats, follow me on Twitter