Showing posts with label Homemade. Show all posts

Thursday, March 31, 2011

Pan Fried shrimps with Glass Noodles in Thai Basil and Coriander Pesto


One of my favourite things to do with fresh herbs is pesto. I had Thai basil (learn about this very special basil in my post on Three Cup Chicken), so I decided to make pesto out of it.

And now that I have a mini-chopper I can do pesto in no time at all! I know, those Italian mamas will insist on grinding everything the traditional way in a mortar and pestle, but.. I wanted pesto fast ): To redeem myself, I have done (chunky) walnut basil pesto by hand before. The next bit about this very special pesto that's sure to send the Italian mamas reeling again, is that I didn't use Parmesan, heck I didn't use any cheese at all! To keep to the true Thai theme, I used naturally fermented soybean paste to provide the savoury factor, and used toasted crushed peanuts instead of pine nuts.


Thai Basil and Coriander Pest0
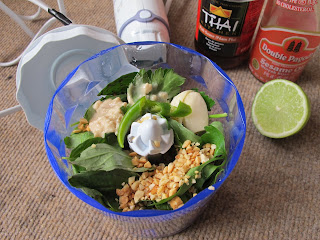
Ingredients
1 clove garlic
1 large handful of Thai basil (leaves only)
2 large handfuls of coriander
1 handful of unsalted (and preferably soaked) peanuts, lightly toasted
1 tbsp of fermented soybean paste (kind of like white miso)
1 green chilli, deseeded (I used Thai birds eye chilli, but you can opt for milder ones;) )
fish sauce (to taste)
1 tsp of sesame oil
extra virgin olive oil
squeeze of half a lime

Method
1. Combine all ingredients in a food processor/mini chopper, pouring in enough extra virgin olive oil till you get to the desired smooth consistency. Add the lime juice after that to add some freshness.


With my controversial pesto ready, it was time for some asian-style pesto-and-pasta!


Panfried shrimps with Glass Noodles in Thai Basil and Coriander Pesto
Ingredients
1 bundle of glass noodles (also known as mung bean threads/vermicelli, cellophane noodles, dang hoon. Not the same as rice noodles.)
couple of shrimps/prawns, shelled (please use more, I just only had 2 sad ones left.)
a few drops of fish sauce
a little bit of coconut oil (or evoo)
1/4 cup of Thai basil and coriander pesto

Method
1. Soak the glass noodles in cold water for about 10 minutes to soften. Drain, then pour boiling water over the noodles and let sit for 10 seconds (these cook really fast!). Drain, then run cold water over it to stop the noodles from continuing to cook.
2. Devein the shrimps by slitting the back, coat with fish sauce and fry them in a hot pan, flipping once. You'll know when they're cooked, because they turn pink and curl into that pretty butterfly shape.
3. Toss all in the pesto, and garnish with a sprig of fresh Thai basil.


I love glass noodles in all their translucent beauty and slippery goodness, and I love shrimps, though I wish there were more, and when both of them are covered in that delicious savoury pesto with the fragrance of these asian herbs and the smell of toasted peanuts, it's <3!


By the way, Miz Helen decided to fill her plate up last week with my Baked Egg in Jacket Potato with Chilli, Lime and Coriander Butter (: Yay.

Thursday, March 24, 2011

Baked Egg in Jacket Sweet Potato, with Chilli Lime and Coriander Butter


Besides making the garlic and herb butter, I also made a flavoured butter, this time infused with the spice of chilli and the freshness of lime zest and coriander. I had them in the fridge anyway because of the type of food I usually cook, and I really wanted to give my own special twist to the usual herb butter.

These few nights have been a mad rush for deadlines, and I haven't had much time to spend fiddling with complicated recipes or those that need me to be hands on. There's been a lot of "throw vegetables and meat and herbs into the slow cooker", and of course, "throw things into the oven". But while I may compromise on effort, I don't compromise on taste or nutrition. A baked sweet potato is simple, yet oozing with sweetness (and vitamins), and topped with an egg, and of course, that yummy butter, I've got a hearty delicious supper ready.

Baked Egg in Jacket Sweet Potato, with Chilli Lime and Coriander Butter
serves 1
Ingredients
1 sweet potato, washed and scrubbed, but skin-on
1 egg
2 coins of chilli lime and coriander butter (see below)
a bit more butter (plain)
coarse sea salt

Method
1. Pre-heat oven to 200 degrees celsius.
2. Pat the sweet potato dry and prick all over with a fork. This allows the steam to escape and prevents it from exploding. Rub melted plain butter over the skin and season with coarse sea salt to get crispier skin.

3. Bake for about 30-45 min (depends how big your sweet potato is!), till tender. Remove, and lower the heat to about 170.
4. Cut the baked sweet potato, but not all the way. Drop one thin coin of chilli butter in so it melts into the soft sweet flesh, then crack an egg over.

Might be a good idea to transfer to an (oven-safe) dish you plan to eat from (if not already), because the egg will probably ooze all over. It's messy, but I don't really mind, I like it when the liquids (egg white, sticky sweet potato juices and spicy zesty butter) all intermingle and caramelise around the sweet potato. Alternatively, you can slice a bit off the top of the sweet potato, scoop out a bit of the flesh, then crack the egg into the hole. That'd be a lot classier, but a pretty dish wasn't really my top priority then.
5. Return to oven for about 10 min more till the egg is set. Serve with another coin of chilli butter and some lightly dressed greens.


Chilli Lime and Coriander Butter
makes 1 little log
Ingredients
1/4 block of butter
2 tbsp chopped coriander leaves (i.e cilantro)
grated zest of 1/2 a lime
1 tsp chilli flakes (to taste)
sea salt (to taste)

Method


I love this butter melted on fish (again, see previous post), but particularly on roasted root vegetables or tubers, because the spicy salty nutty melted butter just complements the concentrated sweetness of the root vegetables, and the lime zest and coriander helps to bring some freshness to counteract that stodginess.

Monday, March 21, 2011

Make your own flavoured butter


Herb butters are the best standbys for a busy weeknight, I feel. And these two weeks, I am going to be very busy, so I bought yet another block of butter (kerrygold's on offer anyway!) to set about making a few different flavours so I can just pop them into or on top of my baked/steamed/pan-fried vegetables/fish/meat<-- yes that's just how useful they are, and not to mention, easy. You can use any combination of herbs you want, or in my case, need to use up.

Garlic and Herb (Parsley) Butter
makes 1 little log
Ingredients
1/4 block of butter
2-3 tbsp of chopped fresh parsley (leaves only)
1 clove garlic, finely grated
sea salt, to taste (if using unsalted butter)

Method
1. Leave the butter out till it softens.

see how yellow grassfed butter is?

2. Mix in the chopped herbs, garlic and sea salt.


3. Scoop onto clingfilm and then wrap the clingfilm around the butter mixture. Roll (the way you roll play-doh!) gently till you get a little log, then twist to seal the edges.


4. Chill in the fridge for a couple of hours, or till it hardens.

Just slice into coins as and when you need them!


This was a quick dinner:


Pan-fried Mackerel with Garlic and Parsley Butter
serves 1
1 mackerel fillet
sea salt, black pepper (to taste)
2-3 'coins' of flavoured butter (above)
1/2 tbsp extra virgin olive oil

1. Pre-heat oven to 180 degrees celsius.
2. Score the mackerel skin, you can slash or do criss-crosses , it just helps to keep it from curling up. Season on both sides.
3. Place the mackerel skin side down on a pan over medium high heat for about 10 min (could be a bit less even, depend how thick your fillet is. Just watch the colour change. It's easy though, no work. You shouldn't try to keep poking it).
4. When almost done, add one coin of butter to the pan and swirl about the edges of the mackerel, to help the skin caramelise and crisp up more.
5. Serve with more coins of herb butter and simply cooked greens. (you can drop coins of flavoured butter into the greens too hehe. never too much eh?)

The flavour of the garlic and parsely, and most importantly, that creamy nutty butter, just melts into the "boring old pan-fried fish", making for a quick yummy dinner!

Tuesday, February 22, 2011

Homemade Coconut Butter


I just love coconut. Adding coconut milk to any soups or curries immediately imparts a sweetness and fragrance. Apart from butter, I think this is one of my (not so) secret tricks to elevating any dish. And if you're worried about saturated fat, you really ought not to be, because our body needs saturated fat in order to be healthy. Coconut oil is also high in lauric acid, which is the only other source of which is found in mother's breast milk, and the medium-chain fatty acids actually BOOST your metabolism, so contrary to popular belief, coconut does not make you fat nor does it cause disease.

So, when I chanced upon Heather's recipe for coconut butter, I just had to try it! It's really easy and requires nothing that you can't get from the supermarket.

Homemade Coconut Butter
Ingredients
unsweetened dried coconut flakes (try to look for those without added preservatives or anti-caking agents)

Method
1. Blend until you get it to pouring consistency. Be patient.
If you have a food processor, just leave it on to do its work.
If you only have a hand blender like me, well, flex your thumb.

This is not going to work.

It's working, it's working..I think?

It worked, It worked!

Refrigerate for a few hours to let it set and solidify. Coconut butter will be solid at room temperature, you can warm it up a bit by running hot water over it (closed!), but it will never be like butter. It's more like...all-natural nut butters you get, which can be a bit dry. I might add some unrefined coconut oil the next time while blending, to get a smoother spread.

Oh and it's not for cooking. I thought at first I created virgin coconut oil that I can use for cooking with and save myself some money, but when I added it to a hot pan, it toasted (very very yummy smell though). So, think peanut butter vs peanut oil. Coconut butter has the oil plus the..actual body? fibre? of the coconut, so use it for spreads (albeit a rather tough one) instead, or you can blend it with dates etc to make desserts or bars. I just eat it straight from the jar (:

Monday, January 3, 2011

Homemade Kimchi


Kimchi!! Sour, salty, sweet, spicy-- all in one! There's no doubt as to why it's such an important part of Korea's rich food culture. It makes the perfect side dish to rice dishes, to grilled meats, it's great in stews and in pancakes/omelettes, and it's also great for your health.

Methods for making kimchi vary, and in Korea they even have nationwide kimchi competitions! (I was watching some food documentary on my plane ride to Singapore last summer after I got bored of the movies.) Do check out Maangchi's kimchi recipe! Hers will probably taste better, because she takes the extra effort to make a kimchi "spice porridge" first before coating the cabbage. And she has add-ons like oysters. But oh well, my fuss-free method tastes not half bad too!

Homemade Kimchi
Ingredients
2 heads Chinese leaf lettuce/Napa cabbage, chopped into big pieces (or you can leave whole)
1/2 cup sea salt
2" piece of ginger, minced
2 cloves garlic, minced
1/2 onion, minced
1 tbsp fish sauce
2 tbsp sugar
5 tbsp Korean red chilli powder (it's more earthy and less spicy than normal chilli powder so you can add a lot to get that depth and nice red colour without burning your tongue)
1 tbsp hot pepper flakes (optional)

Choose your own "add-ons"
Spring onions, Leeks, Carrots, Radishes etc.


Method
1. Sprinkle the cabbage with the sea salt, and set aside for 2-4h, turning once in a while to salt evenly.
2. Rinse the lettuce 3 times. Drain.
3. Rub and evenly coat the cabbage with the rest of the ingredients.
4. Transfer to a tight sealed container, and leave it at room temperature for 2-4 days. You'll see bubbles!
5. Transfer to the fridge, for up to a month. It will get more sour and develop a stronger flavour. If you can wait, don't enjoy immediately. But I've left mine much longer, and Koreans prized long-fermented kimchi.


Tuesday, December 28, 2010

Slow-dried Cherry Tomatoes (Oven-dried)


I love sun-dried tomatoes. That slow drying process removes the water from the tomato, leaving all the flavour behind, so what you're left with is tomato(flavour) x 10. You can get them quite easily at the supermarket, but they're so expensive, so when I saw cherry tomatoes at a reduced price, I figured it's time for some DIY!

London's grey and gloomy these days, but while I may not have the warm Italian sunshine, I have an oven!

Ingredients
500g pack of cherry tomatoes (You can try this with plum tomatoes, it will pack an even sweeter punch!)
1 clove of garlic
sea salt, freshly ground black pepper
pinch of dried basil
extra virgin olive oil

Method
1. Cut tomatoes into halves.
2. Scoop out most of the seeds, then salt the insides. Leave them cut side down on a rack, before rinsing and drying. I missed this step, so my tomatoes still ended up with a bit of juiciness to it. But they tasted yummy so I didn't feel too bad. Just can't keep as well, although, I ended up finishing it in a day anyway.
3. Crush the garlic with the sea salt, then add the pepper and basil. Spread over the cut side of the tomatoes.
4. Place tomatoes cut side up on a baking tray in a single layer. Drizzle over the evoo.
5. Put into oven to dry at 100 degrees celsius, for at least 3h, or preferably overnight.
6. Once done, put tomatoes and the tomato-infused oil into clean and sterilised jars, top with more evoo, and seal. It should keep for months if done properly, but you'll probably use it up way before that.
This:
will shrink to this:

So if you've got a lot of tomatoes and a lot of oven space, do a larger batch at a go!

You can puree it to make a delicious sauce, or add it to savoury baked goodies, or simply toss with pasta-- definitely an easy and yummy addition to your kitchen.

Monday, December 27, 2010

"Chunky" Walnut Basil Pesto


I really want a food processor, then I can start making more of my own dips and sauces and spice pastes. But today I was watching a video of how Italians traditionally made pesto. They made it by hand, with a mortar and pestle! The word "pesto" is literally translated as "pounded" so the food processor, which chops up the basil instead of grinding it, is actually less desirable. Time to put my "ancient" kitchen utensils and biceps to good use.

Walnut Basil Pesto
Ingredients
1 clove garlic
sea salt, black pepper
3 handfuls of fresh basil leaves
1 handful of walnuts, lightly toasted
1 handful of grated good parmesan
good extra virgin olive oil
squeeze of lemon

Method
1. Crush garlic with the sea salt and black pepper.
2. Add the basil a handful at a time and continue pounding/grinding.
3. Crush the toasted walnuts with your hands first, then add in and continue pounding/grinding.
4. When you get a creamy consistency (I left mine quite chunky), add the grated parmesan.
5. Stir in extra virgin olive oil till you get a smooth enough mixture. It depends on the dryness of the cheese.
6. Add a squeeze of lemon, to taste.

Authentic pesto calls for pine nuts, but I didn't have any, so I used walnuts instead. It's more fun experimenting with other types of herbs or leaves and other nuts actually.
I liked it, the texture was very rustic, so it's more like a chimichurri. To be honest, that's because I got tired. I still want a food processor...

Monday, December 20, 2010

Homemade Sourdough Pasta!


I've wanted to try making my own pasta since tasting a sample of the fresh pasta sold at Borough Market. For any of you keen to try, Jamie Oliver says to make your pasta dough with a 1 egg: 100g flour ratio knead into a ball, flatten and you can do whatever shapes you want after that. Sounds not too difficult, but not something you'll do when you're in a rush to just get food into your stomach, so I kept putting it off.

Then I found this recipe for sourdough noodles from Jenny. It's a great way to use up extra starter and encourage yourself to not neglect your baby(: If it sounds weird, actually it's not that weird, it's inspired by the traditional Russian pel'meni, a stuffed dumpling.

I modified the recipe a bit because the dough seemed too dry. Here's my version:

Ingredients
1/3 cup sourdough starter
1 cup wholegrain flour
1 whole egg (having the yolk alone made it too thick to stir)
2 tbsps water/whey (not advisable after all; the mixture felt too dry so I though I needed to add something liquid, but then the dough the next day was a bit too slack?)

Method
1. Mix wet ingredients first, then add the flour a bit at a time.
2. Knead into a ball. Let it rest, covered, overnight.
3. Dump ball on a floured surface, roll out very thin, trim edges into a rectangle, cut into desired shapes.
4. (optional) Leave to dry for half an hour before dropping in boiling water, or dust with some flour and freeze in a sealed bag/container.

Images speak louder than words and I am studying graphic design after all heh, so:

For stuffed pasta

For ribbon pasta/noodles

Now for some photos:
Ravioli

I don't have a fancy pizza cutter so they don't have pretty edges, but oh well, rustic ;)

Tortellini

They're like mini pasta hugs! Oh if you're wondering about the odd pointed crown, I should have made them on circles of dough instead. But it's cute still, heh? Check out my simple Herbed Cheese Tortellini!

I love stuffed pasta, love biting into that little nugget of surprise wrapped up in the dough. There are so many things you can stuff them with! Get crazy!
Noodles have that reassuring "slurp" quality though and I love them just as much.

Fettucini

Remember to flour the surface well, or the dough will stick!

For Linguini, cut thinner strips.
For Parpadelle, cut fatter strips.
For Lasagne, don't cut (sounds good and lazy. will try it the next time i make extra tomato bolognese sauce).


Verdict: Sourdough pasta has a deep, rich, yeasty flavour with a slight tang to it. Really really good. Texture-wise, there's a very comforting hearty mee hoon kueh/ ban mian (oh giving me ideas..)bite to it. But it doesn't have the springiness of al dente pasta.

Update: I don't think it's entirely to do with the sourdough. I think it's me. I was watching youtube videos on making normal egg pasta, and
1. I believe I left out a crucial step: kneading the dough.
"Once you’ve made your dough you need to knead and work it with your hands to develop the gluten in the flour, otherwise your pasta will be flabby and soft when you cook it, instead of springy and al dente. "
2. Also, yes please skip the added water/whey. "When you're making pasta, the dough must be very dry."
3. And to anyone making normal egg pasta, use 00 flour.

This post is an entry for Simple Lives Thursday by GNOWFGLINS.

Friday, December 17, 2010

Homemade Cream Cheese


It's so easy to make your own cream cheese (yogurt cheese, actually) and you need hardly any equipment, even less ingredients, and even lesser effort.

Homemade cream (yogurt) cheese
Ingredients (easily reduced or doubled)
1 cup plain whole (full-fat please) organic yogurt

Equipment
A large bowl or container
A sieve
Cheesecloth or a thin cloth or a kitchen towel

Method
1. Set-up as below:
2. Do nothing.
3. Leave it for a few hours and you get thick creamy Greek yogurt.
Leave it overnight and you get 1 cup of firm yet creamy plain cheese (and 1 cup of whey).

To be on the safe side, the cream cheese should last until the expiry date on the yogurt.
The whey can keep much longer, a month or so. Do not discard the whey! The whey is very useful for soaking your grains, or for making your own fermented vegetables, or just replace it with the liquid in stews or soups for a health boost!

You can add also anything you want to flavour it!

Garlic and Herbs Cream Cheese
1 cup of cream (yogurt) cheese
2 tbsp garlic powder (you can use mashed/pureed garlic, but careful, it won't last as long. roasted garlic would be divine.)
1 tsp each of dried parsley and mixed herbs
sea salt, black pepper

Compare this to the garlic-and-herbs cream cheese you find on the shelves:
Dried garlic, icing sugar, parsley, garlic oil, tapioca dextrin, stabiliser, vegetable oil, whey powder, basil.
Tsk.

Here are some other combinations you can try:
Sundried tomato and Basil (see how to make your own slow-dried tomatoes!)
Black Olive
Onion and Chive
Raspberry/ Strawberry/ Blueberry (for a sweet treat)

Any ideas? I've heard of the weirdest flavours.
You can even leave it plain, for a very versatile cream cheese. (cream cheese and smoked salmon! if I ever afford the latter..)

Thursday, December 16, 2010

Make your own stock


Stock is probably the most important thing to do in the kitchen. So many recipes call for stock, and those little Knorr cubes of packed "MSG-in-disguise" powder come no where close to the flavour and depth of homemade stock. Plus it's super nutritious, full of easily available calcium and minerals. And it costs nothing.

There are recipes out there, but there's no hard and fast rules. It's basically bones (hence also called bone broth. instead of using carcasses, you can throw in a whole chicken or bits with meat too.) and water and time. I just have some tips:

1. To extract all the calcium and minerals from the bones better, let your bones sit in the cold water with a few tablespoons of vinegar added, for an hour or so, before bringing to the boil slowly.

2. Add chicken feet and neck for even more gelatinous broth! For pork bones, try pork trotters! When cooled in the fridge, it should gel like this:


3. Stock recipes usually call for leeks, onions, carrots, celery, garlic, bay leaf to be added. My mum adds garlic and ginger. Ah, only now I learn to truly appreciate my mum's daily bone broths/soups and the "shang tang" (superior stock) she uses to flavour everything she cooks.I add whatever bits and pieces of vegetables I have spare. I save the ends of carrots and celery etc in the freezer and then throw them into my stock. So it really costs nothing.

4. Simmer your bones for as long as you can. I leave it on overnight, till I can easily crush the bones. The broth after that is like..essence. Except if you use fish bones, then 2 hours is enough, else the stock turns cloudy.

5. You can do a huge batch at a time if you've got a big enough pot.
Then reduce it by half or more before storing so you don't end up having no fridge space at all. Just add water to it when you need to cook with it. Should keep for about 5 days.
Or freeze in portions you'll use, or in ice cube trays, then you got REAL stock cubes. Should keep for months.

That's it really! I have bone broths in some form at least every week. Might be in the form of proper soups, especially Asian soups (more particular about the vegetables/herbs added). Or in stews. Or as the cooking liquid in rice. Or in stir-fries.

Ok go make some stock!