Showing posts with label Fusion. Show all posts

Thursday, May 19, 2011

Sambal Chilli Asparagus and Gruyere Crustless Quiche


Asparagus. The coveted spears of spring. I can't remember where I heard that phrase before but it's been stuck in my head ever since. I love asparagus, and to me, the flavour of fresh British asparagus really can't be beat. The best way to enjoy them is simply steamed, with a knob of butter melted over (try flavoured butters like chilli coriander and lime zest butter).


But asparagus is so terribly expensive though. I actually googled it before - "why is asparagus so expensive". Yes I am that geeky. (What will we do without google??) Anyway. Apart from that fantastic flavour, it's also because asparagus take 2 years to harvest and bring returns and of course, because they only appear for such a short period of time i.e. spring. I figured it would be a shame to let spring slip by without an asparagus dish, so I got some at Pimlico farmer's market and stretched them further in a quiche-- one of my favourite ways to throw in any vegetables and experiment with lots of flavour combinations (even yes, sambal chilli).

Basic Crustless Quiche
I love quiche. It was my staple buy every time we passed a bakery in Paris last summer with my sister. And I will share a proper quiche recipe sometime in the future, I used to be scared of shortcrust pastry but it really isn't that difficult after all! But when you just want an easy lazy Sunday brunch, you can't be bothered with all that mixing and rolling. Without a crust as a base, the ratios are adjusted such that the quiche is less decadently custardy, but it is not a frittata. It's confusing seeing people call their frittatas quiches, because frittatas don't have all that luscious cream (or milk) added; for quiche, think: more cream less eggs.
Ingredients
3 eggs, beaten
1/2 cup cream (preferably grassfed)
1/2 cup whole milk (preferably grassfed)
3/4 cup grated Gruyere cheese (or Emmental or even Cheddar)
a handful of grated Parmiggiano (optional)


Sambal Chilli Asparagus and Gruyere Crustless Quiche
Ingredients
7-8 stalks of asaparagus
1 medium onion, chopped
1 tbsp sambal belachan (replace with chilli paste if not available)
1 tsp chilli flakes (or to taste)
3 eggs, beaten
1/2 cup cream (preferably grassfed)
1/2 cup whole milk (preferably grassfed)
3/4 cup grated Gruyere cheese
pinch of sea salt
1 tbsp extra virgin olive oil

Method
1. Pre-heat oven to 180 degrees celsius.
2. Prepare the asparagus by snapping off the woody bottom part of the stalk. Cut the remaining stalks into halves, leave the top half whole, but further chop up the bottom half into bite sized pieces.
3. Over medium high heat, add the oil to the hot pan, and then add the onions to sweat.
4. Once onions are translucent, add the sambal belachan and the top half of the asparagus, saute for a couple of min, before adding the bite-sized asparagus pieces, and cook for 3 min more till almost tender but not soft.


5. To a inch pie dish greased with some butter or oil, spread the onions and asparagus pieces over the base of the dish.
6. Beat the eggs with the cream and milk, season with the salt and chilli flakes, and pour over. Arrange the asparagus tips on top in a starburst pattern (mine shifted when I moved it into the oven ): )

7. Bake for 30-40 min until set with slightly browned edges but centre looks a little jiggly still, as it will continue to cook out of the oven. Leave to cool before cutting into it.


The chilli adds some kick to a classic quiche, and the belachan (fermented fish paste) in the sambal chilli adds a very special salty savoury depth to the asaparagus, the same way the british use bacon to add an extra something. This quiche is rich with flavour and requires hardly any effort, and I can have it for breakfast, for lunch, as a teatime treat maybe, and then for dinner and then supper after so it's a real time-saver. No I was kidding. Actually, no I wasn't.

This is part of Full Plate Thursday.

Friday, April 15, 2011

Salmon Korokke (Croquette) Balls with Wasabi Avocado-naise


Since I posted a recipe which gives canned sardines a makeover following a post on roasted whole sardines, I thought it would be fun to share a recipe giving canned salmon a run for its fresh counterpart following my chilli-soy marinated salmon post. While the canning methods may affect the nutritional profile of salmon slightly, canned salmon is still rich in omega 3 fatty acids, protein, and calcium due to the soft edible bones. What's more, I can get wild Alaskan salmon without breaking the bank, in fact, it's really very cheap when you buy the bulk cans. (Farmed salmon is really not worth your saliva. Did you know that that beautiful orange-pink in farmed salmon comes from chemical dyes, not from the prey they feed on as in wild salmon?)

So here goes!

Salmon Korokke (Croquette) Balls with Wasabi Avocado-naise
makes 10 balls
Ingredients
400g can wild Alaskan salmon, drained
1 stalk spring onion, chopped
1 tbsp garlic powder (you can also use fresh garlic, but I find the garlic powder also helps bind the mixture, kind of like flour)
1/2 tsp sesame oil
1 egg, beaten
1/2 cup breadcrumbs (I put stale sourdough bread into the oven with some olive/sesame oil to lightly toast/dry out, then crushed them in a ziplock bag. You can also use a food processor. For a more Japanese korokke, you can use panko breadcrumbs, but I don't agree with the ingredients in these.)

Method
1. Preheat oven to 200 degrees celsius.
2. Combine the salmon, garlic powder, spring onions and beaten egg. Form little balls with your hands.


3. Roll them about in the breadcrumbs so they all get an even layer of crumb coating. Refrigerate for about 1h or so if you have time.


4. Grease a baking sheet and arrange the croquette balls, spacing them out so they aren't touching. If your breadcrumbs aren't already infused with oil, spray a mix of olive oil and sesame oil over the croquettes so they will crisp up nicely. Bake in the oven for about 20 min, or till crispy and golden.


for the wasabi Avocado-naise
Ingredients
1 ripe avocado
2 tbsp rice vinegar
1 tsp wasabi (Japanese horseradish) powder + 1 tsp water, combined to make a paste

Method
1. Combine all the ingredients together and blend. If you can't take spicy, leave the wasabi out, if you can but don't have wasabi, just sub with mustard/ horseradish. (Note: Avocado will oxidise and discolour on exposure to air, so don't do this too ahead of time!)


I'm sure we've all had our fair share of fishcakes served with tartare or dill sauce, so if you're looking for something slightly different, I think you'll enjoy this with Asian (Japanese) twist! You can flatten them into patties if you like, but I chose to make them into croquette balls because 1.it was easier to roll them about in the breadcrumbs 2. they looked cuter like that 3. so I can indulgently pop hot crispy balls into my mouth whole and get bursts of flavours and texture, yum, no fork or knife or dainty smile ;)


Thursday, March 31, 2011

Pan Fried shrimps with Glass Noodles in Thai Basil and Coriander Pesto


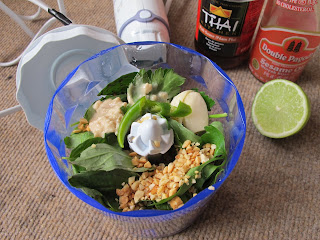
One of my favourite things to do with fresh herbs is pesto. I had Thai basil (learn about this very special basil in my post on Three Cup Chicken), so I decided to make pesto out of it.

And now that I have a mini-chopper I can do pesto in no time at all! I know, those Italian mamas will insist on grinding everything the traditional way in a mortar and pestle, but.. I wanted pesto fast ): To redeem myself, I have done (chunky) walnut basil pesto by hand before. The next bit about this very special pesto that's sure to send the Italian mamas reeling again, is that I didn't use Parmesan, heck I didn't use any cheese at all! To keep to the true Thai theme, I used naturally fermented soybean paste to provide the savoury factor, and used toasted crushed peanuts instead of pine nuts.


Thai Basil and Coriander Pest0
Ingredients
1 clove garlic
1 large handful of Thai basil (leaves only)
2 large handfuls of coriander
1 handful of unsalted (and preferably soaked) peanuts, lightly toasted
1 tbsp of fermented soybean paste (kind of like white miso)
1 green chilli, deseeded (I used Thai birds eye chilli, but you can opt for milder ones;) )
fish sauce (to taste)
1 tsp of sesame oil
extra virgin olive oil
squeeze of half a lime

Method
1. Combine all ingredients in a food processor/mini chopper, pouring in enough extra virgin olive oil till you get to the desired smooth consistency. Add the lime juice after that to add some freshness.


With my controversial pesto ready, it was time for some asian-style pesto-and-pasta!


Panfried shrimps with Glass Noodles in Thai Basil and Coriander Pesto
Ingredients
1 bundle of glass noodles (also known as mung bean threads/vermicelli, cellophane noodles, dang hoon. Not the same as rice noodles.)
couple of shrimps/prawns, shelled (please use more, I just only had 2 sad ones left.)
a few drops of fish sauce
a little bit of coconut oil (or evoo)
1/4 cup of Thai basil and coriander pesto

Method
1. Soak the glass noodles in cold water for about 10 minutes to soften. Drain, then pour boiling water over the noodles and let sit for 10 seconds (these cook really fast!). Drain, then run cold water over it to stop the noodles from continuing to cook.
2. Devein the shrimps by slitting the back, coat with fish sauce and fry them in a hot pan, flipping once. You'll know when they're cooked, because they turn pink and curl into that pretty butterfly shape.
3. Toss all in the pesto, and garnish with a sprig of fresh Thai basil.


I love glass noodles in all their translucent beauty and slippery goodness, and I love shrimps, though I wish there were more, and when both of them are covered in that delicious savoury pesto with the fragrance of these asian herbs and the smell of toasted peanuts, it's <3!


By the way, Miz Helen decided to fill her plate up last week with my Baked Egg in Jacket Potato with Chilli, Lime and Coriander Butter (: Yay.

Saturday, March 12, 2011

Five-spice Roast Poussin with Mandarin Orange and Carrots


So, for my first fusion dish since that very important post, I decided to post a classic british roast chicken, but with lots of chinese flavour influence.

A poussin (pronounced poo-sun, sounds awfully french and posh doesn't it) is a teenage chicken (baby would be a chick wouldn't it??). It costs a bit more than chicken because the meat is much more tender, but my butcher was having a sale due to an oversupply of poussins, 1 pound each. That's cheaper than a chicken leg!

see how small it is!

I never really tried roasting a whole bird before, because it just doesn't make sense for one/two people. I usually roast chicken legs or sometimes chicken breasts, but this time, with a small poussin, I can finally try things like stuffing an entire lemon into the cavity. I want to try the technique of spatchcocking the next time I manage to get my hands on a whole bird!

I did this sometime in January, when mandarins and clementines were everywhere, so I decided to change it to a sweet citrus instead, and being mandarin oranges, I felt compelled to use some chinese spices. To prop up the bird, I roasted it on a bed of carrots, just because I felt very orange ;)

Five-spice Roast Poussin with Mandarin Orange and Carrots
serves 2
Ingredients
1 poussin
2 mandarin oranges/clementines
4-5 small carrots (or 3 large, halved lengthwise)
2 tbsp soy sauce
1 tbsp five-spice powder
1 tbsp Chinese rice wine (hua diao/shaoxing)
few sprigs of thyme
1 tbsp melted butter + a few more dabs
1 tsp sesame oil

Method
1. Preheat oven to 200 degrees celsius.
2. Parboil the carrots for about 5 min, not till it gets soft! At the same time, drop in the mandarin oranges, whole, to make it easier for the juices to release later.
3. Meanwhile, wash the poussin, pat dry and season the inside and outside of the poussin with the soy sauce, five spice powder. Rub the sesame oil and butter over the skin.
4. Poke one of the mandarin orange all over then stuff it with a sprig of thyme into the cavity of the poussin.
5. Arrange the carrots in a single layer on a roasting tray , throw the remaining thyme around, and then place the poussin on top (try to prop the legs up by being strategic with the carrots hehe).
6. Cut the other mandarin orange in half and then squeeze the juices all over the bird and carrots. Sprinkle the tbsp of Chinese rice wine around.


7. Into the oven for about 45 min, till the juices run clear!


8. Let the poussin rest, tented with foil for at least 15 min before cutting into it. I served it halved with the roasting juices spooned over.


Yes, on mashed potato,very un-Chinese I know, but it just felt right against the roast poussin and sweet carrots. I think it would also work out very well if you drop the carrots and then section the chicken, serving it over a bed of noodles and steamed vegetables, with the gravy poured over, kind of like roast duck noodles.


This is the first time I've tasted poussin. You know how if you poke baby skin you get that feeling of slight amazement at the tenderness and smoothness? It's the same with poussin! Poussin has less developed flavour than chicken though, so the five-spice and soy sauce really helps to add a punch. The mandarin orange adds sweetness without the need for sugar or honey, giving the crispy skin a deeper golden hue and the carrots, a yummy sticky glaze. I love seeing so much yellow, orange and brown on a plate, I think they're a few of the most appetising colours to the eye(:

This is part of Weekend Herb Blogging #274 hosted by Winnie from Healthy Green Kitchen.