Showing posts with label Chinese. Show all posts

Friday, April 29, 2011

Steamed Glutinous Rice with Chicken (Lo Mai Kai)


I still keep in mind my self-challenge to showcase asian (especially Singaporean) food instead of the usual real food fare, and if I do share a recipe that's not, to follow up with one that's similar/inspired, but asian. When I did the Greek dolmades, I knew I just had to do Lo Mai Kai, fragrant glutinous rice steamed with chicken, shiitake mushrooms, chinese sausage, and/or dried shrimps, wrapped up in lotus leaves (hence also called Lotus Leaf Rice 荷叶饭). However, the Singapore version of Lo Mai Kai is slightly different. It's steamed in little aluminium foil bowls, sold in coffeeshops (kopitams) along with Chinese steamed buns (pau), as takeaway tea or breakfast.

Lo Mai Kai
serves 1 hungry person (please make more!)
Ingredients
1/2 cup brown glutinous rice
70g chicken thighs, deboned and chopped into bite-sized pieces
2 shiitake mushrooms, soaked (mushroom soaking water reserved)

For chicken and mushrooms
1 tsp dark soy sauce (I use 1 tsp tamari + 1 tsp molasses)
1 tsp natural oyster sauce
1 tsp shaoxing huadiao rice wine
1 clove garlic, grated
few drops of sesame oil
white pepper

For Rice
1 cup water (or stock)
1 tsp tamari light soy sauce (+a little bit of molasses)
1 tsp natural oyster sauce
1/2 tsp five spice powder
few drops of sesame oil
white pepper

Method
1. The night before, soak the rice with enough water to cover (This is not just a step to reduce phytic acid in grains, this is a must for sticky rice!) and marinate the mushrooms and chicken.
2. The next day, drain the rice and cook with 1 cup of water for about 30 minutes, or till cooked (I use a rice cooker). Mix with the seasoning for rice.


3. Fry the chicken and mushrooms for a few minutes till cooked.


4. To assemble, place the chicken and mushrooms at the bottom of a greased metal dish, then top with the rice. Press down to make sure the layers are tight.


5. Steam over medium high heat for 30 minutes.


6. Turn out onto a plate and dig in! If you've been wondering so far why I'm hiding the chicken and mushrooms with the rice instead of showcasing them, ah, now you know! It works like pineapple upside down cake.


The sticky rice is infused with the delicious flavours from the spices and seasoning, shiitake mushrooms, and marinated meat. And the pork lard, as used traditionally, and which I'd happily add to if I had. This was one of my favourite dishes growing up. My mum would go to the Tanjong Rhu Pau stall (best paus ever) and buy like 20 buns and these delicious Lo Mai Kai for tea that day and breakfast the next day. Now I wish I doubled the recipe..

Friday, April 22, 2011

Tea Leaf Eggs 茶叶蛋


Remember my dozen eggs? The best way to use up old eggs, is to make a batch of hardboiled eggs, because they not only peel easier, but can keep in the fridge for about a week or so and serves as my emergency real-food protein snack when I feel a bit peckish. Since Easter was coming up, I thought it'd be a great time to create some naturally patterned and coloured tea leaf eggs.

Tea leaf eggs are a favourite traditional chinese street snack. Apparently, in Taiwan, tea leaf eggs are common in their convenience stores, and my taiwanese friend just loves them. It's commonly sold as street food, especially in pasar malams (makeshift markets) in Singapore too. The key ingredient here is the star anise, which, along with the other spices and the fragrant tea, perfumes your kitchen with tempting aromas.

Tea Leaf Eggs 茶叶蛋
Ingredients
4-8 eggs, however much you can fit in the saucepan/ can eat
2 black tea leaf bags, or 2 tbsp loose leaves (if you have chinese tea e.g. my favourite oolong, or pu-erh, or tie guan yin, or assam tea, it'd be even better!)
2 star anise
1 cinnamon stick
2-3 cloves
1 tsp five spice powder
1 tsp sugar (unrefined cane sugar)
4 tbsp soy sauce (naturally brewed, I use tamari, which is wheat-free and more intense)
2 cups water

Method
1. Make the best hard-boiled eggs i.e. 15 min.
2. Crack the eggshells with a spoon.


3. Return the eggs to the saucepan with all the ingredients added, bring to a boil, and let simmer for 2h. If you can, let it marinade overnight for better flavour and colour. (Or even longer. I like them more 2 days later. And even more 3 days later.)

4. Serve with a little of the broth/brew.


By cracking the eggshell, you get a beautiful marbled appearance, and the flavour and aroma of the spices seep into the cracks and infuse the egg. It's not just style ok, this egg has substance.

Tuesday, April 5, 2011

Pan Seared Chilli Soy-Marinated Salmon with Sesame Spinach


Finally! A horrible two weeks of deadlines after deadlines is over!

And to treat myself, I decided to slowly marinate a piece of salmon steak in spicy garlicky tamari and sesame oil for a couple of hours instead of my throw-it-all-together meals the past few days. The actual cooking and preparation time is still very short though, and there's nothing extremely unique or wow about this, but it's one of my favourite (comfort) flavour combinations.

Pan Seared Chilli Soy-Marinated Salmon
serves 1
Ingredients
1 piece salmon steak
1 tbsp coconut oil (or ghee or a mix with evoo, to fry)

Marinade
2 tsp soy sauce (naturally fermented and aged, I used tamari)
1/2 tsp sesame oil
1 small clove garlic, grated
1 cm piece of ginger, grated
1/2 tsp chilli flakes
1/2 tsp unrefined cane sugar or molasses

Method
1. Combine marinade ingredients and cover the salmon with it. Leave in the fridge for a couple of hours. Remove from marinade and bring to room temperature 20 min before cooking.
2. Over medium-high heat, add the oil in a pan and place the salmon into the hot pan. Don't keep poking it, or you won't get a nice sear. Salmon steaks are a bit trickier than the fillets because I can't see the colour change along the sides, but I give it an estimate of about 3 minutes before flipping over and letting it cook for another 2 min.

Sesame Spinach
Ingredients
2 big handfuls of spinach
2 tsp sesame oil
2 cloves garlic, chopped finely

Method
1. Heat the sesame oil in a pan and add the chopped garlic, stirring often till they get browned.
2. Meanwhile, wilt the spinach in boiling water or you can steam it. Refresh in cold water.
3. Toss with the garlic-infused sesame oil.

Sprinkle the toasted garlic all over the spinach and the salmon and serve with rice!

Salty spicy and sweet with the aroma of toasted sesame and garlic --Ah, happy (:


Tuesday, March 29, 2011

Three Cup Chicken 三杯鸡


I know I talked about growing your own herbs, but it's kind of funny because I really only started to learn about herbs after I moved to London.

In Singaporean food, there are a lot of spices involved, but not really herbs. Curry leaves, pandan leaves, banana leaves are used to impart fragrance, but they aren't really herbs are they? In Chinese food, especially, you don't really need anything besides coriander and spring onions. That said, they're used a lot, and go into everything from soups to stir-fries.

But once in a while, you do get the odd herb that's not one of the aforementioned two. Introducing... the Thai Basil!

It has a slight purple-ish tinge to its much tougher stalks.

It's kind of different from the sweet basil that's more commonly used here, because it has a strong anise-like scents that adds a very different dimension to dishes, and also, it holds us a lot better in cooked dishes, unlike sweet basil, which is best eaten raw I feel.

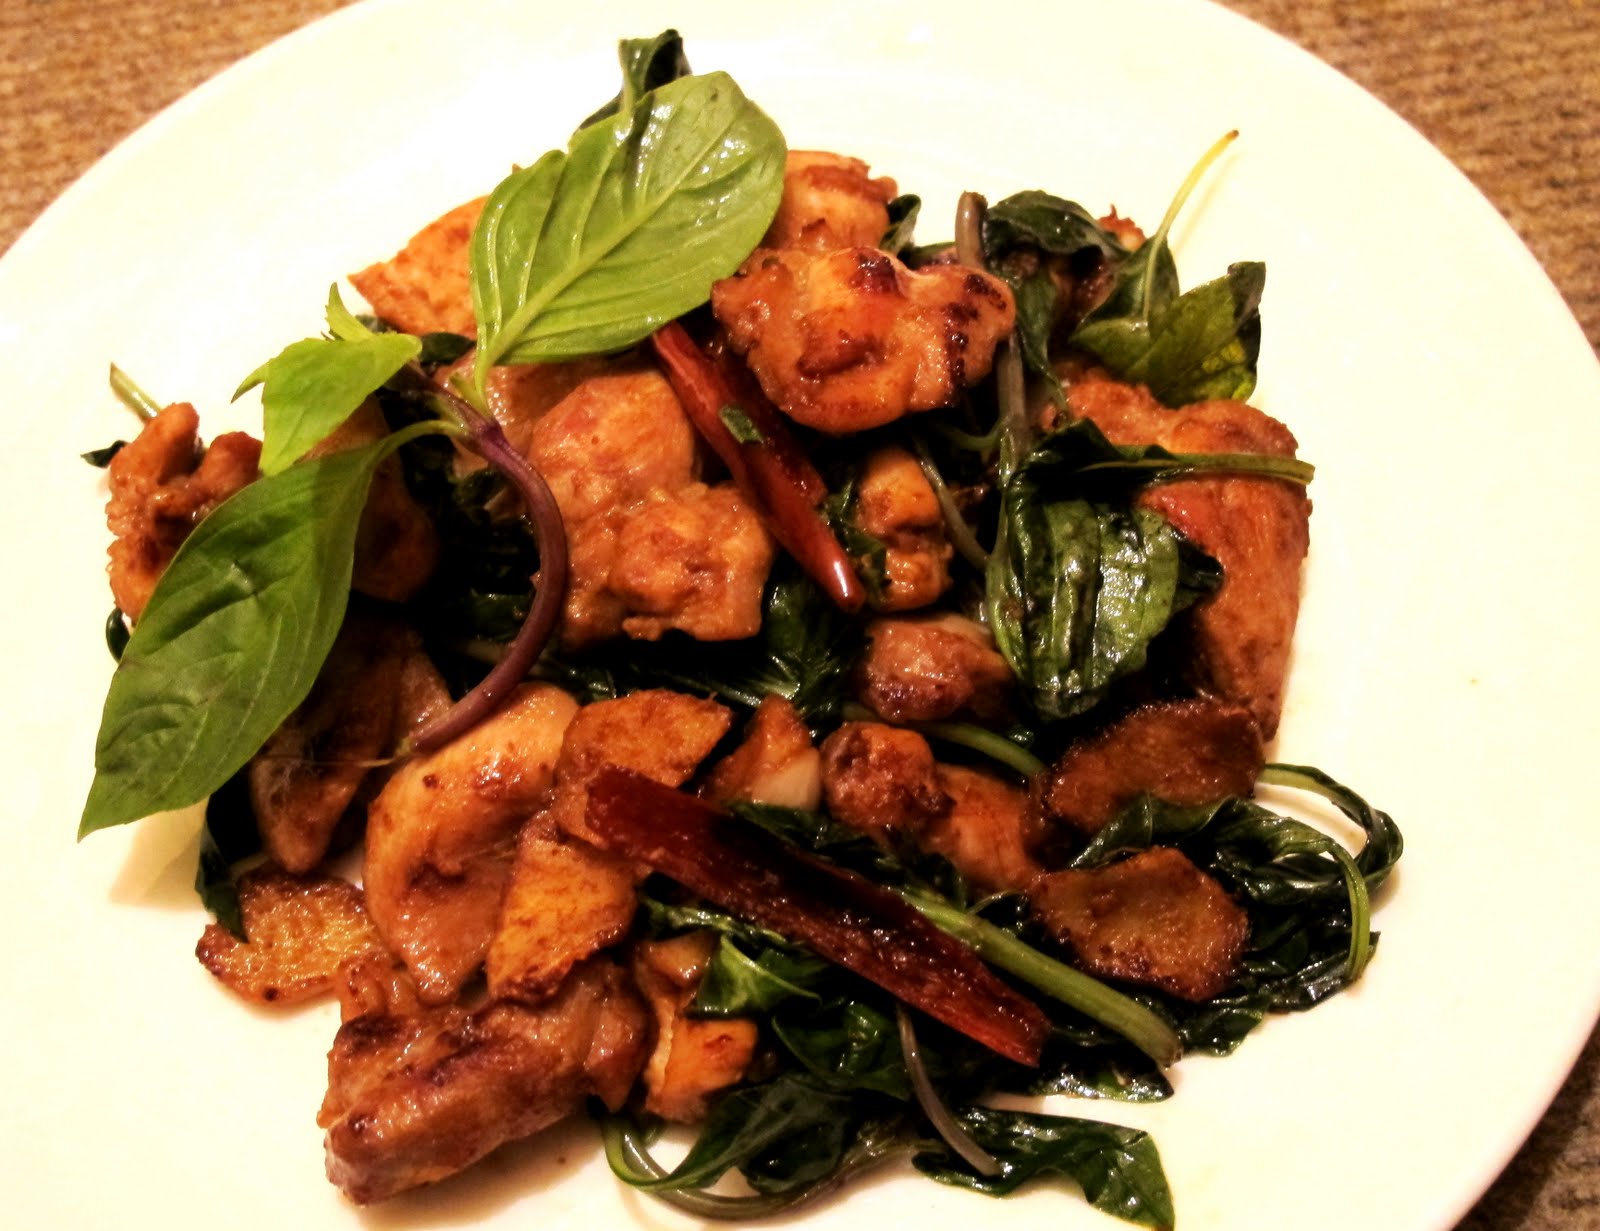
Thai Basil is an important part of Thai dishes (duh) but also in this less known Chinese chicken stirfry reminiscent of the more famous Kung Pow Chicken, called Three Cup Chicken. Three Cup because the original recipe called for 1 cup of each of these 3 Chinese pantry essentials: sesame oil, Chinese rice wine, and soy sauce.

But I guess it's a really small cup, (haha see Chinese tea cups) because you definitely do not need a cup of each. Or maybe because Half Cup Chicken just doesn't have the same ring to it. Nonetheless, what's more important is that you need to keep them in the same ratios, how easy is that to remember!

Three Cup Chicken 三杯鸡
serves 2
2 chicken legs (about 500g), deboned and chopped into small pieces
(it's important to keep them in small pieces, so they all get coated in the sauce, because they aren't marinated in seasonings like other chicken dishes e.g. sesame oil chicken 麻油鸡, and will turn out bland otherwise.)
6 cloves garlic, peeled but left whole
6 thin slices of ginger
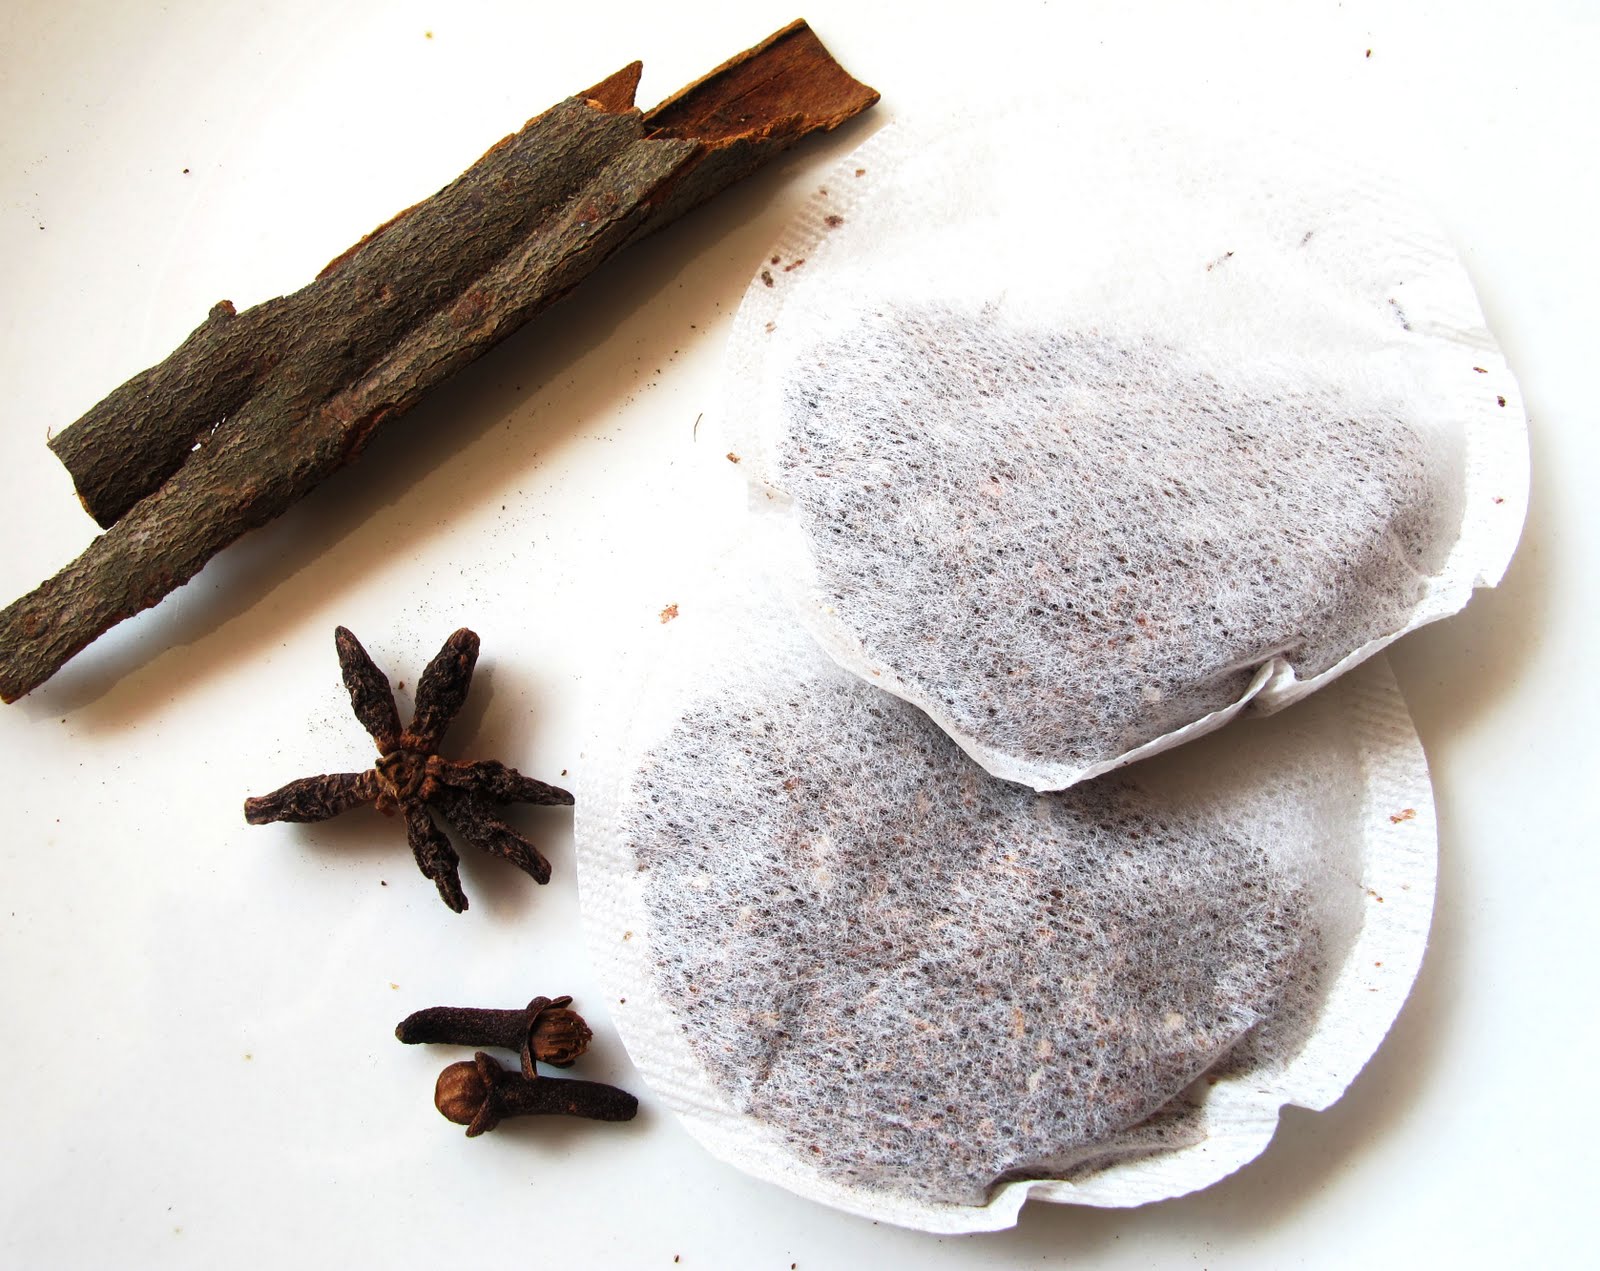
2 tbsp sesame oil (traditionally black sesame oil, which has an even stronger aroma)
2 tbsp Chinese rice wine (Shaoxing Hua Diao Jiu, do not replace with cheap cooking wine!)
2 tbsp soy sauce (naturally fermented and aged)
2 tbsp blackstrap molasses (or you can use brown/rock sugar, but I like using molasses when I cook with soy sauce)
handful of Thai basil leaves
3-4 dried red chillies

For velveting the chicken (optional)
1 egg white, beaten but not frothy
1 tbsp cornstarch
1 tbsp Chinese rice wine

Method
1. (optional) 20 min before you are ready to cook, marinate the chicken in the velveting mixture. 20 min later, parboil the chicken in simmering water till they turn white on the surface, but are not yet cooked. Drain and set aside.
(I'm in the midst of my Chinese stir-fry secrets experiments. You can try the baking soda /poaching in oil methods too and let me know! )
2. Heat work/pan on high heat and add the sesame oil.
3. Add the garlic and ginger and stir-fry for 2 minutes till fragrant.

yes they are left whole! If you haven't yet realised, this dish is not shy on flavour!

4. Add the dried chillies and chicken pieces and stir-fry for another few minutes.
Keep stirring or you'll burn your food! This whole dish is cooked on high heat, so the meat is nicely seared and caramelised!
5. Add the other sauce ingredients, and let it simmer, covered for another 4-5 min, till there's sticky and no longer wet.
6. Add the Thai basil leaves and then immediately remove from the heat. They will wilt in the residual heat.

This dish is traditionally cooked in a claypot, so you just serve it in the claypot. I don't have one the right size, so oh well, dish out and garnish with an extra sprig of fresh Thai basil and serve with rice.

This is great humble food, simple yet bursting with flavour. The sweet salty caramelised chicken has a sticky coating of sauce (it's a dry dish, you aren't supposed to be left with a pool of gravy), amped up with the kick from the ginger and whole garlic cloves and chillies, and perfumed with that anise scent from the Thai Basil, and one of my favourite smells in the world--sesame oil! If you can;t find Thai Basil, I guess you can use normal sweet basil, it will still be good, but it will not be Three Cup Chicken.


Saturday, March 12, 2011

Five-spice Roast Poussin with Mandarin Orange and Carrots


So, for my first fusion dish since that very important post, I decided to post a classic british roast chicken, but with lots of chinese flavour influence.

A poussin (pronounced poo-sun, sounds awfully french and posh doesn't it) is a teenage chicken (baby would be a chick wouldn't it??). It costs a bit more than chicken because the meat is much more tender, but my butcher was having a sale due to an oversupply of poussins, 1 pound each. That's cheaper than a chicken leg!

see how small it is!

I never really tried roasting a whole bird before, because it just doesn't make sense for one/two people. I usually roast chicken legs or sometimes chicken breasts, but this time, with a small poussin, I can finally try things like stuffing an entire lemon into the cavity. I want to try the technique of spatchcocking the next time I manage to get my hands on a whole bird!

I did this sometime in January, when mandarins and clementines were everywhere, so I decided to change it to a sweet citrus instead, and being mandarin oranges, I felt compelled to use some chinese spices. To prop up the bird, I roasted it on a bed of carrots, just because I felt very orange ;)

Five-spice Roast Poussin with Mandarin Orange and Carrots
serves 2
Ingredients
1 poussin
2 mandarin oranges/clementines
4-5 small carrots (or 3 large, halved lengthwise)
2 tbsp soy sauce
1 tbsp five-spice powder
1 tbsp Chinese rice wine (hua diao/shaoxing)
few sprigs of thyme
1 tbsp melted butter + a few more dabs
1 tsp sesame oil

Method
1. Preheat oven to 200 degrees celsius.
2. Parboil the carrots for about 5 min, not till it gets soft! At the same time, drop in the mandarin oranges, whole, to make it easier for the juices to release later.
3. Meanwhile, wash the poussin, pat dry and season the inside and outside of the poussin with the soy sauce, five spice powder. Rub the sesame oil and butter over the skin.
4. Poke one of the mandarin orange all over then stuff it with a sprig of thyme into the cavity of the poussin.
5. Arrange the carrots in a single layer on a roasting tray , throw the remaining thyme around, and then place the poussin on top (try to prop the legs up by being strategic with the carrots hehe).
6. Cut the other mandarin orange in half and then squeeze the juices all over the bird and carrots. Sprinkle the tbsp of Chinese rice wine around.


7. Into the oven for about 45 min, till the juices run clear!


8. Let the poussin rest, tented with foil for at least 15 min before cutting into it. I served it halved with the roasting juices spooned over.


Yes, on mashed potato,very un-Chinese I know, but it just felt right against the roast poussin and sweet carrots. I think it would also work out very well if you drop the carrots and then section the chicken, serving it over a bed of noodles and steamed vegetables, with the gravy poured over, kind of like roast duck noodles.


This is the first time I've tasted poussin. You know how if you poke baby skin you get that feeling of slight amazement at the tenderness and smoothness? It's the same with poussin! Poussin has less developed flavour than chicken though, so the five-spice and soy sauce really helps to add a punch. The mandarin orange adds sweetness without the need for sugar or honey, giving the crispy skin a deeper golden hue and the carrots, a yummy sticky glaze. I love seeing so much yellow, orange and brown on a plate, I think they're a few of the most appetising colours to the eye(:

This is part of Weekend Herb Blogging #274 hosted by Winnie from Healthy Green Kitchen.

Saturday, February 5, 2011

Claypot Rice with Chinese Sausage and Shiitake Mushrooms


Tucked away in the back of my kitchen cupboard, is a claypot, left by the landlord/previous owner of this flat. But it's the first time I'm looking at it with devious eyes, because it's Chinese New Year and I've got lap cheong from my roommate's mum.

Cooking rice in a claypot means that the rice gets slowly simmered in low heat, absorbing the delicious porky flavours of the sausage and the savouriness of the dried shrimps and mushrooms. The best part about claypot rice is the caramelised crust at the bottom, much like the Spanish paella. The crust gives the rice a hint of smokiness (of course, in the past, when this was done over a charcoal stove, I'm guessing that smoky flavour would be much more divine), and texture.

the prized crust

This is a Chinese cured sausage, called lap cheong, and is kind of like a sweet version of Italian salami or Spanish Chorizo. Its combination of sweet and saltiness adds a lot of dimension to the rest of the dish.

fyi, in that jar of unknown squidgy things, are marinated shiitake mushrooms.

Claypot Rice with Chinese Sausage and Shiitake Mushrooms
serves 4
Ingredients
2 cups of long grain brown rice, soaked overnight or longer (I ran out, so I had to use short grain, hence the stickier rice in the photos ): )
1 link of Chinese sausage, chopped diagonally into long coins.
6 dried shiitake mushrooms
1 handful of dried shrimps
2 stalks of spring onions, chopped
3 cloves garlic, minced
1 cm piece of ginger, chopped finely
1 tsp olive oil + 1/2 tsp sesame oil

Marinade
2 tbsp good (naturally fermented/aged) light soy sauce
1 tbsp good oyster sauce (i.e. made of real oysters, not oyster flavouring, and without MSG)
1/2 tbsp Chinese rice wine (shaoxing/huadiao)
1 tsp sesame oil

To serve
dark thick soy sauce and sesame oil (to taste and very optional)

Method
1. The night before, soak your brown rice and shiitake mushrooms. 30 min later, slice the mushrooms and add the marinade ingredients to the mushroom-soaking water and let the mushrooms continue soaking up the flavourful liquid (that's a trick from my mum. usually recipes call for the chicken or whatever meat is being used to be marinated, but forget about these equally meaty and juicy mushrooms).
2. The next day, put the dried shrimps and some warm water into the claypot, for about 30 min.
3. Drain the rice and add the rice into the claypot. Drain the mushrooms too, but do not pour off the mushroom liquid! Add the liquid into the claypot.
4. Add enough water to just cover the rice by 1 cm. Now your rice is ready to cook in the shiitake and shrimp-infused stock! Place the claypot over medium heat on the stove, lid on, and allow it to slowly heat up. Watch it! Once it comes to the boil, reduce it to a simmer for 15 min.
5. Meanwhile, add the olive oil and sesame oil to a hot pan, and add in the chopped garlic, ginger and white parts of the spring onions. Saute till fragrant, then add the Chinese sausage, and saute till you see it ooze out some of its own fragrant oils. Add the drained mushrooms and cook for 3 min more.
6. 15 minutes should have passed. Open the lid, you should see the rice having holes on the surface. Spread the sausage and mushroom mixture over the top of the rice, close the lid, and let everything infuse and cook for 15 min more.
7. That's it, serve straight from the claypot, with the chopped green parts of the spring onions scattered over! (note be careful don't set the pot over a cold surface immediately, or it will crack)


To eat, dig your spoon in, mix it all up, and drizzle over as much of the dark soy-and-sesame-oil mixture as you want (that's how they do it in the claypot rice shops in Singapore. It's totally to taste, and I found I didn't have to add any because the rice was already so flavourful, but it's up to you!)


This is such a wonderful one-pot meal (though I will still have it with some vegetables at the side because I cannot do without eating something green, spring onions not enough). And of course, it's so convenient plus the claypot keeps the whole dish warm for a long time after serving. The flavour-infused fat from the Chinese sausage plus the shrimps and shiitake adds so much umami, and there's a wonderful contrast of savoury and sweet flavours, and fluffy and crunchy and springy (from the shiitake mushrooms!) textures.

Thank you landlord.

My Chap Chye (Nonya-style Mixed Vegetable Stew)


I love Peranakan food, it's that combination of fragrant spices influenced by a Malay background and the use of very Chinese ingredients and techniques that give rise to dishes that you really don't find anywhere except in Singapore and Malaysia. Not many people even know about this wonderful cuisine, so that makes it all the more unique. I need to do more recipes from home. My (chinese) new year's resolution maybe!

Anyway here goes for a Nonya Chap Chye (mixed vegetables stew), which is quite common for Chinese New Year, Most of the vegetables are actually dried, so I have them stored in my pantry, (brought over from home), and I can cook this anytime I want. There are so many variations of Nonya Chap Chyes out there, some with ginkgo nuts and black moss ('fat choy' which sounds like 'fa cai' which means to strike it rich, hence very popular for Chinese New Year). Some add oyster sauce/sugar but I don't see the need to. I like that natural sweetness of the cabbage, brought out by the extra sweetness and savouriness of the fermented beancurd and dried shrimps. This is my chap chye, the way I like it/do it ;)

My Nonya Chap Chye
serves 3-4
Ingredients
1 head round cabbage (not Napa), cut into large pieces
1 small handful of dried black fungus (aka wood ear mushrooms), soaked to rehydrate
1-2 long sticks of dried beancurd, soaked to rehydrate, then cut
4-6 dried shiitake mushrooms, soaked to rehydrate, then halved *save liquid
1 small handful of dried lily bulbs, cut off the hard tips, soaked to rehydrate *save liquid
2 tbsps dried shrimps, soaked to rehydrate *save liquid
1 bundle glass (mung bean) noodles, soaked till it becomes soft
1 tbsp fermented beancurd paste (aka taucheo)
4 cloves garlic, minced
1 small onion, minced
1 tbsp olive oil
dash of white pepper

Method
1. Prep ingredients about half an hour before by by soaking the 2nd to 7th ingredient in warm water for about 20 min. Meanwhile, chop up the fresh vegetables.
2. Over medium high heat, fry the garlic and onions till fragrant, then add the taucheo, fry 1 more min, then add the cabbage and stirfry till it's softening.
3. Add the rest of the ingredients, along with the *soaking water, plus enough water to cover. Cover, bring to a boil and then lower the heat and let it simmer for 15 min.
4. When the vegetables are all cooked, add the glass noodles, and let everything cook for 5 min more, uncovered, so the liquid reduces and concentrates in flavour. Not more than that,because these noodles will greedily absorb everything up then you'll be left with no sauce/stew.
5. Check seasoning, adding the white pepper to taste. Yum yum served now, or as leftovers the next day.

The dish looks like a grandma's patchwork quilt, but of vegetables! And indeed, it's those kind of traditional homecooking that brings warmth and a smile to your face (:

This is part of Muhibbah Monday.

Thursday, February 3, 2011

Sourdough Dumplings (饺子) and Gyoza/ Potstickers (锅贴)


Dumplings (aka Gyoza, when they spread to Japan) signify family reunion and their original round wrappers also look like coins (I know right, half the things we eat look like coins but, well, there you go) so they're traditionally eaten on Chinese New Year. I don't have my family here in London with me now, but it's fun making dumplings anyway! These were actually done a month ago though, when I was too free.

The basic dumpling dough is 2 cups of all-purpose flour and 1/2 cup of hot (that's what gives dumpling skins their elasticity) water. I made mine using my sourdough pasta dough, so texture-wise it's not exactly springy and also, I rolled out the dough too thick i.e. these are not fantastic dumplings. But they were so much fun anyway, and that tanginess and extra umami-ness of the dough made up for it! You can add any fillings you want, it's traditionally pork (plus shrimps. that would be nice), or even make it vegetarian with shitake mushrooms, but I was using up leftover chicken.

Sourdough Dumplings (饺子)
makes 20 (it's a great opportunity to pull your whole family in and make like 200 instead and freeze.)
20 round wrappers (I cut the flattened sourdough pasta dough into circles of about 7cm in diameter)
200g minced chicken
2 stalks of spring onion, sliced thinly
3 cloves garlic, minced
1 tbsp of grated ginger
1 tbsp soy sauce
1 tsp Chinese rice wine (shaoxing/huadiao)
1/2 tsp sesame oil

Method
1. Mix all the ingredients except the wrappers together and leave to marinade in the fridge for as long as you can, preferably overnight.
2. The next day, make your wrappers by rolling out the dough as thinly as possible and then cutting out circles (I used a glass).

3. Place about 2 teaspoons of the filling (don't be too greedy, but don't be too stingy either-- it's Chinese New Year!) in the centre of the circle.

4. Fold over to make a semi-circle, and press the edges to seal, with a bit of water or eggwash if needed.
5. (opt) To make it look pretty, you crimp the edges using a pinch-and-tuck technique. (watch from 2:20)

which I failed at.

but ah, that's why we have forks!

6. Done! I know they still don't look totally gyoza-like.. Anyway you can refrigerate or freeze them now for later use.


OR make

Sourdough Dumpling Soup
In a pot of boiling water, lower the dumplings in carefully and let them cook gently in simmering water for about 10 minutes till they float. Add to homemade chicken stock with a dash of soy sauce to taste, and garnish with chopped spring onions.

OR make
Sourdough Gyoza/Potstickers (锅贴)
Potstickers get their name because of their very special cooking technique.
Over medium-high heat, in a lightly-oiled pan, place the dumplings flat side down in a single layer, and let it fry until the bottom browns and sticks a little to the pan. Then add 1/4 cup of water or so and cover the pan, to unstick the bottoms and steam the top of the dumplings for about 3 min more, then uncover the pan and let the water evaporate (fully! else they won't be crispy).
A cheat method that I used is to steam (or boil) the dumplings for about 10 min first till they are fully cooked. Then place the cooked dumplings flat side down in one layer in a lightly-oiled pan, and fry over medium-high heat to get the bottom crispy and brown ;)
Traditionally served with a very simple dipping sauce made with Chinese black vinegar and shredded fresh ginger, that's all you really need!

I know these dumplings are not traditional and they probably taste not at all like the one you get in dim sum restaurants. But it's not a bad difference at all! They're denser, with a tangy depth to it, and combined with the savoury filling and the sharp vinegar and ginger to cut through that heaviness, are.. ho liao (means good stuff, in Hokkien)!

This is an entry for Presto Pasta Night hosted by Ruth of Once upon a Feast.

Wednesday, February 2, 2011

Stir-fried Leeks with Beef and Beancurd


It's Chinese New Year! Back home, my family's probably having a feast with lots of abalone and sea cucumber and roast duck ): The Chinese New Year fare is not only about the expensive or rare ingredients though, often it's the simple vegetables that shine. I love leeks, and as my mum happily informed me, that's going to bring me lots of wealth. Leeks are 蒜苗/大蒜 ('suan'), which sounds like “算”i.e. count, so the Chinese believe it means you will have lots of money to count. You could do it minus the beancurd too, or with extra vegetables like carrots, but the golden beancurd represents happiness (white tofu not recommended..white=death?) I can't promise you'll suddenly get a windfall with this, but no harm having some lucky food in you right? ;)

Stir-fried Leeks with Beef and Beancurd
serves 2-3
200g beef rump (it's a cheap cut but check out the Chinese stir-fry tips I learnt on how to make cheap meats tender even if you aren't slow-cooking it!)
1 medium leek, sliced into about 5cm long pieces
100g firm beancurd, chopped into medium pieces
1 red chilli, sliced thinly
2cm ginger, sliced thinly
3 cloves garlic, minced
1 tbsp of olive oil+2 tbsp of coconut oil/palm oil

For marinade and velveting
1/2 tbsp cornstarch
1/2 tbsp Chinese rice wine
1/4 tsp baking soda
1 tsp good (naturally aged) soy sauce
pinch of five-spice powder
few drop sesame oil

For sauce
4 tbsp of homemade stock
1 tbsp good (naturally aged) soy sauce
1 tsp of Chinese rice wine (shaoxing/huadiao)
1 tsp Chinese black vinegar
1/2 tsp of sesame oil
pinch of sugar
1tsp of cornstarch mixed with 1 tsp water (to thicken)

Method
1. Slice the beef thinly against the grain. Mix well with the marinade and then leave it aside for 30 min.
2. Meanwhile, you can prep your ingredients, wash the dirt off the leeks and chop everything up. Also, mix the sauce ingredients except the cornstarch and water so later you can have a relaxing stir fry.
3. Over med-high heat, add half the oil and fry the firm beancurd for about 5 min till light brown and set aside.
4. 30 min should have passed. Over high heat, add the rest of the oil and flash-fry the beef for 1 min, then remove from the pan (sorry no wok) and let drain and set aside.
5. Add the ginger and garlic to the hot oil, fry till fragrant. Add the leeks and chilli and cook till the leeks soften.
6. Add the sauce, which should help deglaze the pan. Let it come to the boil, then reduce the heat.
7. Stir in the cornstarch slurry a little at a time till you get the consistency you want. Note: it will thicken after it cools, so don't go pouring everything at a go!
8. Add the beef and beancurd (finally all the ingredients are happily together!) and stirfry for 2 min or so, making sure everything's coated.
9. Serve over a steaming bowl of rice (:

The beef, prepared this way, is really tender, oozing with juices and flavour-- no need for expensive sirloin steak cuts. Yay for frugal ingredients (:

The Secrets to a Chinese Stir-fry

Whenever people think of Chinese food, they naturally think of stir-fries. It's like the equivalent of Chinese cooking, but I think there's so much more to Chinese food. A lot of effort goes into the food, all the careful steaming to get everything done to perfection, the braising, the slow-cooking for tender and flavoursome food. It's not all quick, easy stir-fries. Chinese restaurants in Singapore (and in China I assume) are so so different from the Chinese restaurants here which serve up MSG-laden sticky and oily deep-fried food.

That said, a good Chinese stir-fry is not that easy. Even with the exact same ingredients and recipe my stir-fry can never match up to that of my favourite tze-char stalls in Singapore. I love cooking and finding out about food, to the extent of a nerd actually. So here are the compilation of tips from surfing a lot of forums, watching a lot of Youtube and master chefs, and Saturday Kitchen on BBC iplayer.

1. High heat!
Sauteeing slowly over low-heat doesn't sear the meat and vegetables the same way, and everything needs to be done fast, which brings me to the next point

2. Fast!
It's not always the more the better, in this case, more time is not better. It always amazes me how much time goes into the prepping of the ingredients but the actual stirfry is over in a matter of minutes.

3. A wok
The heat distribution of a wok is quite different form that of a frying pan. It's where you get that wok hei, that smoky depth to the food at tze char stalls or restaurants. Also, because it curves in at the base, you can "deep-fry" garlic, shallots and ginger without having to use much oil. I don't have this ): I will always be inadequate. Boo.


With meat, I've always wondered how Chinese chefs get the meat so tender and juicy despite the fast cooking on high heat. So anyway, Ken Hom revealed the secret to this on the recent episode of Saturday Kitchen:

4. Velveting
You coat the chicken or whatever meat pieces in egg white, cornflour and some rice wine, before cooking in warm (forums say hot. but the Ken Hom says warm..) water or oil, take it out before it's cooked, because it'll continue cooking on slowly, and that add it back to the dish at the end for a final heatshock. I was so fascinated I trawled the forums and found out some people use baking soda instead too.
So, it goes like this
For about 500g of meat, let it marinade for 20-30 min in:
1/2 tsp baking soda OR 1 eggwhite
1 tbsp cornstarch
1 tbsp Chinese rice wine (shaoxing/huadiao)
1/2 tbsp or so of oil (I'll use sesame oil)
any other flavouring agents like soysauce etc.
2 tbsp of water/stock (for beef esp, apparently because beef will absorb more water when cut)
I like the idea of parboiling in water, so you get a lighter dish than using oil to parcook. I've tried chicken cooked this way before I almost thought it wasn't cooked because it was so tender! But I'm not sure if it'll work with beef?
Future project: Experiment with all the techniques (baking soda/eggwhite, water/oil, warm/hot), using different meats, then do an update someday ;)

5. Slicing
For meats like beef, slice against the grain, and slice thinly.
Tip: Partially freeze it so the meat stiffens up and you can go real thin diagonally easily.

Ah I know I'm weird, but I really enjoy doing research like this.

Saturday, January 22, 2011

Steamed Herbal Chicken Parcels 纸包鸡


I love Chinese herbal chicken soup, like a simple Ginseng Chicken soup, or the more complicated ones that I rely on my mum for ;) This is a variation of herbal chicken soup-- the chicken thigh is marinated and then steamed with the sweet Chinese herbs, giving tender meat and juices infused with that wonderful herbal smell (that some people hate but I totally love). This recipe is adapted fromNoobcook's foil-wrapped herbal chicken.

Steamed Herbal Chicken Parcels 纸包鸡
serves 1 (makes 1 parcel)
Ingredients
1 chicken thigh+drum
1 ginseng
3 red dates, pitted and halved
3 slices dang gui (chinese angelica root)
1 piece dang shen (condonopsis root)
1 tsp wolfberry
1 clove garlic, minced,

Marinade
1" grated ginger
1/2 tsp sesame oil
1 tsp light soy sauce
1 tbsp Chinese shaoxing rice wine (I used 花雕酒)
pinch of brown sugar (I used unrefined Rapadura)
pinch of white pepper

Method
1. Combine the chicken thigh with the marinade ingredients and leave overnight in the fridge, or at least 2h.
2. Place the chicken thigh on a sheet of parchment paper (I prefer this to aluminium foil, less.. toxic?) with the rest of the ingredients and pour the marinade over. Tie the parchment paper up so you get a cute little parcel.
3. Steam for about 35 min, then open the parcel and flip the chicken over for another 10 minutes. If you use chicken breast, just 20 min+10 min is enough!

I love unwrapping parcels, especially if my parcels contain food ;)

Ginseng Chicken Soup


In Chinese cooking and TCM, herbs are the superfoods. Chinese herbs are very different from Western herbs. Chinese herbs can be really rare, made from the weirdest of ingredients like for e.g. cordyceps are made from caterpillar fungus, and the flavour they impart is often pungent and medicinal. But they really are medicinal in nature, and when combined right, are very healing (yet easy on the palate, unlike horrible pink cough syrups).

My mum is always sending me herbs (they always come dried), often pre-packed in lovely ziplocked bags with all the herbs in the right quantities, so I only need to throw them in with some meat on bone into the slow cooker and I come home to find dinner ready (made with mummy's love haha). I'm trying to learn about herbs, but it's not easy, because there are so many. This is the most popular soup of all, and there's even a very similar Korean version of it called Samgyetang. Ginseng is very prized, it's considered a cure-all for most ailments, and even for the healthy, are rejuvenating.

Ginseng Chicken Soup
Ingredients
serves 2 (you can easily double the recipe with an entire chicken to make a herbal chicken bone broth)
2 chicken thighs and drums (bone-on!)
2 pieces of dried Korean ginseng, with their "beards"
5 red jujube dates, pitted
2 tbsp of wolfberries

In TCM, they usually measure ingredients by weight, but this soup isn't exactly a medicine, so pardon my lack of specific grams.

Method
1. Bring all ingredients to a boil and let simmer on a very low heat for 3h, or put into a slow-cooker on low, for 6h or more.


It's winter now (very yin) hence you should use Korean or Chinese ginseng, because they're much stronger and very warming (yang). In summer, substitute with American ginseng. So you can have this the whole year round(: This is a really simple and clean soup so it really showcases the ginseng flavour. There are many other more complicated Chinese herbal soups like Eight Treasures Soup 八珍 or 六味汤, but my mum packs them for me ;)

Wednesday, January 12, 2011

Chinese Black Bean Soup


More pregnancy/confinement food haha. Beans this time(: They're just fantastic in soups and stews because they help thicken the soup up, and they add body and fullness. Chinese soups are not just about taste, they're more like tasty tonics.

For instance, in this soup, the black bean (a.k.a. black turtle bean. how cute is that! NOT black-eyed peas.) is known to be a rich source of protein, fibre and antioxidants, and in TCM terms, it tonifies the kidney, strengthens the yin, and nourishes the blood. The red jujube dates are very common in Chinese soups, they not only sweeten the soup (not in the sugary way), but helps to harmonize the effect of all the other ingredients or herbs in the soup to nourish the blood, spleen and stomach. And since this soup (like many Chinese soups) make use of pork bones to give it that body and flavour, is an excellent bone broth, full of calcium and more.

Chinese Black Bean Soup
serves 2-3
Ingredients
200g pork with bones (my mum prefers pork ribs. I just use any meaty bones that my butcher gives for free)
2/3 cup black beans, soaked and rinsed
6 red jujube dates, pitted
3-4 dried scallops
2l water


Method
1. Blanch pork bones in boiling water (you'll see some disgusting scum floating in the water). Drain and discard the water.
2. Combine all ingredients and bring to a boil for 5 min, then simmer for at least 2h. Or transfer to a slowcooker like I did, on low for 6h, or on high for 3h.

UPDATE: I left it on high for 6h by accident, and ended up getting a super flavourful and thick soup, and the..white bones? tendon? (someone enlighten me what this part is) became soft enough you could slurp it out. Usually my slow cooking already results in them being soft enough to chew on, but this was like..
I like (:

Monday, January 10, 2011

Pork Trotters with Vinegar Stew (猪脚醋)


I was just speaking of TCM in my previous post, and pork trotters in the post before that, so, voila! I thought of this Chinese pork trotter stew. It's favoured by all Chinese mothers during the confinement period because it's incredibly nourishing, and soooo yummy. I love this so much I once famously said "I don't mind being pregnant just to eat all these (confinement) food." Hey, but, it's really a great stew for the winter, not just post-pregnancy. And there are hardly any ingredients, and even fewer steps.

Pork Trotters with Vinegar (猪脚醋)

Ingredients
2 pork trotters (ask the butcher to chop them up)
1 large (about 500g) ginger (old ginger preferably), smashed
5 tbsp sesame oil
1 bottle black vinegar (Koon Chun is a good brand. yes the entire bottle, or at least 3/4 the whole bottle)
3/4 cup brown sugar (I use unrefined Rapadura, use less if you choose to use a sweetened black vinegar)
some water
a few hard boiled eggs

Method
1. Boil the pork trotters vigorously for 15 min, and discard the water with all the scum. Rinse.
2. Fry the pork trotters with the ginger and sesame oil till fragrant.
3. Add the black vinegar, brown sugar, and enough water to cover the pork trotters.
4. Bring to a boil, then simmer for about 2 hours. (Or you can transfer to a slow cooker like I do, and then simmer on low for 4 hours. The best pot to use is the type that my mum uses-- big black clay pots, over a charcoal fire.)
5. Add the hard boiled eggs to the stew after the trotters are done.

You can eat immediately if you can't wait. But the stew is actually much better the next day. And much much better the day after. And the day after. The most amazing thing about this stew is that you don't have to refrigerate it, the ingredients used act as a form of preservative, I guess it works somewhat like a pickle? (and we know how healthy preserved/fermented foods are for our gut) Just bring it to the boil before eating. In fact, Chinese families will make a huge pot and eat throughout the week.

Here are the healing properties of the components according to TCM:
Black vinegar purifies blood and cleanses the arteries.
Old ginger gets rid of wind in the body, which invades the body especially after pregnancy.
Brown sugar gets rid of dampness in the body.
Sesame oil promotes blood circulation.
Pork trotters have plenty of collagen to strengthen the joints and ligaments, and the bones in them also provide calcium.
Eggs are seen as a complete source of nourishment.

The trotters are so melting soft, and the gravy/broth is sweet sour and savoury all at once, and thick and gelatinous. It makes you lick your sticky lips with satisfaction after that, and your tummy will feel nice and warm and happy. Proof of a powerful broth: look at how it gels after it has cooled!

This is an entry for Muhibbah Monday, and The Best Thing I Ever Ate hosted by more than burnt toast, because it simply is!