I've been so involved in paper crafting for the last 6 months that I haven't made any jewelry. Last night I woke up around 2am and couldn't get back to sleep. As I lay there my mind tends to wander, going over every thing I need to do, things I want to do, and when I will do them...this project just popped into my head. I remembered that silver disc I bought thinking I had great plans for, but really it just sat in my bead box waiting to be used. Most of the beads were from my mom's collection that she gave me. It came out just as imagined it would!
I've been away for a while, vacationing in San Francisco. I will have a serious amount of photos I will posting as soon as I collect them from all parties. So stay tuned for that business.
In the meantime I came across a tutorial for making pretty paper flowers. There are several different styles out there and I've tried them all. I never saw this one before and I like it because the flowers
still have dimension but are flat so you can attach them to a card to send in the mail, or they would
be great for scrap booking. I made mine into cute magnets for the fridge. They are super easy,
Ok my people of the blogosphere, I have been working so hard on this room last week to surprise Nathan when he came home...the verdict?.....he liked it. Obviously he wouldn't say he didn't after how hard I worked on it. I freaking LOVE it though. I worked long days deep in dust and paint up to my elbows, and with a few minor cuts and bruises from trying desperately to move our furniture out of the way, it has paid off. Have you guys any idea how freakin' heavy the memory foam mattress are? Seriously over 100lbs. I think.
So here's what some of you have been waiting for...the reveal.
I wanted to lighten up the room and give it some life. Originally it was all brown. Brown carpet, brown walls, brown curtains, and brown furniture. YUCK! We've given several rooms a face lift since we bought this house, but for some reason our master just wasn't at the top. I tend to paint when Nathan leaves for a week...this way I can do whatever I envision without complaints. Sorry honey if you're reading this....if the husband is away, the Kat will play!
It's really hard to tell in these crappy phone photos what the color is. It is Behr brand, which I love, called "Light French Grey". It has a hint of blue to it that I really like. I also chose to use some pops of yellow as a contrast to the blue and brown. Yellow is one of my favorite colors, it just makes me happy.
All decorators/diy people know that vinyl decals are a huge trend right now. I really like how they look, however I'm not willing to pay for them. So my secret you ask? I steal borrow and image of a decal online, print it out, then I have this amazing vintage wall projector that a wonderful friend has let me borrow to project the image on the wall. Then....I paint! Sounds like a process and it kind of is, but there is something so therapeutic about painting while listening to music and watching the rain outside It just makes my soul feel good.
White is a hard color to use because it requires several coats, but I chose it because I didn't want the graphic to be too bold on the wall, and besides...our linens and moulding are already white.
I did the same thing with the trees on this wall...I love that projector. I'm not quite done though, I plan on painting a little yellow birdie on that branch above the TV to bring the yellow to the other side of the room.
I picked up some accessories from a couple different places for decor.
- Branch Hooks - Urban Outfitters ( I made most of those necklaces )
- White Birdie and yellow pot - Michaels for super cheap
- The bucket thing is actually a glass vase that I had laying around, I covered it in twine with some super glue, and now it holds my headbands.
I picked up this little shelf from Michaels and painted it white. The blocks are also from Michaels.
I hated these curtains so much I couldn't wait to get them down. Originally I had planned to just get rid of the box valance altogether and make regular curtains, however the chick at Joann's cut the fabric wrong so I came home with the wrong amount. It worked out good, because I really like how they came out.
Basically all I really did was cut the fabric to length and use my hot glue gun (my favorite weapon of choice) and glue it over the old fabric. So easy you guys! I also bought a little ribbon for the bottom to tie in the brown to the furniture. What I love most about this ribbon is that it looks like stitching, but is again...attached by glue.
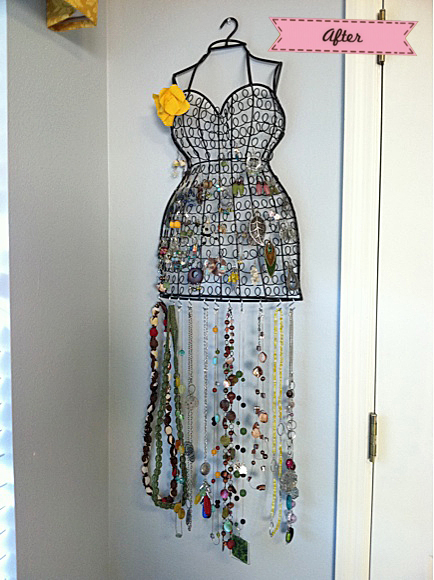
This jewelry holder didn't change too much. I have a ton of jewelry, its another one of my many hobbies, I love making things that I can wear. I found this wire form at Ross for like $14 and its about two feet in length. It is perfect for my earrings, but I still didn't have a place for my necklaces. It popped into my head one day that I could get s hooks and hang them from the bottom, like a skirt! I love functional art.
I needed an accent pillow on the bed to match the new decor, so I took the scraps from the curtains and made over an old pillow that I already had. This took me seriously like 20 minutes. I want to makeover all the pillows in my living room now. haha. Pillow making party anyone? I'll buy the wine!
What you don't know about this pillow is that I did not use a sewing machine like most people do. You guessed it...I used my trusty friend the glue gun. Its super sturdy guys, this thing ain't coming apart! I also added some rosettes I made a while back that were supposed to become a necklace.
Ok so for the lampshade, I bought this plain one from Target for like $6. I dug through the $1 scrap bins at Jo Ann's and somehow got lucky and found the perfect color yellow I was looking for.
Once again I used my hot glue gun to glue the fabric on. I added the same ribbon from the curtains as an embellishment to tie the two in together. Voila!
If you've made it this far into my post, I want to congratulate you for your dedication, haha. It's probably the longest one I've ever posted.
If pictures weren't enough for you here's a short video I made and edited with my phone. If you're looking for an app that is super easy to use it's called "Splice" I didn't do any fancy effects on this, just wanted something to put up here.
Are you into crafts? DIY stuff? I'd love to see your work!
Here are a couple random photos uploaded with my phone, you can tell because the quality totally blows.
Cuddles with my best friend. Apparently her best friend is her stuffed flea.
Pissed.
This is the most AMAZING jewelry holder thing I've ever found. It was at ROSS for $14!
It's about 3ft tall and can hold a butt-load of earrings. Most that you see are earrings that I've made myself. I hung the figure right above my dresser so now its a functional piece of art!
A close up. I dressed her up with a belt, and fringe on her dress with my earrings. Oh and my hair clip flower for her broach, she's so hot.
In between all my graphic design projects, I always find time to keep my hands busy. Yesterday I decided to try some wire-wrapping around beads, so I made a couple of those, and was surprised at how cute they actually came out. They are wrapped around resin beads that my mom gave me, they look like tasty little gumdrops.
Omg, then I got this CrAzY idea, that since it was cooler yesterday morning...I got into the "Fall" season that is coming up..I thought I would make acorn earrings! So I took the bella monster outside to dig for old acorns by our big oak. We have 3 huuuuge live oak trees in our yard..we got lucky...but anyway, we dug around for acorns for a while and found a bunch. I drilled holes in the tops and voila! Acorn earrings! The perfect fall accessory. I plan on making a bunch of these to sell in my etsy shop.
The last picture is Bella monster's new necklace. I've been making them for me, and she suggested that I make her one too. It's just made out of felt. Dorky I know...but at least I don't dress her up. (Don't be offended if you're one of those people, I'm just not into it)
What do you think about the acorns? I hope you all have a fabulous weekend! -Kat
Here's the third style I have designed. These little rosettes are so much fun to make. Materials I used are: fabric scraps, felt, metal findings, and hot glue gun! That's it!
Now that I have three different styles down, I think I will start making some sets for Etsy to see how they do, I've been getting a lot of positive feedback from people. It might be a cute gift for Christmas too! Click twice to zoom in all the way.
I tried out a different approach on the fabric train I've been riding lately. This one was made from some scraps of fabric in my bin. I cut various sizes of circles, and then glued them onto some felt & added some embellishments & chain. Click To Zoom & Enjoy!
Etsy has been my inspiration for many projects, and this one I'm sharing today is no exception. I've done different styles of jewelry making, and got the bug to work with some lovely fabric scraps. The first image is my inspiration. The second is my version.
Awesome Right! I just love how this came out and I can't wait to make more. They are indeed time consuming so don't even think about asking for one unless you show me the money! Haha They would make great Christmas gifts perhaps?
Want to try it out for yourself? Here's a tutorial I found to make mine: http://createanddelegate.blogspot.com/2010/04/tutorial-shabby-fabric-roses.html
Her blog is great if you're a crafty nut like me. Very inspiring!
So the magnetic inspiration board wasn't working. I couldn't find magnets strong enough and just decided to try something new. I painted my old cork board & Shelf, giving me more room & a place to keep my jewelry that I wear, and the jewelry that I'm selling.
I have been seeing these banner flag things everywhere lately. It first started with this scrapbook paper I saw (on the inspiration board above), then I saw creations on Etsy, and on Web Ad's...they are everywhere! I thought they were really cute so I made my own with scrapbook paper and some brown ribbon.
The next image is about change. My life is always about change...in lifestyle, clothes, cities, houses, food, opportunities...I love change. I am constantly changing and re-inventing myself and wanted to share a comparison of change in just one year! Wow, when I saw them side by side my first thought was "Holy Crap my hair is long!" I never thought I would have long hair again, but I am really diggin' it. I probably won't go any longer than this, its fun for now. Who knows what I'll look like next year!
I have been working on my new Office/Craft/Art room for a while now. I wish I had a before picture to go along with the after but I don't. It was so ugly before. The walls were a darker blue color, very horrible. It was used as a second guest room...basically a room we never used unless we had company. (We have two guest rooms). I recently started working from home, & needed a "creative" environment to work in, alas the remodel came about. I painted the walls a light yellow, sanded some old bookshelves, and painted them white. The room is so bright and happy now! Since then it has been a continuous diy project. I found an old mirror taken from the trash at our old apt building & created a new frame for it out of fabric. Who knew it could look this good! I also needed an inspiration wall and had these old wire shelf things that I turned into my new "magnetic" inspiration board. Being a designer, I am in love with typography. I got these great letters from Joann's and spiced them up with scrapbook paper and modgepodge. There's more to do, but it takes time and money...I'll post new pics as I progress. If you see something that I need or should do in my room, I'm open to suggestions! (click to enlarge)
I've been very busy re-doing one of our guest rooms, turning it into an art/office creative space. I've been painting, painting and more painting. I finally moved my desk in and realized I need a place for my pens and pencils and such. I made this simple cup from a soup can, and some scrapbook paper. Turned out cute!
I saw a sweet tutorial online about how to wrap beads in fabric for necklaces, so I thought I might give it a go. I bought a few patterns 1/4 yard, and all I used was...cloth, scissors, cheap wood beads, needle and thread! My sewing machine decided to commit suicide so it is out of order for the time being. It took much longer, but I had to hand-sew the tube before filling it with beads. Click on the photo for a larger view.
Oh, and I have also included my other newest necklace creations....wire bending.
Here are a few sets of jewelry I've made. I love to wear it, why not make my own! I really got into it one day when my mom and I were having a beading session. I've been trying to grow my collection, maybe some day i'll put them on etsy.
Inspired by my mom's paper flowers she and her friend Bonnie made for my wedding, I wanted to give it a go. I found a great tutorial online to make paper roses, a different style than she made, but both are beautiful. I made three of them and turned the big one into a barrette for my hair, and the others I turned into magnets to decorate my fridge! I love making them and plan to make really large ones to put in shadow boxes and hang on the wall eventually.