Ok my people of the blogosphere, I have been working so hard on this room last week to surprise Nathan when he came home...the verdict?.....he liked it. Obviously he wouldn't say he didn't after how hard I worked on it. I freaking LOVE it though. I worked long days deep in dust and paint up to my elbows, and with a few minor cuts and bruises from trying desperately to move our furniture out of the way, it has paid off. Have you guys any idea how freakin' heavy the memory foam mattress are? Seriously over 100lbs. I think.
So here's what some of you have been waiting for...the reveal.


I wanted to lighten up the room and give it some life. Originally it was all brown. Brown carpet, brown walls, brown curtains, and brown furniture. YUCK! We've given several rooms a face lift since we bought this house, but for some reason our master just wasn't at the top. I tend to paint when Nathan leaves for a week...this way I can do whatever I envision without complaints. Sorry honey if you're reading this....if the husband is away, the Kat will play!
It's really hard to tell in these crappy phone photos what the color is. It is Behr brand, which I love, called "Light French Grey". It has a hint of blue to it that I really like. I also chose to use some pops of yellow as a contrast to the blue and brown. Yellow is one of my favorite colors, it just makes me happy.

All decorators/diy people know that vinyl decals are a huge trend right now. I really like how they look, however I'm not willing to pay for them. So my secret you ask? I steal borrow and image of a decal online, print it out, then I have this amazing vintage wall projector that a wonderful friend has let me borrow to project the image on the wall. Then....I paint! Sounds like a process and it kind of is, but there is something so therapeutic about painting while listening to music and watching the rain outside It just makes my soul feel good.
White is a hard color to use because it requires several coats, but I chose it because I didn't want the graphic to be too bold on the wall, and besides...our linens and moulding are already white.


I did the same thing with the trees on this wall...I love that projector. I'm not quite done though, I plan on painting a little yellow birdie on that branch above the TV to bring the yellow to the other side of the room.


I picked up some accessories from a couple different places for decor.
- Branch Hooks - Urban Outfitters ( I made most of those necklaces )
- White Birdie and yellow pot - Michaels for super cheap
- The bucket thing is actually a glass vase that I had laying around, I covered it in twine with some super glue, and now it holds my headbands.


I picked up this little shelf from Michaels and painted it white. The blocks are also from Michaels.

I hated these curtains so much I couldn't wait to get them down. Originally I had planned to just get rid of the box valance altogether and make regular curtains, however the chick at Joann's cut the fabric wrong so I came home with the wrong amount. It worked out good, because I really like how they came out.

Basically all I really did was cut the fabric to length and use my hot glue gun (my favorite weapon of choice) and glue it over the old fabric. So easy you guys! I also bought a little ribbon for the bottom to tie in the brown to the furniture. What I love most about this ribbon is that it looks like stitching, but is again...attached by glue.

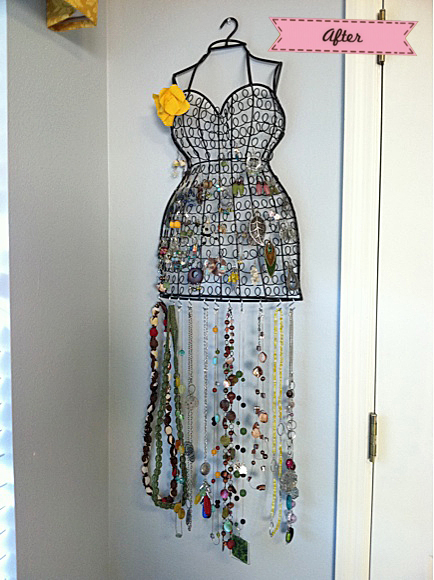

This jewelry holder didn't change too much. I have a ton of jewelry, its another one of my many hobbies, I love making things that I can wear. I found this wire form at Ross for like $14 and its about two feet in length. It is perfect for my earrings, but I still didn't have a place for my necklaces. It popped into my head one day that I could get s hooks and hang them from the bottom, like a skirt! I love functional art.

I needed an accent pillow on the bed to match the new decor, so I took the scraps from the curtains and made over an old pillow that I already had. This took me seriously like 20 minutes. I want to makeover all the pillows in my living room now. haha. Pillow making party anyone? I'll buy the wine!
What you don't know about this pillow is that I did not use a sewing machine like most people do. You guessed it...I used my trusty friend the glue gun. Its super sturdy guys, this thing ain't coming apart! I also added some rosettes I made a while back that were supposed to become a necklace.


Ok so for the lampshade, I bought this plain one from Target for like $6. I dug through the $1 scrap bins at Jo Ann's and somehow got lucky and found the perfect color yellow I was looking for.

Once again I used my hot glue gun to glue the fabric on. I added the same ribbon from the curtains as an embellishment to tie the two in together. Voila!

If you've made it this far into my post, I want to congratulate you for your dedication, haha. It's probably the longest one I've ever posted.
If pictures weren't enough for you here's a short video I made and edited with my phone. If you're looking for an app that is super easy to use it's called "Splice" I didn't do any fancy effects on this, just wanted something to put up here.
Are you into crafts? DIY stuff? I'd love to see your work!


No comments:
Post a Comment