Showing posts with label seasonal. Show all posts

Tuesday, October 19, 2010

Omg the kitchen smells AMAZING


Ok so maybe I'm like, three weeks late but Laura you can make these into muffins! Make pumpkin muffins! You did just make a turkey so maybe it fits into the whole post-Thanksgiving meal mood.

Anyway, we've finally run out of turkey leftovers (seriously we ate it for lunch AND dinner for an entire week) but lo and behold, I look in the cupboard yesterday and see a can of pumpkin from last year when I stocked up panicked about the pumpkin shortage! Luckily I had been wanting to try a pumpkin loaf recipe for awhile (I'm so addicted to the Starbucks one...mmm). I used one from Epicurious and added a few things...some orange zest and juice, and pumpkin seeds since they taste good and look pretty too.

Seriously, I forgot just HOW good baked pumpkin smells. I was literally drooling as it baked in the oven. So good that I was concerned that it couldn't possibly taste as good as it smelled. I hate it when an recipe underwhelms. Fortunately, that didn't happen this time. It was SO good, and eating it just made me want more. And I think it's one of those things that's going to taste better with time, so I can't wait to try it tomorrow.


Pumpkin Spice Loaf

adapted from Epicurious

1 cup white sugar
1 cup dark brown sugar, packed
1 orange, zested and juiced
1/2 cup vegetable oil (or enough to make 1 cup liquid with the juiced orange)
3 large eggs
16 oz pure pumpkin (this is a small can, or half-ish a large can)
2 cups all purpose flour
1 cup whole wheat flour
4 tsp pumpkin pie spice, or 1 tsp each cinnamon, cloves, nutmeg, ginger
1 tsp baking soda
1/2 tsp salt
1/2 tsp baking powder
1 cup lightly toasted pepitas (raw pumpkin seeds)

Preheat oven to 350°F, 190 degrees Celsius

1. Butter two loaf pans. Beat sugar, orange zest, orange juice and oil in a large bowl to blend.

2. Mix in eggs and pumpkin. Add salt, spices, baking soda and baking powder. Stir flour into pumpkin mixture slowly (try not to get flour all over yourself - I always do). Add in most of the toasted pumpkin seeds, leave about 2 tbsp worth for garnish.

3. Divide batter equally between the two pans. Sprinkle remaining pumpkin seeds over the loaves. Bake until tester inserted into center comes out clean, about 1 hour 10 minutes. Transfer to racks and cool 10 minutes. Using a sharp knife, cut around edge of loaves. Turn loaves out onto racks and cool completely.

Friday, September 10, 2010

Seasonal Change

Hi everyone, I thought I would take a break from Gracie and show you some small changes I made for fall. Fall is a great time of year, you can sit out without being burned up or frozen. Depending on where you live you can feel a pleasant nip in the air at night. Fall colors are not usually in my palette, but I make small changes for the season. I find its cheaper to make small changes, and it does have more of an impact than you might think. First change dining room, all I did was get a black urn I already had (I know its not white, I don't paint everything white), rolled up some paper (in this case a clearance calender from Anthropologie I bought years ago, because the pages had an old parchment quality), threw in some pheasant feathers (I did have to buy them, but they weren't much), and a vintage paint brush I had around the house. Wa La... a cheap and cheerful center piece.


Here is a no money change, some lavender (ok I know everyone has potpourri, or can get some cheap, I had this in a baggy doing nothing), Pour it in these apothecary jar I had (try a glass bowl, or silver platter), and added some watch faces. Quick and easy....
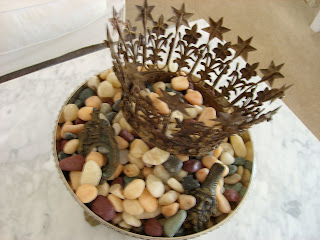
My favorite crown in some river rocks (I usually use the rocks to put around orchids), some old hardware I picked up a long time ago, in a silver bowl I had in the china cabinet. Fall for no money......

This one is another freebie and only took 2 minutes, I took this piece (my favorite) off a bookcase shelf and put it on the coffee table.
Some more pics of this wonderful piece...

Look around, you may have a piece if you look at it a little different may make the perfect seasonal change. After all why should the big designer stores get your money, you use whatever you buy from them for a month, maybe two, then toss it or have to find a place to store it. I hope this inspired some of you. Now back to Gracie, I hear her now........COMING GRACIE (she sure is a taskmaster!!!)
(No I don't hear voices, just kidding LOL!!!)
See everyone next time.......

Thursday, August 26, 2010

A reminder

Alright so I should of posted this in June but, seriously folks, these are what we call Ontario strawberries.

Sunday, August 22, 2010

Beeb's Brambly Apple Blackberry Crumble

Laura: an epic introduction Part 1.

Hello! I am a messy cook. Jessica (over there, delicately forming sugar cages and perfectly laced peach pies) is worthy of Martha Stewart magazine but alas, I must fully embrace the rustic family-style cooking trend. And yes, during the day I am paid to make things pretty while Jessica is paid for math so I don't know how this happened.

It's not that I don't love a good complex recipe (oh I do! the most!) it's just that after simmering that sauce for four hours I want it in my mouth – damn the presentaion, plate, knives, forks, etc.

Needless to say, the science of baking and I have a complex relationship (leveled cups of flour? ha!). I save 'baking' for a weekend of Julia or Deb role play.

So now then: "Brambley Apple & Blackberry Crumble: when you can't be arsed to make pie."

Pie has its place. I love pie. But there is something about just chucking a bunch of apples, blackberries & topping into a dish then, popping it into the oven for 30 minutes and come out with something so perfect and delicious. Amounts? Times? Ballparks! Simple! Perfect! Delicious! How the fuck did it do that?

Okay so you have to caramelize the apples so the gooey apple-caramel coasts the blackberries. And topping the buttery crumb with clotted cream (whipped, extra thick or creme fraiche will work as well) is required by law. But how else are you going to make the 'best crumble in England'*

To summarize: Pie is great but crumbles are your dirty secret.

*independently validated by a bunch of English people who have eaten more crumble in their lives than you can imagine.

Brambly Apple Blackberry Crumble
(heavily adapted from a BBC recipe, now offline – philistines!)
Filling
3 large Bramley apples (use what you can find, tart cooking apples are traditional)
30g/1¼oz butter
150g/5oz caster sugar (or 150g of granulated sugar)
pinch of cinnamon
A squeeze or two of lemon juice (to taste)
80g/3oz fresh blackberries (looks tiny but trust, there is enough)

Topping
100g/4oz unsalted butter, diced
220g/8oz plain flour
100g/4oz caster sugar
clotted cream

Method
1. Preheat oven to 200C/400F/Gas 6.
2. Peel, core and cut apples into ¼in thick slices (or so they are relatively thin and even)
3. Heat butter in large saucepan. Add apples and gently sauté.
4. Add sugar and cinnamon. Continue stirring until apples are just cooked and the goo is thick and ready to coat the blackberries.
5. Add blackberries & lemon juice and stir very gently until coated with delicious.
6. To make the topping, lightly rub butter into flour and sugar until crumbly.
7. Spoon apples and blackberries into shallow, oval 23cm/9in ovenproof
dish. Sprinkle crumble mixture over top until fruit is covered. I enjoy crumble. I am liberal on this step.
8. Place in oven until light golden brown (usually between 15-40 minutes depending on your oven)
9. Serve with clotted, whipped or heavy cream. Creme fraiche works as well if you like a sour tang... I just wouldn't recommend vanilla ice cream, the flavours clash.

Monday, August 16, 2010

Busy Bee

So it's been a pretty busy summer. Birthdays, weddings and a trip to Chicago has booked up practically every weekend in July and August. Not to say that it hasn't been enjoyable, but I haven't been cooking as much as I'd like. And I'm sorry to say that I haven't baked a single cobbler, pie or cake with my favourite summer fruit: peaches!

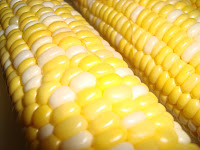
I went to the market this past weekend and had a little panic attack that I was missing peach AND corn season (though I believe both are actually in season for another month...I get a little anxious!). That led to me buying a dozen ears of corn (which aren't as light as you'd think), shelling the ears and freezing both the kernels and cobs (for soups). I bought some peaches too. Yum! I still don't have much time for the next few weeks to bake so we'll probably just be enjoying them fresh, but they did remind me of some delicious hand pies that I made last summer when I was baking up a storm while spending a few weeks in Ancaster with my mom.

These may seem a bit intimidating, and are admittedly a bit more work than a traditional pie. But they're so cute, how could you resist? Plus it's pretty much impossible to take pie in to work or social settings without easy access to plates and serving utensils. But hand pies? Hand pies are perfect for the office! Or parties! Or stuffing a plateful into your mouth while telling yourself "they're so small, one more can't possibly make a difference...". Whatever. Make them. Love them.

Peach Hand Pies

adapted from SmittenKitchen
Makes 14 to 24 (depending on cutter size)

1 batch of Pie Dough
1 1/2 lbs peaches, preferably freestone
1/2 lb blueberries
1/4 cup flour
1/4 cup sugar
Pinch of salt
Juice of half a lemon
1 tsp vanilla extract

One egg yolk beaten with 2 tablespoons water (for egg wash)
Sugar for sprinkling on top (optional)

1. Make pie dough; you don't need to divide into discs here but I would divide into two balls for easier handling later. Make sure it's been refrigerated for at least an hour

2. On a lightly floured counter, roll out one half of the dough to 1/8-inch thickness. Using a 4 1/2-inch-round biscuit cutter (or a knife if you don't have a biscuit cutter...seriously, I make biscuits enough that I should probably get some of those), cut circles out of the rolled dough until you can't anymore. Transfer the circles to a parchment-lined baking sheet, and chill in the refrigerator for about a half hour. Repeat with the other half of the dough.

3. Blanch the peaches: bring a large pot of water to a boil, drop the peaches in and let them boil for about 2 minutes. Remove from water and dunk in ice water to stop the cooking. Once cool, peel and chop the peaches into small pieces, (remember they need to be small enough to fit into small pies!)

4. Make the filling: mix peach bits with bluberries, flour, sugar, lemon juice and vanilla, plus a pinch of salt. Set aside.

5. Remove the chilled dough from the fridge and let stand at room temperature for just a few minutes until they're pliable. Spoon about 1 to 2 tablespoonfuls of filling onto one half of each circle of dough. Brush a little cold water around the edge and fold it in half so the other side comes down over the filling. Seal the pie, and press down on the edge with a fork. Repeat with the rest of the dough. Place the hand pies back onto the parchment-lined baking sheet, and return to the fridge to chill for another 30 minutes.
Preheat oven to 375 degrees Farenheit, 190 degrees Celsius

6. Remove the chilled hand pies from the fridge, cut a small slit in each and lightly brush with the egg yolk wash. Sprinkle some sugar over the pies, and bake for about 20 minutes, until they are golden brown and just starting to crack. Remove from oven, and try to let them cool slightly before you taste them.

Monday, July 5, 2010

A Perfect Pair


This summer seems to be flying by. One minute I'm eagerly anticipating the warm weather, and before I know it strawberry season is almost over! Rue and I went strawberry picking on the last weekend in June. And of course, with strawberries come rhubarb for some delicious baked goods. Yum.

We made the requisite strawberry rhubarb pie (with a crumble topping) which was oddly received with enthusiastic praise from everyone at the pool party that I brought the first pie to, and a thumbs down from my family who thought it was too tart. I guess rhubarb isn't for everyone?


The majority of the remaining berries went into some refreshing agua frescas the following weekend. But I still had about a pint and some rhubarb left over so my plan was to make muffins. Unfortunately you need a muffin tin for that (I seem to have lost mine) so I decided to make coffee cake instead.

Sometimes you make something that just know is going to be delicious before you even start getting the ingredients together. You can just kind of feel it. That's what this cake was like. A not-too-sweet cake batter infused with vanilla flavour and some sour cream to keep it moist, a fairly heavy crumb topping and some delicious seasonal fruit...what's not to love?


Anyway, I was right and then some. The cake was moist, perfectly sweet and just the right combination of cake and fruit. And the smell. Oh god. I took some in to work and could hardly restrain myself from eating the entire batch. It's really too bad that strawberry season is over...but the best part is that you could make this cake with any seasonal fruit. Next up...peach crumb cake?


Strawberry Rhubarb Crumb Cake

Adapted from Smitten Kitchen

Fruit filling:
1/4 lb rhubarb, trimmed and sliced into 1/2 inch pieces
1/4 lb strawberries, washed and sliced
1/4 cup sugar
1 tbsp cornstarch or flour

Crumb topping:
1/6 cup brown sugar
1/6 cup granulated sugar
1/2 tsp ground cinnamon
1/8 teaspoon salt
1/4 cup (2 oz) butter, melted
3/4 cup flour

Cake:
1/4 cup sour cream
2 large eggs
1 tbsp vanilla extract
1 cup all-purpose flour
1/2 cup sugar
1/2 tsp baking soda
1/2 tsp baking powder
1/4 tsp salt
1/4 cup softened butter, cut into pieces

Preheat oven to 325 degrees Farenheit, 163 degrees Celsius

1. Grease an 8-inch round baking pan. For filling, toss strawberries and rhubarb with sugar and cornstarch or flour. Set aside.

2. To make crumbs: in a large bowl, whisk sugars, spices and salt into melted butter until smooth. Then add flour with a spatula or wooden spoon until the mixture is more doughy than crumb-ly. Leave it pressed together in the bottom of the bowl and set aside.

3. To prepare cake: in a small bowl, stir together the sour cream, eggs and vanilla. Using an electric mixer of some sort or a wooden spoon (I used my immersion blender with the whisk attachment) mix together flour, sugar, baking soda, baking powder and salt. Add butter and about half the sour cream mixture and mix on medium speed until flour is moistened. Increase speed and beat for 30 seconds. Add remaining sour cream mixture and beat for about another 20 seconds.

4. Scrape all but about a 1/2 cup of batter into the prepared pan. Spoon fruit filling over batter. Drop the remaining batter over the fruit filling; it does not have to be even.

5. Using your fingers, grab bits of the crumb topping and squeeze into a big clump, breaking it into large crumbs about 1/2 inch to 3/4 inch in size over the cake. Keep doing this until the topping is all used up. Bake cake until a toothpick inserted into the center comes out clean (it may be moist from rhubarb), about 35 to 45 minutes. Cool before serving.

Saturday, May 22, 2010

Giddy With Anticipation

So, I went on a Caribbean cruise a few weeks ago and it was gloriously hot and sunny and wonderful. I love Love LOVE hot weather; so maybe living in Canada isn't exactly the best choice climate-wise. It's now the middle of May and I've spent the last two weeks cursing our building for shutting the heat off the weekend we came back as it during a warm spell, but then the temperature plummeted immediately afterward. I've been sleeping in fleece pajamas ever since. FLEECE.

Anyway, the weather seems to (finally) be creeping back into the twenties and I'm getting so excited for summer. Not only for the warm weather but also for the produce that will soon be available at the farmer's market. CORN. PEACHES. And TOMATOES!

You can obviously buy tomatoes year round, but they're so depressingly flavourless in the winter that sometimes I wonder why we even bother. They're nothing like the summer tomatoes that are so plump, juicy and delicious you can just eat them plain with a little sprinkling of salt and be in heaven. Or with some buffalo mozzarella for a nice Caprese salad. Drool.

Laura and I helped her mom make some delicious oven-roasted tomatoes at the end of last summer with the multiple bushels they had gotten from a local farm. They were sooo good and froze very well. The combination of garlic, basil and the oven created a delicious concentrated and caramelized flavour that was amazing in sauces, pizzas and whatever else you might use tomatoes for. I think that this summer we'll have to make some more so that I can have delicious tomatoes for recipes all winter long. Brilliant!

Note: If you are wondering why the photos in this post are not the usual level of pathetic photography that I tend to put out, it's because these were taken by Laura with her much, much better camera and photography skills in general. Thanks Laura!

Another Note: This is a sketchy recipe. We DID use a recipe from a book, but lost it so I'm really just guessing here. But oven roasting tomatoes isn't exactly rocket science. See conversation below re: the lost recipe...

Laura: my mom says she doesnt remember the tomato recipe
but its just like cut up tomatoes, deseed, cover in olive oil, basil and garlic

20 minutes
3:02 PM me: damn
yea, i know the basics but i like to have a recipe
3:03 PM does she know what temp/time?

36 minutes
3:39 PM Laura: roasted... i imagine hot
for twenty minutes
till they are roasty

So yea. I'm pretty sure we actually baked them for longer than 20 minutes. There are also many recipes for slow roasting tomatoes in the oven. To be honest, I'm not entirely sure what the main differences are. I imagine slow roasting would build up more caramelized flavour and intensity but I had absolutely no complaints on these ones either.

Oven Roasted Tomatoes

Tomatoes (we used Plum tomatoes)
Garlic
Fresh Basil
Salt and Pepper
Olive Oil

Preheat oven to 425 degrees Farenheit


1. Cut off tops of tomatoes and cut in half lengthwise. Use a paring knife to remove seeds.

2. Mince garlic and chop up basil.

3. Lay tomato halves on a baking sheet, cut side up. Drizzle with olive oil and sprinkle on garlic, basil and salt and pepper. I'm sorry I can't tell you how much, just don't use too much salt and pepper as the other ingredients will release plenty of flavour during baking.

4. Bake for 40 (or possibly 20) minutes until tomatoes start to look wrinkled, or "roasty".

Wednesday, August 19, 2009

Just Peachy

Note: this post is from a few weeks ago and is photo-less...I wouldn't normally point this out but some circumstantial events have prevented me from posting for a few weeks and I just wanted you all to know that I realize the arrival of peach season isn't exactly "new" news.

So. It's peach season. Finally. Last summer was my first living in Toronto with easy access to the St. Lawrence Market. For some reason, I didn't realize it was peach season (or that I liked peaches? I'm not really sure what happened here) until it was practically over. So I spent the last couple weeks of August buying baskets of those gorgeous, juicy peaches and baking a couple of cobblers here and there, but mostly just using them obsessively for smoothies. I really didn't get the chance to use the glorious little suckers in the way that they deserved. And I've been waiting patiently for peaches to arrive in Ontario since the beginning of summer.

Well, last weekend I finally went to the market and saw baskets of peaches for sale. YES! They were still a few days from being fully ripe so I left them in the paper bag and planned out my first baking experiment.

The obvious choice was pie, and I'd seen a few fantastic looking recipes on the net in the last couple of weeks. But I was alone at the apartment for a few days, so I thought I would bake something that would be a little easier to take into work the next day for my co-workers to enjoy. I'd been re-reading some of the Anne of Green Gables series lately (I know, I'm a huge dork) and those PEI folk sure talk a lot about plum cake. I've never HAD plum cake before, but it seemed tasty enough and something that couuld be easily substituted with peaches, so that seemed like a good way to go.

The recipe I used is a plum cake recipe from Patent and the Pantry, which got the recipe from Dinner with Julie. I love butter, and browned butter always seems SO good but I've never actually tried or used it in a recipe before. Perfect! Plus, the pictures were so pretty and basically made me start drooling.

I tried really hard not to adapt this recipe too much - pretty much all I changed was the fruit (obviously) and added vanilla, because vanilla is SO good with everything. And I left out the nutmeg because I didn't have any.

Anyway...the only real problem I had here was that it was more of a cobbler-cake, as I used probably too many peaches. But that wasn't really a problem unless you're concerned about making a bit of a mess while you eat it. And it shouldn't be, because this was GOOD. Not too sweet, but delicious from all the fresh fruit and a bit nutty from the browned butter. I'm sad that I don't have photo documentation but if you go to the source blogs their photos are much prettier than mine anyway. But if you have some extra peaches lying around, try this recipe. Please!

Brown Butter Peach Cake

adapted from various sources, noted above

6 peaches
1/2 lemon
3/4 cups + 3 tbsp sugar, divided
1/2 tsp cinnamon
1 tsp vanilla
1/2 cup butter
2 large eggs
1 cup all-purpose flour

Preheat oven to 350 degrees Farenheit - butter a pie plate or cake pan

1. Peel peaches - bring a medium sized pot of water to a boil. Remove from heat and add peaches. Let sit for 45 seconds, then remove with a slotted spoon and immediately immerse in a water bath. The skins should just slip right off - it's like magic! I know this is probably a pretty basic concept but I've never peel peaches like this before so I was pretty amazed.

2. Cut peaches into large slices and toss with a squeeze of lemon juice, 2 tbsp sugar and cinnamon. You can do this directly in the cake pan/pie plate. Set aside.

3. Brown butter - in a small saucepan (make sure it's doesn't have a black bottom so that you can tell when the butter is brown!) melt butter and cook for about 5 minutes until it's a golden brown colour. Immedidately take the pan off hte stove and if you can, dip the bottom in a bowl of water (I just used the same bowl I had the peaches in, to save a bowl). I don't think you NEED to do this step but apparently the butter keeps cooking a bit after you take it off the heat, so be careful if you don't. I actually have a feeling that I didn't let my butter brown enough, but again this was a first try at this so I was super paranoid about burning it.

4. Pour butter into a medium sized bowl. Add 3/4 cup of sugar, eggs, vanilla and flour and stir to combine. Pour over fruit and sprinkle with remaining sugar (I didn't use a whole tablespoon here...probably more like a teaspoon).

5. Bake for 40-45 minutes, until top is golden brown and juices are bubbling up the sides.

Sunday, July 26, 2009

I Think I Have a Problem

I know, I know...corn again? What is this girl thinking? Well, I can't help it. I have an obsessive-food personality. My favourite foods are REALLY my favourites for a reason. That's not to say I'm going to eat the same meal every day for a week, but certain variations of ingredients or dishes will happily be eaten week in and week out. Which might explain why I get cranky if I don't have pizza at least once a week. Or tacos once every couple of weeks. (I know it doesn't actually SOUND like a lot, but its hard when a certain someone has a *gasp* carb AVERSION. That's right. Maybe I need to re-think our relationship. But it's also probably the only reason I'm not morbidly obsese) And why I'm writing about corn for the third time in two weeks.

Now in all fairness, this is probably the most common corn dish in our dinner rotation, except that its usually made with canned and frozen corn so I just HAD to try it with the fresh! Can you blame me?

I can't exactly claim that this recipe is my own, as like the Taco Dip you'll find endless variations on the Internet. For years, I thought it was actually unique to a certain restaurant that we used to order "fancy" chinese food from. But that was stupid, because its on the menu of most Chinese restaurants. And it's insanely easy to make so I have no idea why the lightbulb only went off sometime last year that I could make the soup at home.

Anyway, this soup can be VERY easily made with a can of creamed corn, but for the purposes of the recent fresh corn obsession, I made my own. And it was tasty! The corn flavour was a lot more pronounced and although the corn itself was very sweet, the overall soup had a nice savoury element to it. But I won't lie. I'll probably keep making this with canned corn in the future because a part of the appeal for me is its convenience. So go ahead, grab that can and get cooking!

Chicken Corn Soup

Cream-Style Corn
3 cobs fresh corn, hulled (cobs reserved)
1 cup water
1 tbsp corn starch
1 tbsp sugar
1 tsp salt
(you can substitute canned creamed corn here as a shortcut. I'm going to guess this is about one large 19 ounce can of creamed corn)

Soup
2 cooked chicken breasts, cubed
1 cup imitation crab meat (optional)
4 cups chicken broth (preferably homemade)
1 tbsp corn starch
2 tbsp water
1 egg, lightly beaten
sesame oil (optional)
salt and pepper, to taste

1. Make the creamed corn - combine corn, water, corn starch, sugar and salt in a large pot and bring to a boil. Cook for about 5 minutes, until corn kernels are soft and plump. At this point you want to break up the corn kernels a bit. I used a hand blender lightly, you could use a stand blender or even just mash with a potato masher or ricer.

2. Add chicken stock, and bring to a boil. Let cook for about 10-15 minutes. If you used fresh corn, add the corn cobs to add some more flavour.

3. Remove corn cobs and add cooked chicken and crab meat, if using. Bring back to a boil and reduce heat to medium. Combine corn starch with water until a paste forms, and add to soup. Season with salt and pepper to taste and add some sesame oil (maybe 1 tsp) if using.

4. Reduce soup to a simmer, and add egg mixture. Wait a minute for the egg to cook slightly and give it a stir. And done.

Friday, July 17, 2009

I Heart Corn

So...after the whole potato salad revelation, I was still on a corn kick that I couldn't shake. So I just went with it, and made some corn muffins!

I know I already ranted about how much I love corn, so I won't repeat myself here. But I do LOVE corn bread yet haven't baked much of my own, mostly because I seem to have a hard time deciding between the savoury and sweet recipes out there and I always feel like I need to have something to eat the cornbread with. But...corn muffins are easier. Corn muffins can be eaten on their own! And they should always be sweet! (or at least I think so).

For this recipe, I adjusted Michael Ruhlman's basic quickbread ratio for muffins, adding in cornmeal and corn. And it was really good! Slightly but not too sweet, plenty of corn flavour from the kernels and not too crumbly. A couple of notes...I actually used a lightly grilled corn cob for this because it was all I had left of the fresh corn. I wouldn't do this again though, because the corn chunks came out a bit dry since they had already been cooked once (I assumed this would happen, but again it was all I had). I also reduced the egg from 2 to 1, because I was also looking at other random cornbread recipes and decided for some reason that this was a good idea. I don't think it was - the muffins, while delicious were a bit on the dense side. I think the extra egg would help with that so I'm going to leave that as the amount of eggs in the recipe.

Corn Muffins
1 1/4 cups cornmeal
1 cup all-purpose flour
1/4 cup brown sugar, packed
1/4 cup white sugar
1/2 tsp salt
2 tsp baking powder
1/2 cup butter, melted
2 eggs
1 cup buttermilk*
1 corn cob, hulled (you can also use frozen or canned corn here - it should be about a cup)

*I never actually keep buttermilk in the house, so to substitute, combine 1 tbsp of white vinegar and enough milk to make one cup and let sit at room temperature for about 10 minutes

Preheat oven to 425 degrees Fahrenheit

1. Combine cornmeal, flour, sugars, salt and baking powder in a medium-sized bowl.

2. Whisk together butter, egg and buttermilk. Pour into the dry mixture and stir until just combined.

3. Add in corn kernels

4. Drop by spoonful into a greased muffin tin, about 3/4 full. This will make enough for a dozen.

5. Bake in preheated oven for 12-15 minutes, or until a toothpick inserted into the centre of a muffin comes out clean.

Tuesday, July 7, 2009

Pie!

So remember that pie I've been thinking about for weeks? I actually did make one this weekend. I went to the local strawberry farm on Saturday afternoon and bought a couple of quarts of Ontario strawberries and a few stalks of bright and vibrant rhubarb for my first ever strawberry rhubarb pie. I really enjoy rhubarb because it's so tart and I don't like super sweet fruit desserts, but had never actually cooked with it before so I was very excited to try this out!

I also decided to try a (sort of) new pie crust recipe. I've been reading Ratio by Michael Ruhlman which is all about cooking with ratios rather than measurements, and focuses on the basic ingredients that you need to make something. In the case of pie, they are flour, fat and water. The recipe I normally use involves egg and vinegar, but I've been thinking lately that my pie crusts have been a bit too "puffy" and the egg probably has something to do with it. So I figured I would try it with just the basics and just a dash of sugar to sweeten it a tad.

And the result? Man was this good. Tart and sweet, with a wonderfully flaky crust. I forgot just HOW good strawberries and rhubarb are together. There was just the right amount of fruit chunks and slightly thickened syrup. I barely even noticed the Splenda, which when executed badly can totally kill a dessert for me (I have an unnatural aversion to artificial sweeteners).

So in short...I will be making this pie again before strawberry season is over. You should too.


Pie Dough
3-2-1 pie crust ratio
15 ounces flour
5 ounces butter
5 ounces vegetable shortening (I use Tenderflake)
5 ounces ice-cold water
1/2 tsp salt
1/2 tbsp sugar (optional)

Filling
from Bon Appetit via smittenkitchen
3 1/2 cups chopped rhubarb
3 1/2 cups chopped strawberries
1/2 cup brown sugar
1/2 cup sugar (I used Splenda so that my dad could have a slice)
1/4 cup cornstarch
1 tsp cinnamon
1/4 tsp salt

1. Cut out butter and shortening amounts, and freeze for about 1/2 hour Making sure the ingredients are cold is incredibly important when making pie crust. I try to store the tools I'm going to be using in the freezer while my butter and shortening are in there as well to keep everything cool.

2. Measure out flour, salt and sugar into a large bowl

3. Cut in (or grate in) butter and shortening into the flour

4. Add water a couple tablespoons at a time, until flour mixture starts to clump together. Form a ball with your hands (be careful not to overwork the dough or it will end up tough)

5. Divide into two discs, wrap with saran wrap and refrigerate for about 20 minutes or until ready to use (you can do this a day or so in advance as well)

Preheat oven to 400 degrees Farenheit

6. Combine filling ingredients together in a bowl.

7. Roll out bottom of pie crust until it's about 1 inch wider than your pie plate and transfer to pie plate

8. Spoon in filing

9. Roll out second crust. Slice into 1/2 inch strips and weave into a lattice pattern on top of pie. Trim edges with a bit of overhang and fold up so that your strips stay in place. Crimp edges if desired (I usually do, mostly because I find that my crust doesn't really "stay" in place if i don't).

10. Bake for about 20 minutes, then reduce temperature to 350 degrees and continue baking until edges are golden and filling is bubbling (This particular recipe said to bake for almost 2 hours. I only baked for about an hour)

Random Pie Crust Tips:
1. Use plenty of flour

2. Turn the dough at a 90 degree angle once or twice to make sure your dough isn't sticking to your surface

3. Don't freak out - it will get easier every time you make a pie

4. When you're ready to transfer the bottom crust to your pie plate, fold into quarters and place in your pie plate so that the bottom point is in the middle, and unfold

Friday, October 31, 2008

Friday Nibbles, Special Edition - Turkey

With Christmas barely eight weeks away, and Thanksgiving just around the corner for my American brethren, I thought this might be a good opportunity to talk turkeys, not least because I spent yesterday on a genuine working turkey farm just south of Cambridge (OK, it’s a tenuous segway and I know Christmas is actually a while away but I wanted to get it written down while it was all still fresh in my mind, plus I got some cool pictures that I wanted to show you).


I can now say from extensive empirical research through close proximity that turkeys are big birds and when there are several hundred of them staring down at you, it can all too easily feel a little bit Hitchcock for comfort (although I think the movie would have taken on a slightly more comedic slapstick feel had turkeys been the vengeful flock in question).

They are also fiendishly ugly with odd folds of skin that appear to be taking over their distinctly reptilian features and a general look of permanent annoyance, much like a Daily Mail reader glancing over a story about how Jonathon Ross’s salary has caused the rise/fall/stagnation of house prices or other such nonsense (if you aren’t familiar with The Daily Mail, think National Enquirer, only with a more questionable ethics and less concern for fact or journalistic integrity).


But I’ve never been one to judge books by their covers or turkeys by their wattles for that matter and despite their unattractive exterior they are friendly and placid birds that live comfortably in large groups.

I should say from the off that the farm I went to was not an intensive battery operation where the young chicks are fed a horrific cocktail of hormones, additives, drugs and growth promoters in order to fatten them up in little over three months. This was very much a free-range operation where the birds had access to locally sourced feed and as much sunlight as they wanted. They were free to spend all day running their little claws off, should they so wish. The lack of nasties in their diet means that it takes them twice as long to reach maturity but the result is a much tastier bird with a far superior texture, a world away from the dried out examples that blight so many Christmases.

The bird itself is native to Mexico and the eastern United States and although there is no historical evidence that the early Pilgrim Fathers ate one in their first Thanksgiving dinner, by the 19th century the tradition had been galvanized. Now a roasted (or deep fried (!?)) turkey is as much a part of the day as pumpkin pie and the NFL. Over 250 million are bred for the table each year and 20 per cent of those are consumed on a single day. It is not known how many people actually like turkey and how many eat it because they have to. A bit like a Brussels sprout.


Those which I met yesterday at the Gog Magog Hills Farm Shop were a rare breed called Kelly Bronze favoured and bred for a more traditional flavour and texture and a favourite of self-proclaimed domestic goddess Nigella Lawson. Personally, I think she sits somewhere on the annoyance scale between ‘patronising’ and ‘odious’ but she seems to know her stuff so I might take her advice on this one. As long as she ties her bloody hair back when she cooks it. Those luscious L’oreal locks are all well and good but not when extracting one from the depths of your throat.

So, in summary, what have we learnt? Turkeys originally resided across the pond, they are tasty enough to warrant an annual eating and don’t let Nigella Lawson cook you a soufflé.

Joking aside, when hunting out your turkey there are a few key words to look out for and a number of tips I can now offer you, having spoken to someone who really knows that they are talking about. Look for the words ‘slow-maturing’ or ‘rare-breed’. Try to buy one that hasn’t had to travel too far and has managed to see at least a semblance of daylight. The more they’ve run around and the less they’ve been pumped full of chemicals like some gross futuristic nightmare, the tastier they will be. In short, apply the same rules when buying your turkey as you would any other meat. If you’re only going to eat it once a year, might as well make it a good one, no?