Showing posts with label Pilafs and Savoury Pastries. Show all posts

Tuesday, February 15, 2011

Lunch at the Seven Sleepers/Yedi Uyanlar Cafe


View through peach trees of the Grand Fortress of Selçuk on Ayasoluk Hill

I was  invited to Selçuk for the weekend and a sixty minute flight on Friday took me from Istanbul to Izmir down on Turkey's Aegean coast. From there a car ride to the small town of Selçuk where my old friend lives more or less in the shadow of the landmark 6th Century Basilica of St John the Apostle while the town itself is dominated by the Grand Fortress on top of Ayasoluk Hill. Selçuk is very popular because of its proximity to the ancient city of Ephesus or Efes, the House of the Virgin Mary/Meryem Ana which attracts thousands of pilgrims annually, as well as glorious sandy beaches and a wealth of interesting places to see and visit. It’s a fabulous area. The remains of the Temple of Artemis, one of the Seven Wonders of the World, are there! Imagine!


Temple of Hadrianus at Ephesus

And all this with hardly any traffic, fresh air, and a blue blue sky!
First stop was lunch and here's the tale:
Have you ever heard of the Yedi Uyanlar or the Seven Sleepers, commonly referred to as the Seven Sleepers of Ephesus? I’m afraid I have to confess ignorance here yet it seems that the story is widely believed by both Christians and Moslems. Seven young men refusing to recant their Christian beliefs during the persecutions of Roman Emperor Decius, in 250 AD retired to a cave to pray and fell asleep. Decius had the cave sealed and there they slept undisturbed for about 200 years. A landowner opened up the cave planning on using it for his cows, and found them whereupon they woke up. Everbody was astounded. The bishop was summoned to interview them and they died praising God. A miracle indeed.
This is the story!

Meanwhile:
local women making mantı at the  Seven Sleepers cafe

Nearby the ruins of the church and grotto under some trees is a small pleasant outdoor cafe. Nothing fancy:  rustic wooden tables and chairs outside and local women inside preparing the food in the traditional way.

the woman on the right is waiting to cook our gözleme over her hot fire


We found a sunny table as it was a bit nippy in the shade. Friend Frances recommended the gözleme, typical rural fare.  The village women in Assos make them too but I have to admit, these were in a class of their own. Whereas ours are filled with white cheese and parsley, these were either patlıcan/aubergine or potato.


believe me, these were mouthwatering: light and flaky with just the right amount of filling

In the first picture the women are making mantı, often referred to as Turkish ravioli. The preparation is very time-consuming as you can imagine but if home-made, can be a feast if a bit fattening! But I doubt very much that today's young Turkish women make it. It can be bought so easily.  It is served  in bowls with tomato sauce and garlic yogurt then sprinkled with dried mint and sumac. Here, the blue plastic is to stop the mantı from drying out.


the fiddly task of making mantı


Very often in a Turkish family, there will be a teyze or auntie whose speciality it is to make mantı. Our own  Auntie Ümit  was the one with the magic touch re mantı and an invitation from her was not to be turned down!

Saturday, October 30, 2010

Savoury Cheese Tart

warm and inviting

Turks are amazingly hospitable so a word of warning in your ear: when a Turkish friend invites you round for tea, be prepared. This is no cup-of-tea -with-a slice-of- sponge affair, oh no. Teatime is treated very seriously here and is a way of life as it is all over the Middle East. It will be a full-scale laden table, no-supper-tonight sort of do. It is perhaps hard to reciprocate with the same intensity as English teatime is not quite so full on but your efforts will be truly appreciated!  So down to basics: coffee invitations in the morning are always for 11am, never before as Turkish ladies are not early birds. Expect to stay on. Teatime should traditionally be 5pm but the logistics of the city dictate an earlier start. I would say 3pm is more realistic and your guests will probably stay until 6. The name of the game is to prepare a full sofra.  This word means table in the sense of what’s on it as opposed to the piece of furniture. In London there is a very upmarket restaurant by the same name and the connotation is exactly that: what’s on our table tonight!


a variety of tuzlu and tatlı

It is very usual for Turkish women to have their groups and large gatherings of ladies in cafes across the city can regularly be seen enjoying themselves in the afternoon over glasses of çay. In all probability, they have been meeting on a regular basis for years and are classmates dating back to either high school or university.  If you invite a moderately-sized  group over,  let’s say 5-6, the drill is 2 tuzlu, 2 tatlı/ 2 savoury, 2 sweet. These will be supplemented by little dishes of cherry tomatoes and cut up cucumbers – for those who are watching their weight! I actually like these additions as they provide colour to the table. Ah, that’s another thing: your guests will expect to sit at the table so it is worthwhile making an effort and providing a nice table cloth and napkins. It is quite a production, I grant you, but is well worth it.
My personal answer to the first part is to prepare something like this Cheese Tart and  to supplement with some tuzlu from my local pastane/cake shop or cafe.  My forte is cakes so I can handle the second part with panache!
Here is the recipe for this Cheese Tart, which is actually Swiss: it always goes down well. It is adapted from an ancient Good Housekeeping cookbook and Katie Stewart:
Ingredients for the Cheese Tart
Serves 6-8
Shortcrust pastry  made with 8oz/225g flour ( see my basic pastry-making recipe)
1 medium onion, finely chopped
1oz/25g butter
4oz/100g grated Gruyere cheese ( I use  eski kaşar)
1 level tsp plain flour
3 eggs
½ pint/300ml single cream ( I use plain milk instead)
Salt and freshly ground pepper
Grated nutmeg
Method
·         Roll out the prepared pastry into a circle and use to line an 8 in/20cm quiche tin set on a baking tray.


here I have used a rectangular-shaped tin
·         Heat the oven to 375F/190C/gas no 5.  Peel and finely chop the onion. Melt the butter in a pan over low heat. Add the onion and fry gently for 5 mins to soften but not brown. Spread over the pastry case.
·         Mix the grated cheese and flour together. Lightly beat the eggs, cream, a seasoning of salt and pepper and a little grated nutmeg into a mixing bowl and add to the cheese and flour. Pour over the pastry case. Place the shapes you have cut out on top. Brush with a little milk.
·         Place in the centre of the pre-heated oven and bake for 40 mins until the filling turns a beautiful brown. It will rise and look great. It is better served  warm not hot but is also delicious cold.  
Tips
  1. The recipe is for 8 oz pastry but I usually increase it to 10 oz with 5 oz of butter so that  it is easy to roll out and there is enough left over to cut out shapes. 
  2. A rectangular-shaped tin makes a change from the usual circular one.  It looks modern and makes for easier serving.
  3. Go all out with your silver and two plates, one for the savoury, and one for the sweet. Make your table look great! Flowers in the centre and even candles are a good addition. Set to impress!
  4. It is a nice idea to finish off your afternoon, which will be verging on early evening anyway, with a little alcohol: at my last tea I served some Pedro Jimenez sherry that we had been offered in Washington DC in the summer and loved. It is eminently drinkable and the ladies thought so too!

When are you planning your next teaparty?

Saturday, October 9, 2010

Bulgur Pilaf with Fresh Herbs


I want to tell you all about bulgur or cracked wheat. This is my favourite grain and I wonder if you are aware a) how tasty it is and b) how easy it is to cook.  Many Turkish meals are all-in-ones and I love them for that simplicity. But sometimes we do cook meat and add perhaps a salad, and then need something starchy to add body to that meal. In the UK, it would most often be potatoes and I have no objection to that – I love potatoes in all their forms. Sometimes we make pasta or rice. Here, I am suggesting that you try bulgur. I use it a lot.
Go to the supermarket and you will see on the shelves two types of bulgur: köftelik/for koftes or rissoles, which is small-grained, or pilavlık/pilaf type, which is larger. The type that I go for is the second, the pilavlık. It is so much easier to make than rice as it never loses its shape. It is never in danger of becoming mushy. You can make it in advance and reheat  with just a little extra water without risking anything. Additionally, it is most successful in salads.  I think it is quite easily obtainable in the UK now but I do remember going to M&S with my father well within living memory and asking for bulgur. I remember my dad rolling his eyeballs as I asked, and then his mock relief when they were perplexed and admitted they didn’t have it. When my mother died, the task of organising the food  after the funeral was delegated to me. I woke up at about 5 am thinking about the day ahead and worrying about the amount of food we had.  I suddenly had this certainty that I would find a packet of bulgur in the pantry, an unopened, untried packet that I had brought over on one family holiday and if indeed it were there, I could make kısır, a delicious salad made with masses of parsley and lots of lemon juice, tomato, a bit of mint, spring onions, and cucumber which would extend the buffet table.  Sure enough, I was right and that’s exactly what I did. To my mind, that bulgur saved the day.
Here is the recipe for Taze Otlu Bulgur Pilavı or Bulgur with Fresh Herbs from Alev Kaman's Modern Türk Mutfağı:
Ingredients
Serves 8
2 cups large grain bulgur
1 cup boiled green lentils
½ bunch flat-leaf parsley
½ bunch dill
10 spring onions
4 cups hot water
6 tbsp olive oil
1 tsp salt

adding the chopped herbs to the bulgur

Method
§  Wash and chop the parsley, dill, and spring onions.  Put to one side.
§  Gently heat the olive oil in a heavy pan and add the washed bulgur.  Stir for a few minutes. Add the boiled green lentils and salt and stir to mix.
§  Add the hot water and cover the pan with a lid. Bring to the boil and then cook over gentle heat till all the water has been absorbed and the grains have softened.
§  Remove from the heat and add the fresh herbs . Using a wooden spoon,mix in well.
§  Let the pilaf rest for 15 mins covered before serving.
Tips
1.       If you want to make a salad with bulgur, don’t cook it. Simply wash well, put in a bowl, and cover with boiling water. It will soften up and after being drained well, be ready to use.
2.       An everyday bulgur pilaf can be made by gently sauteing  1 chopped onion in a little olive oil and a knob of butter. Add 1 – 2 cups bulgur  depending on how many people you plan to feed and mix till grains are covered.  Cut 1 big tomato in half and grate both halves into the saucepan. Add 1 chicken stock cube, plus hot water to cover by 2/3. Bring to the boil then cover and lower the heat. Cook till the water has been absorbed. Test a grain or two for doneness. Add more boiling water if necessary.
3.       Yes, I did say grate that tomato! This is an easy way of avoiding peeling it and is a method often found in Turkish cooking, especially with those large Çanakkale tomatoes. Of course you can always chop up 2 smaller toms if you haven’t got a big one.
4.       Very often, after the heat has been turned off, a folded clean tea towel is lain over the pan and the lid put over it. Thus while the pilaf is resting, the steam is absorbed into the towel and the pilaf will be fluffier.
   Enjoy!

Sunday, August 15, 2010

Claudia’s Basic “You Can Do It!” Pastry Recipe

When I was getting married, my mother said ‘There are two things you need to know how to make: one is pastry and the other is a bechamel sauce’. And you know what? She was right. Those two things have been invaluable over the years. Bechamel sauce may have fallen out of fashion now because it is fattening but at the time I embellished many a dinner with an au gratin vegetable dish and it was good training for other sauces. But pastry! Knowing how to make it opened up a new glorious vista into my culinary offerings. I even gave lessons to friends when we lived in Tokyo. I don’t know why but there is a certain amount of mystique and even fear of trying to make pastry. And the outcome is that you can’t make quiches, people avoid your mincepies at Christmas, and above all, no fruit tarts in the summer!


My mother was French, you see and the French on the whole prefer fruit or cheese for dessert. BUT they do like a good tart!

OK. Here is Claudia’s basic recipe for short pastry:

• 225g/8oz flour

• 125g/4oz butter (at room temperature)

• ice cold refrigerated water

• a 23-25cm/9-10in flan tin (pie dish)

(If you have a larger-sized tin, simply increase the measurements in proportion to each other ie 10oz flour to 5oz butter, 12 to 6 etc).

Pre-heat your oven to 180/350 degs.

Method

• Measure out the flour and put it in a bowl. Add the butter in small pieces.

• Using your fingers –just your right hand is enough- mix the butter into the flour but don’t go too far otherwise it turns into crumbs. (Take rings off!) Don’t worry if there are lumps as these will be integrated into the pastry in a minute.

• Using a tablespoon, start by adding one spoonful of the cold water at a time. Now you are going to concentrate on mixing in all those small lumps of butter that didn’t get mixed in before. Add more water. So you mix with your hands but be gentle. Pastry doesn’t like to be overhandled. You will easily see if you need more water as it will be too dry but continue adding by the careful spoonful as too much, it will end up a sticky mess. Go nice and slowly, adding, mixing.


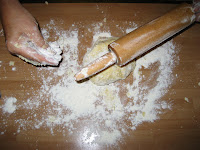
• When it forms a ball, take it out of the bowl and lay it on the counter (cool marble is ideal!) which you have liberally sprinkled with flour. Now knead your ball. This feels great! It should be smooth and flexible at this stage. Some people recommend putting it in the fridge in a plastic bag for 30 minutes just to rest it but I never seem to do that.


• And now take your trusty rolling pin, flour it as well as putting a spoonful of flour on top of your pastry, and roll away! Roll it in all directions. Turn it over and roll. At this point, the shape is not that important. Now comes my mother’s trick: take your butter which has become nice and soft as it has been out of the fridge all this time, and with a knife, spread it all over your circle of pastry. This  makes it ‘shorter’ ie you are on the way to milles feuilles! Just kidding, but it does add that melt-in-your-mouth touch after baking.

• Then from the top, fold the pastry over, then from the bottom and finally the sides, so you have a nice little packet in front of you. Turn it over, again sprinkle with a little flour so it doesn’t stick to your rolling pin, and roll it out. Don’t be scared of it. Go for it, left, right, up and down. This time try to get it to the shape of your tin. If the consistency is right and you have made enough for the size of your tin, this is a breeze. Fold it over gently to transfer to the tin or dish. You can do this easily with your hands, you don’t need a spatula or anything.

 With a sharp knife, go round the edges cutting off the excess. I sometimes make a pattern with a fork round the edge or I use this nifty little device that I have that looks like a trick cyclist’s wheel and roll it round the edge if it is thick enough, to make it look nice. I always prick the bottom all over with a fork to stop the pastry rising. I never do that business with greaseproof paper and pulses as I don’t see the need for it.

I use the trimmings to make little cutout shapes to decorate the tart with. For these I use my old childhood cookie cutters so we have little rabbits, ducks and something that looks like Rupert Bear! But of course I can be more serious too and also have hearts and flowers to embellish my tarts. If I’m feeling creative, I ‘draw’ stems and leaves with a sharp knife and then make my own design.

Another good way of using up the extra bits that my friend Lesley told me about is to roll them out, sprinkle with granulated sugar, roll it in and then using cookie cutters, make little biscuits! She says they are called sables ie from the French, sandy! These cook quickly in your pre-heated oven at 180 degs for about 10 mins.

Tips:

• I may not subscribe to some of the usual rules associated with pastry-making but there are indeed some that hold true. One is that pastry does not like hot weather and indeed it doesn’t! My pastry the other day, for example. It was 38 degrees outside and the pastry magically felt it. It was impossible to roll out smoothly so I had to patch it up a bit to make it fit the tins. So you see, there are always pitfalls! That’s why a cold marble surface is ideal.

• The other tip is that I always place my tin on a baking sheet that has been in the oven while heating up. This is to make sure the base of the pastry case cooks through. How many times have you eaten stodgy quiche?

• Pastry cases freeze very well. Make sure you wrap them in foil or clingfilm otherwise they go all hard and take on an attractive greyish colour!


Voila!